
You are using an out of date browser. It may not display this or other websites correctly.
You should upgrade or use an alternative browser.
You should upgrade or use an alternative browser.
Head Gasket Trouble - Pull Engine
- Thread starter stang89bidges
- Start date
-
Sponsors (?)
It got worse before it got better, lol @TOOLOW91 knows what I mean.PS: The fender is dirty
Concrete wall at 150mph made it look worse than that lmfao
Thanks for the compliments
") I just wanted to illustrate that even a slightly more radical build could still cool properly with a good system. I seems that your cooling system is pretty stout from the pictures that I was looking at.
I just wanted to illustrate that even a slightly more radical build could still cool properly with a good system. I seems that your cooling system is pretty stout from the pictures that I was looking at.That's good to hear honestly. I may just keep what I have going on and switch the tstat down to a 180 and call it a day then. Save my penny's for something else like a new suspension.
Here's the up to date copy . Lol . That car in person is a killer machine for just a little old streetcar playing in the big leagues. Oh and that rad is stil there just turned sideways and buried on the driver side thanks to nicks bad ass work .That sir is a cool looking engine bay
I would love to know what all is going on there. That TB looks custom. Those lines are friggin awesome. And what is that big probe thing with the 2 lines coming out of the air inlet tube to SC? Geeze I just want to come over and drool fo real while you explain all that sexy stuff.

Sent from my iPhone using my fingers while my auto correct makes me seem illiterate

That's what I suggestThat's good to hear honestly. I may just keep what I have going on and switch the tstat down to a 180 and call it a day then. Save my penny's for something else like a new suspension.
Have a told anyone lately that I wish I just left this damn thing alone...???
Trade you straight up for an 89 with stock heads.
")
Back to work.
So the next step was my idle. It was pretty bad after a couple of test runs down the road. I purchased the LMR intake kit that came with a new 70MM TB. Yeah, I know. But its better than the stock and when I do decide to upgrade the fuel system, I will be putting some serious thought into that so no worries guys.
Anyways I had not checked the TPS voltage yet. I bought a new TPS when I had my car dyno'd a couple years ago. I was having serious idle problems and I had replaced everything BUT the TPS at that point. So guess what, problem was the TPS. Wish I knew better back then instead of throwing parts at her...

So I just slapped the TPS module on my new TB during the build and bolted it all up. This was the first time I had ever checked this thing on my own. You guessed it, researched the hell out of it. Turns out its a cinch!
Took my fluke and RED probed the green wire, BLACK probed a ground on the strut tower. Turned the ignition key to KOEO. BAM, voltage was over 1.2!!! So I went to back her down and my particular setup has the issue where the TPS can't turn far enough to get the proper voltage. So I had to take a drill and hollow out the screw holes a little bit. I took a marker and marked the holes in the direction I needed to shave. Took me a few tries as I took very little off each time, didn't want to overdo it.
Piece of cake, got a pretty idle now along with a little bit of TB linkage adjustment. Sitting around 850rpm. Just huffin that beautiful growl out the pipes.

So the next step was my idle. It was pretty bad after a couple of test runs down the road. I purchased the LMR intake kit that came with a new 70MM TB. Yeah, I know. But its better than the stock and when I do decide to upgrade the fuel system, I will be putting some serious thought into that so no worries guys.
Anyways I had not checked the TPS voltage yet. I bought a new TPS when I had my car dyno'd a couple years ago. I was having serious idle problems and I had replaced everything BUT the TPS at that point. So guess what, problem was the TPS. Wish I knew better back then instead of throwing parts at her...
So I just slapped the TPS module on my new TB during the build and bolted it all up. This was the first time I had ever checked this thing on my own. You guessed it, researched the hell out of it. Turns out its a cinch!
Took my fluke and RED probed the green wire, BLACK probed a ground on the strut tower. Turned the ignition key to KOEO. BAM, voltage was over 1.2!!! So I went to back her down and my particular setup has the issue where the TPS can't turn far enough to get the proper voltage. So I had to take a drill and hollow out the screw holes a little bit. I took a marker and marked the holes in the direction I needed to shave. Took me a few tries as I took very little off each time, didn't want to overdo it.
Piece of cake, got a pretty idle now along with a little bit of TB linkage adjustment. Sitting around 850rpm. Just huffin that beautiful growl out the pipes.

This was taken just after I set TPS. Video is worth a MILLION words.
Click/Tap Pic.
Click/Tap Pic.
liljoe07
5 Year Member
Just so you know next time. You didn't have to hollow out the holes with the Throttle Body you have. If you loosen the spacer that is under the TPS, it will let you rotate the TPS and give you the adjustment you need.
liljoe07
5 Year Member
Been having idle problems last couple days. Having to daily drive the car while I work on my truck. I went through @jrichker surging idle checklist but he doesn't really mention(or I didn't catch it if he did) my symptoms/codes. I am thinking its 1 of 3 things. IAC, TPS, or vacume leak.
I thought the colder weather was the issue but nope, got warm etc and still doing this. Car starts fine. Idles fine at first start. It idles high 30sec at first then calms down(this tells me the IAC is doing its job right?). Then at some point during my commute the idle sticks high around 1200-1500 rpm. I have to shut it off while driving and restart to fix. Then it idles fine usually. It's been progressively getting worse. At first it was only doing it once a commute, now its doing it just after I take off in the mornings and through the commute after work.
I was immediately thinking TPS. I have been through this before.
I got home last night and check voltage on TPS. .83 each time I probed it with the Fluke. Pulled codes. KOEO= 67O, 56C, 63C
I pulled the IAC and it was pretty clean but I cleaned it anyway. I didn't lube it though. Just reinstalled it.
I pulled and cleaned the MAF sensor. Used MAF cleaner. Just sprayed the resistors and reinstalled.
Reset the computer.
Fired it up first time this morning. Fired right up, did the high idle for 30 seconds and lowered to normal. Went to back up in driveway and turn around, idle didn't go all the way down, stayed around 1200rpm. I shut it off, fired it up, idle normal. Took off, got 1/4 mile down road, slowed down around curve, changed to a different gear, noticed the idle stuck high when I depressed clutch. Kept driving. Depressed clutch again and it was fine. Did this all the way down the road for a couple miles. I also noticed the car was jerking(engine studder) when change gears and push gas pedal. But just initially and then it would take off like bat out of hell. Very erratic.
So I stopped at a driveway, pulled the IAC electrical connector. Idle didn't drop much just sitting there. So I left it unplugged and drove the rest of way to work. Sucker idled just fine all the way to work. Still did the stutter a bit but expected with IAC unplugged I think. Also check engine light was on when I was driving up to speed but would go off when I was sitting at lights idling.
I still think it's the TPS or vacume leak even though unplugging the IAC fixed the issue. The engine never did a stuck high idle the rest of way to work though which has me thinking but its function is to bypass the TB with air and that seems to be working fine like when it idles high in morning and then lowers down just fine.
And even though the TPS voltage was fine when I checked it last night, I had this issue before and the voltage NOISE was my issue which I couldn't detect with volt meter, the Tuner caught it when I brought it in to him.
I guess I will buy a TPS, then go home and check for vacuum leaks first. Take the TPS back if its vacuum, replace TPS if its not.
Wish me luck, I hate idle issues...
TPS Troubleshooting and testing
Revised 2 July 2014 to reflect changes in resistance values for testing of TPS wiring.
Setting the TPS: you'll need a good Digital Voltmeter (DVM) to do the job. Set the TPS voltage at .5- 1.1 range. Because of the variables involved with the tolerances of both computer and DVM, I would shoot for somewhere between .6 and 1.0 volts. Unless you have a Fluke or other high grade DVM, the second digit past the decimal point on cheap DVM’s is probably fantasy. Since the computer zeros out the TPS voltage every time it powers up, playing with the settings isn't an effective aid to performance or drivability. The main purpose of checking the TPS is to make sure it isn't way out of range and causing problems.
Do not use anything for a ground than the black/white wire for a ground to set the TPS. If it doesn't work, then you have wiring problems. Read the whole test path to get more information.
Wire colors & functions:
Orange/white = 5 volt VREF from the computer
Dark Green/lt green = TPS output to computer
Black/white = Signal ground from computer
TPS troubleshooting steps:
1.) Use the Orange/white & Black white wires to verify the TPS has the correct 5 volts source from the computer.
2.) Use the Dark Green/lt green & Black/white wires to set the TPS base voltage. Try this... All you need is less than 1.0 volt at idle and more than 4.25 at Wide Open Throttle (WOT). You'll need a voltmeter with a 1 or 3 volt low scale to do the job.
The Orange/White wire is the VREF 5 volts from the computer. You use the Dark Green/Lt green wire (TPS signal) and the Black/White wire (TPS ground) to set the TPS. Use a pair of safety pins to probe the TPS connector from the rear of the connector. You may find it a little difficult to make a good connection, but keep trying. Put the safety pins in the Dark Green/Lt green wire and Black/White wire. Make sure the ignition switch is in the Run position but the engine isn't running. Set the voltmeter on the 2 volt range if it doesn’t auto range.
Here’s a TPS tip I got from NoGo50
When you installed the sensor make sure you place it on the peg right and then tighten it down properly. Loosen the back screw a tiny bit so the sensor can pivot and loosen the front screw enough so you can move it just a little in very small increments. I wouldn’t try to adjust it using marks.
(copied from MustangMax, Glendale AZ)
A.) Always adjust the TPS and Idle with the engine at operating temp. Dive it around for a bit if you can and get it nice and warm.
B.) When you probe the leads of the TPS, do not use an engine ground, put the ground probe into the lead of the TPS. You should be connecting both meter probes to the TPS and not one to the TPS and the other to ground.
C.) Always reset the computer whenever you adjust the TPS or clean/change any sensors. I just pull the battery lead for 10 minutes.
D.) The key is to adjust the TPS voltage and reset the computer whenever the idle screw is changed.
The TPS is a variable resistor, must like the volume control knob on a cheap radio. We have all heard them crackle and pop when the volume is adjusted. The TPS sensor has the same problem: wear on the resistor element makes places that create electrical noise. This electrical noise confuses the computer, because it expects to see a smooth increase or decrease as the throttle is opened or closed.
TPS testing: most of the time a failed TPS will set code 23 or 63, but not always. Use either an analog meter or a DVM with an analog bar graph and connect the leads as instructed above. Turn the ignition switch to the Run position, but do not start the engine. Note the voltage with the throttle closed. Slowly open the throttle and watch the voltage increase smoothly, slowly close the throttle and watch the voltage decrease smoothly. If the voltage jumps around and isn’t smooth, the TPS has some worn places in the resistor element. When the throttle is closed, make sure that the voltage is the same as what it was when you started. If it varies more than 10%, the TPS is suspect of being worn in the idle range of its travel.
TPS will not go below 1 volt
Note: Make all resistance checks with the ignition switch in the OFF position. Failure to do so will result in incorrect results and may possibly damage the meter.
Engine mounted sensor circuit: Check the resistance between the black/white wire on the TPS and battery ground. It should be less than 1 ohm. Higher resistance than 1 ohm indicates a problem with the 10 pin connector, computer or the splice inside the main harness where the wire from the 10 pin connectors joins the rest of the black/white wire.

See the graphic for the location of the 10 pin connectors:
Diagram courtesy of Tmoss & Stang&2birds
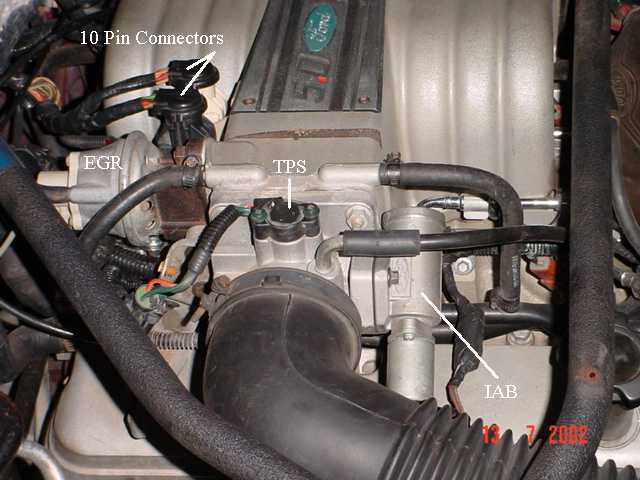
See the graphic for the 10 pin connector circuit layout.

Unplug the white 10 pin connector to do some resistance testing. It is good time to clean the connector pins and examine the connector for corrosion, broken wire or other damage. See http://oldfuelinjection.com/?p=85 for help in this department.
If the resistance on the TPS Black/White wire and pin 1 of the white engine fuel injector harness 10 pin connector, is more than 1.0 ohm, you have bad connection or broken wiring. Repeat the test using the pin 1 of the white body side 10 pin connector and battery ground. You should have less that 1 ohm. More than that is a damaged signal ground inside the computer or bad connections or wiring.[/b]
Revised 2 July 2014 to reflect changes in resistance values for testing of TPS wiring.
Setting the TPS: you'll need a good Digital Voltmeter (DVM) to do the job. Set the TPS voltage at .5- 1.1 range. Because of the variables involved with the tolerances of both computer and DVM, I would shoot for somewhere between .6 and 1.0 volts. Unless you have a Fluke or other high grade DVM, the second digit past the decimal point on cheap DVM’s is probably fantasy. Since the computer zeros out the TPS voltage every time it powers up, playing with the settings isn't an effective aid to performance or drivability. The main purpose of checking the TPS is to make sure it isn't way out of range and causing problems.
Do not use anything for a ground than the black/white wire for a ground to set the TPS. If it doesn't work, then you have wiring problems. Read the whole test path to get more information.
Wire colors & functions:
Orange/white = 5 volt VREF from the computer
Dark Green/lt green = TPS output to computer
Black/white = Signal ground from computer
TPS troubleshooting steps:
1.) Use the Orange/white & Black white wires to verify the TPS has the correct 5 volts source from the computer.
2.) Use the Dark Green/lt green & Black/white wires to set the TPS base voltage. Try this... All you need is less than 1.0 volt at idle and more than 4.25 at Wide Open Throttle (WOT). You'll need a voltmeter with a 1 or 3 volt low scale to do the job.
The Orange/White wire is the VREF 5 volts from the computer. You use the Dark Green/Lt green wire (TPS signal) and the Black/White wire (TPS ground) to set the TPS. Use a pair of safety pins to probe the TPS connector from the rear of the connector. You may find it a little difficult to make a good connection, but keep trying. Put the safety pins in the Dark Green/Lt green wire and Black/White wire. Make sure the ignition switch is in the Run position but the engine isn't running. Set the voltmeter on the 2 volt range if it doesn’t auto range.
Here’s a TPS tip I got from NoGo50
When you installed the sensor make sure you place it on the peg right and then tighten it down properly. Loosen the back screw a tiny bit so the sensor can pivot and loosen the front screw enough so you can move it just a little in very small increments. I wouldn’t try to adjust it using marks.
(copied from MustangMax, Glendale AZ)
A.) Always adjust the TPS and Idle with the engine at operating temp. Dive it around for a bit if you can and get it nice and warm.
B.) When you probe the leads of the TPS, do not use an engine ground, put the ground probe into the lead of the TPS. You should be connecting both meter probes to the TPS and not one to the TPS and the other to ground.
C.) Always reset the computer whenever you adjust the TPS or clean/change any sensors. I just pull the battery lead for 10 minutes.
D.) The key is to adjust the TPS voltage and reset the computer whenever the idle screw is changed.
The TPS is a variable resistor, must like the volume control knob on a cheap radio. We have all heard them crackle and pop when the volume is adjusted. The TPS sensor has the same problem: wear on the resistor element makes places that create electrical noise. This electrical noise confuses the computer, because it expects to see a smooth increase or decrease as the throttle is opened or closed.
TPS testing: most of the time a failed TPS will set code 23 or 63, but not always. Use either an analog meter or a DVM with an analog bar graph and connect the leads as instructed above. Turn the ignition switch to the Run position, but do not start the engine. Note the voltage with the throttle closed. Slowly open the throttle and watch the voltage increase smoothly, slowly close the throttle and watch the voltage decrease smoothly. If the voltage jumps around and isn’t smooth, the TPS has some worn places in the resistor element. When the throttle is closed, make sure that the voltage is the same as what it was when you started. If it varies more than 10%, the TPS is suspect of being worn in the idle range of its travel.
TPS will not go below 1 volt
Note: Make all resistance checks with the ignition switch in the OFF position. Failure to do so will result in incorrect results and may possibly damage the meter.
Engine mounted sensor circuit: Check the resistance between the black/white wire on the TPS and battery ground. It should be less than 1 ohm. Higher resistance than 1 ohm indicates a problem with the 10 pin connector, computer or the splice inside the main harness where the wire from the 10 pin connectors joins the rest of the black/white wire.
See the graphic for the location of the 10 pin connectors:
Diagram courtesy of Tmoss & Stang&2birds
See the graphic for the 10 pin connector circuit layout.
Unplug the white 10 pin connector to do some resistance testing. It is good time to clean the connector pins and examine the connector for corrosion, broken wire or other damage. See http://oldfuelinjection.com/?p=85 for help in this department.
If the resistance on the TPS Black/White wire and pin 1 of the white engine fuel injector harness 10 pin connector, is more than 1.0 ohm, you have bad connection or broken wiring. Repeat the test using the pin 1 of the white body side 10 pin connector and battery ground. You should have less that 1 ohm. More than that is a damaged signal ground inside the computer or bad connections or wiring.[/b]
Last edited:
First, thanks @jrichker , I was looking at some other version of your idle checklist, didn't see the above...
Second, I was looking at your current checklist(found up to date). Can you elaborate on this a little more?
Any car that has a 3G or high output current alternator needs a 4 gauge ground wire running from the block to the chassis ground where the battery pigtail ground connects. The 3G has a 130 amp capacity, so you wire the power side with 4 gauge wire. It stands to reason that the ground side handles just as much current, so it needs to be 4 gauge too.
I upgraded to the high output alternator(3G). It came with a 4awg wire to alternator. At this time I replaced both battery terminals/cables with 2awg wires. Huge. My question is why does the chassis need 4awg wire when the alternator is grounded to the engine, which in my case has a 2awg ground from battery? It doesn't use the chassis right? What am I missing?
Check the ect sensor . I had this problem . Sensor would read negative 30 and car would high idle coming to a stop and stuff trying to correct it .
Sent from my iPhone using my fingers while my auto correct makes me seem illiterate
Sent from my iPhone using my fingers while my auto correct makes me seem illiterate
Turned out to be my TPS.
I just changed the dam thing a couple years ago. My tuner did it actually. He must have used a really cheap TPS because as I started inspecting it I noticed it was coming apart. Of course I caused this by using a couple safety pins to probe the wires. I was sticking the pins inside the plastic housing right along with the wires. The plastic housing came unsealed/unglued and started to separate. I think this elevation of the spring was happening during heat cycles of the engine causing either noise or contact separation I dunno...
So this time I took the safety pins and stuck them right into the wire jackets themselves. It works but of course this punctured holes in the wires and I wasn't comfortable with this so after I finished I sealed the holes back up with some crazy azz glue, cuz my glue is crazy, not super
If you look close you can see my little glue spots on the green and black wires.
What is the plastic shielding on these aftermarket TPS's for anyways? Why does it only cover some of the wires and not all? And its huge, not snug??

Similar threads
- Replies
- 7
- Views
- 899
- Replies
- 22
- Views
- 1K
- Replies
- 12
- Views
- 670
- Replies
- 13
- Views
- 1K