Progress Thread Therapy Car-- Freshening Up the Lower Intake

Wow, that spring is terrible.
Uh... Yeah! LOL Thanks for the lead on the oiling funnel. Going by the name it sounds like something that should be fully functional.
20191025_085358.jpg


I've been trying to think of a good way of reinstalling the shifter detent spring and ball. I'm pretty much working on the car solo and as I'm sure you guys know this has to be installed as the tail shaft housing goes on, at least I think it does, but I can only be in the car or under the car at any given time. I was thinking about trying to use a heavy rubber band to hold it in place while I install the housing. Then when I get up in the car I can position the shuttle then just cut the rubber band and pull it out.

Thoughts?

I'm also going to do some youtube research as well.
 
  • Sponsors (?)


What the hell happened to that spring? Looks like you removed it with a blow torch.

I probably wouldn't install the sportlines.
They are an extreme lowering spring, that's about it.
Counterproductive for handling.
They make the car ride like one of those old school s10 mini trucks that are slammed.

And no you don't need the piece in the middle, but I would absolutely run a new set of isolators all the way around. Especially with those springs.
 
Well I guess it'll be what it is for now. Hopefully it wont be too bad. Gotta be better than what is currently on in. The drivers side spring is worse than the one I took off. Not going to happen anytime soon, but at some point in the future I want to upgrade to coil over. If everything works out I'll probably try to do that at the same time I do the 5 lug upgrade.

Absolutely on the isolators! I've got new ones to go on already.
 
You pulled the tailhousing off with the rest of trans still in car? Wow, that's awesome.

But yeah, that detent is a total PITA to do if the trans is in the car. You need two people to do it in the car, but if you can manage that solo I will give you some major credit. Just doing it on a benchtop is tough.

If I still had the rubber sleeve that went inside my rear springs, I would have reinstalled them. But I don't, so I didn't, and don't lose sleep over it.
 
  • Like
Reactions: 1 user
Also, while you have it out...if you have the black 8-tooth speedo gear in place on the mainshaft....use the opportunity to swap it to a 6 or 7 tooth drive gear. The drive and driven gears will have thicker teeth less prone to stripping
 
  • Like
Reactions: 1 user
Exhibit A still attached to the car.

20191016_215034.jpg

Dont give me too much credit. Remember this thing is hanging on a lift. All I had to do was walk under there and take it off. Climing a ladder to get into the car to do things in there is a little sketchy, but it works.

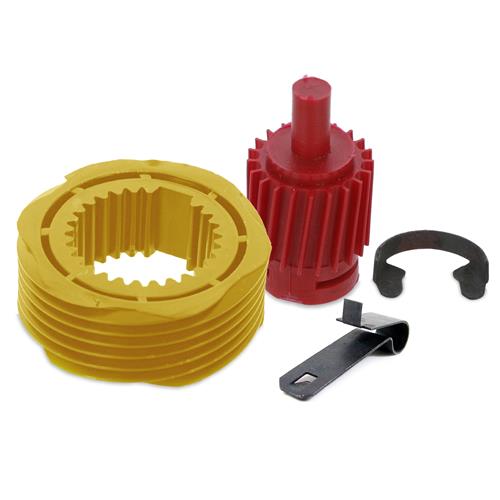
I installed a new spedo gear to go on the cable and the output shaft. The gear on the cable is red and the one on the shaft is yellow. It was a matched set from LMR that said it was for 3.73 gears.


It will still be off because the tire height is different from stock, but it was reading 85 when I was actually doing 60 according to a GPS. I can deal with within 10, but over 20 mph off is excessive.

Oh and @2000xp8 . No blow torches were used in the removal of that spring. It was just that wore out!
 
Lower the jack downslightly to tilt the T5 down to the ground a bit. Might give you just enough clearance to get your hand up and over to install the shifter block and tailhousing. Of course...you still will need to be able to see and drive the roll pin in.

Why not just pull 4 bolts and drop the t-5 down at this point.
 
To remove it from the point you are at now? Yeah that's all. The clutch should hold the flywheel aligned.

Really the tough part is holding the trans. It's not light at around 75lbs, so it can be a 2-person job. I still have the scars on my hand from the last time I tried to take out a t-5 by manhandling it. That's why when I recently removed it, I just went and bought a trans jack to hold it.
 
  • Like
Reactions: 2 users
A couple blocks of wood in a L and some weight should get it done. Measure how much space you have behind the shift rail block. Cut accordingly and screw to top block. Put the ball in the center notch and put some petroleum jelly on it so it doesn't move around. Might not need it.( I use petroleum jelly is to help put automatic transmission transmissions together...t5s use automatic fluid ). Block that thing up with a few pounds on top. Still will be hard to line the rail up but it should help. The shift block thingy won't move so a little wiggling should get it done.

If you have an inspection camera you could use it to see up top while you get it back together. I got one from harbor frieght pretty cheap. Advance auto sells them too. I've even used it on my sink drains. Comes in handy.

; disclaimer... I've never done one by myself like that. Just an idea that may work.
 
  • Like
Reactions: 1 user
@90sickfox I do have an inspection camera. It's a cheap thing that I bought off Amazon for $30 and it works pretty good. It broadcast a wifi signal that your phone connects to. Then you use an app to turn your phone into the viewer. It works. Thanks for the tip!

I think I might have came up with a way of getting the shuttle back into the tail housing as I install it. It's still going to be tricky, but if I have enough room between the shuttle and the body of the tail housing it just might work.

I took a piece of box banding material here at work and made a small loop. I then used a pad of sticky notes as a base and compressed the spring and ball into the shuttle. With it compressed I was able to kinda roll it into the loop. It's holding the ball up there pretty tight. We'll see what happens this weekend!

20191025_144850.jpg
 
  • Like
Reactions: 1 users
I think you'll get it back together with a little effort. Who doesn't like a challenge. When this car is back on the ground it'll be amazing. Keep up the good work and the posts coming. :nice:
 
  • Like
Reactions: 1 user
Did a test fit tonight. My little band seems to be working great! To about 10 minutes to put the housing on. The Eric the car guy vid I watched said to use anaerobic gasket maker on the housing. I'll try to find some of that tomorrow and finish putting it together. I'll need to use a punch to line up the hole for the roll pin.

20191025_213103.jpg
 
  • Like
  • Hell Yeah!
Reactions: 2 users
That's amazing. I don't know how you kept that thing still while you got the shaft in. Clapping hands for you sir !!!
 
  • Like
Reactions: 1 user
Applause for sure!

It would have caused a garage clean out over here, as I searched for the ball and spring that flew into some little used corner of the garage!
 
One LCA installed along with the new spring.

20191026_170423.jpg
Finally got to use my MM bushing removal tool for its intended purpose. Made talking the bushing out pretty easy. Used a drill to get the old rubber out. Had to get creative to press the new poly bushing into the metal shell. Ended up using parts of the MM tool to press it together as much as possible then used parts of the MM tool and my ford 4x4 spindle nut socket to press it the rest of the way together. That spindle nut socket has came in handy a lot lately!
20191026_211315.jpg

20191026_212149.jpg
 
  • Like
Reactions: 1 user
The car had a good weekend. I felt like I got a lot of stuff done, and the best thing is I didn't break anything, including myself. I finished installing the upper control arm on the right side of the car.

20191027_174031.jpg


I had a lot of trouble getting the arm to line up in the torque box though. So much so that I resorted to what I would even consider a pretty sketchy solution to fix it. I used my truck....

20191027_173927.jpg


I didn't have to put a lot of pressure on it, but pulling on something while its up on the rack like that just doesn't sit well with me. It wasn't too bad putting the pressure on, but it was a ratchet strap. All the pressure had to be released all at once. I thought about trying to back the truck up to let the pressure off, but I also thought of how vehicles tend to lurch when you put them in gear. I worked out in the end.

Thats the yard sale pile behind the car. I'll be glad when its gone!

This was the left side UCA.

20191027_210253.jpg


and spring.

20191027_185923.jpg


New wheel bearings came in on Saturday!

20191027_210338.jpg


I think these will work.