
You are using an out of date browser. It may not display this or other websites correctly.
You should upgrade or use an alternative browser.
You should upgrade or use an alternative browser.
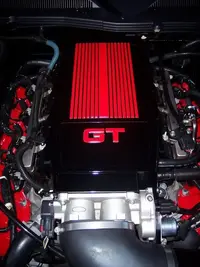
Intake cover and cam covers done!
- Thread starter nbk13nw
- Start date


Mike06_10pm
New Member
- Mar 30, 2005
- 98
- 0
- 0
wow thats amazing. how did it work with gettin your cam covers painted? are you going with a black and red color combo through the whole car cause that will be awsome, should paint the capilers red too, will look hot!
-mike
-mike
Mike06_10pm said:wow thats amazing. how did it work with gettin your cam covers painted? are you going with a black and red color combo through the whole car cause that will be awsome, should paint the capilers red too, will look hot!
-mike
I have the red leather accents in the interior.. I thought that I found some polished rims with red lips but not sure if I want to take it that far yet... I just removed and sanded down the covers, then 3 coats of primer and then another 3 coats of red.

CaptainSaveAHoe
New Member
rrobello said:was it a pain to remove and replace the valve covers? I want to do mine but I cant find high temp paint in the color I want. Any recomendations?
yea i'd really like to know how you did it
 (in detail if not too big a problem)... I have a the same color scheme (Black on red leather) and think its looks sweet on your car...
PowerJunkie
New Member
- Jun 3, 2005
- 22
- 0
- 0
Plenum (Intake) Cover: Midwest Auto Gear
Well, mostly just a lot of taping off of the areas that I did not want to red. A very light sanding once the taping and papering was completed. I then used some thinner on a rag to wipe down the suface area to be painted. 3 coats of gray primer with a 15 minute cure time between coats. Then another 3 coats of red enamel (Seems to hold up better than a laquer based paint) again with the appropriate drying time between coats. After the last coat I gave it a good 4 hours to cure.
The install was pretty basic. 4 bolts that hold down the fuel rails are all that is needed to be removed. Using wither a deep well socket (8mm) or an 8mm wrench, you remove the 4 bolts after pulling the wiring stays off. (Small caps that fit over the tops of the threaded bolts). Sit the intake cover down onto the bolts and replace the bolts that you removed earlier. Be sure not to over-tighten the bolts. Pop the wiring stays back onto the bolt tops and there ya go.
Cam covers:
Hmmm... I think that there are 12... maybe 14 bolts to remove. Again and 8mm socket is best, or even a nut driver of the proper size. I found that two extensions, a 3 inch and a 6 inch, with a univeral adapter in between made it much easier to remove a few of the bolts in the back sections near the firewall. Also, an 8mm wrench may come in handy as well.
I loosened all of the bolts and then the wiring connections to the covers as well as any hoses. Only a few so don't sweat it. Once that was done I then removed the bolts from the cover housing, they have rubber groumets taht keep them in place, so just wiggle them and pull and they will come out.
Then you will have to remove the air filter housing or CAI if you wanna make it easier to get them out. Just slide them up and forward to remove them, taking car to keep the cams covered with wither plactic or a towel until you can replace the covers.
Once removed, I then proceeded to sop up any residual oil in the covers using paper towels. I used a dremel tool and a high speed drill with some wire wheels and buffing pads to remove the outer surface of the covers. Once completed I rubbed them down with a thinner to remove any residual oil, dirt or dust. Taped up what I wanted to protect. Then, 3 coats of primer with drying time between coats, then 3 coats of red again with the proper drying time between coats.
I gave it a good 4 hours to cure then installed them again. But I did wait 12 hours total before runnning the car in order to allow the covers to cure fully.
As for paints, any good quality primer will work and the same for the red enamel. A high heat paint is not required it seems. So, if you can find a high heat color of your choice (BBQ grill would work well) then definetly use it, if not then any good quality paint will work.
351CJ said:Looks GREAT!, those stock dull cam covers ruin the look of the engine.
what brand of paint? I agree enamel is the way to go, lacquer will not hold up.
However, I'll be doing mine in Ford blue.
Rustoleum High Performance Enamel is the paint that I find holds up over time with high heat and environmental concerns. Both the primer and paint. I think a nice clear coat (I forgot) would be nice as well...
thanks for the details....is there a threat of overtightening the bolts when replacing? I would hate to damage the gasket and not know it unitl its too late. Also do you need to do anything like disconnect the battery and reset the idle when done like you do when you install the CAI. Are you sure you do not need high temp paint? I thought that over time it would crack and chip even though it looks great at first. Anyone know where to get a good selection of colors in high temp paint I've been looking for a while and can only find the primary and some secondary colors? I am about to give up and pay to have them powder coated. Also how long did it take to remove the outer surface of the covers with the dremel? Was it a pain? and did it make that big of a difference in its smoothness? Thank you.
argabright52
New Member
Where did you get the intake cover? My car doesn't have one, so did them forget some of my parts or did you buy it aftermarket?
Beautiful job, but I have to agree with one of the other posters: My preference would be the old dark "Ford Blue"... The red on an engine always makes me think "Chevy"... <chuckle>
I hope that paint holds up in there. I've always used "engine paint" under the hood even though the valve covers don't really get that hot.
Really, a nice job.
Mike Elia
05 GT lime
87 Regal Turbo T
I hope that paint holds up in there. I've always used "engine paint" under the hood even though the valve covers don't really get that hot.
Really, a nice job.
Mike Elia
05 GT lime
87 Regal Turbo T
argabright52 said:Where did you get the intake cover? My car doesn't have one, so did them forget some of my parts or did you buy it aftermarket?
Aftermarket cover from Midwest Auto Gear. The link is now in the description I posted above earlier...
nbk13nw said:Rustoleum High Performance Enamel is the paint that I find holds up over time with high heat and environmental concerns. Both the primer and paint. I think a nice clear coat (I forgot) would be nice as well...
I'm with you, I've had good results with Rustoleum, so I'm sure your paint job will hold up real well.
I wonder if any special preparation is needed to get good adhesion to the magnesium cam covers.
351CJ said:I'm with you, I've had good results with Rustoleum, so I'm sure your paint job will hold up real well.
I wonder if any special preparation is needed to get good adhesion to the magnesium cam covers.
I just took a little bit of a layer off of them before I painted, then primer and paint.
Revised edition! Tucker should like this one!
Added a little something to it!
View attachment 512579
View attachment 512581

Added a little something to it!
View attachment 512579
View attachment 512581
Attachments

01GT/03ZX9
New Member
please don't take this wrong,but you took what was a Fantastic paint job and made it look silly with that" JLT inside "sticker.Maybe just a origonal JLT sticker in red would be better.JMO.Nice paintwork though.
Similar threads
- Replies
- 3
- Views
- 140
- Replies
- 6
- Views
- 98
- Replies
- 0
- Views
- 98