
You are using an out of date browser. It may not display this or other websites correctly.
You should upgrade or use an alternative browser.
You should upgrade or use an alternative browser.
code 42
- Thread starter sjhm9102
- Start date


Code 42 & 92 (engine running) System rich - Fuel control or (memory) System was rich for 15 seconds or more (no HO2S switching) - Fuel control. Look for leaking injectors, fuel pressure too high, cylinder(s) not firing due to bad ignition.
Code 42 is the RH side sensor,
Code 92 is the LH side sensor.
Testing the O2 sensors
Because the oxygen sensor generates its own voltage, never apply voltage and never measure resistance of the sensor circuit. To measure voltage signals, use an analog voltmeter with a high input impedance, at least 10 megohms. Remember, a digital voltmeter will average a changing voltage.
Measuring the O2 sensor voltage at the computer will give you a good idea of how well they are working. You'll have to pull the passenger side kick panel off to gain access to the computer connector. Remove the plastic wiring cover to get to the back side of the wiring. Use a safety pin or paper clip to probe the connections from the rear. The computer pins are 29 (LH O2 with a dark green/pink wire) and 43 (RH O2 with a dark blue/pink wire). Use the ground next to the computer to ground the voltmeter. The O2 sensor voltage should switch between .2-.9 volt at idle.
There is a fuse link for the O2 sensor heater power. According to Ranchero50, it is in the wiring near the passenger side hood hinge. Measuring the voltages will give a clue if it has shorted to the O2 sensor signal lead. The O2 sensor voltage should switch between .2-.9 volt at idle.
Fuel pressure OK, the injectors are not firing, OR one or more injectors stuck
open
Do a cylinder balance test: Warm the car's engine up to normal operating
temperature. With the Engine Off, Key OFF, use a jumper wire or paper clip to
put the computer into test mode. Start the engine and let it go through the
normal diagnostic tests, then quickly press the throttle to the floor. The
engine RPM should exceed 2500 RPM's for a brief second. The engine will shut
off power to each injector, one at a time. When it has sequenced through all
8 injectors, it will flash 9 or the number of the failing cylinder such as 2 for
cylinder #2. Quickly pressing the throttle again up to 2500 RPM’s will cause
the test to re-run with smaller qualifying figures. Do it a third time, and if the
same cylinder shows up, the cylinder is weak and isn’t putting out power like
it should. See the Chilton’s Shop manual for the complete test procedure
The red wire on each injector is powered up whenever the ignition switch is
in the Run position. The computer provides a ground to complete the circuit
and fire the injector. The injector must have a ground to squirt fuel on
command. A short to ground in the injector return wiring can cause one or
more injectors to be continually open or triggered
injector to computer control wire to ground out. This would cause the
injector to remain on anytime the key was in the Run position. Remove the
injector wiring connectors from the injector. Note that each injector has one
red wire for power and a non red wire (wire some color other than red) for
computer controlled ground. With the key off, disconnect the computer
connector from the computer. Use an Ohmmeter between the non red wire
and ground. You should see more than 100000 (100K) ohms resistance.
See the following website for some help from Tmoss (diagram designer) &
Stang&2Birds (website host) for help wiring Mustang FAQ - Engine Information
Diagram courtesy of Tmoss & Stang&2birds
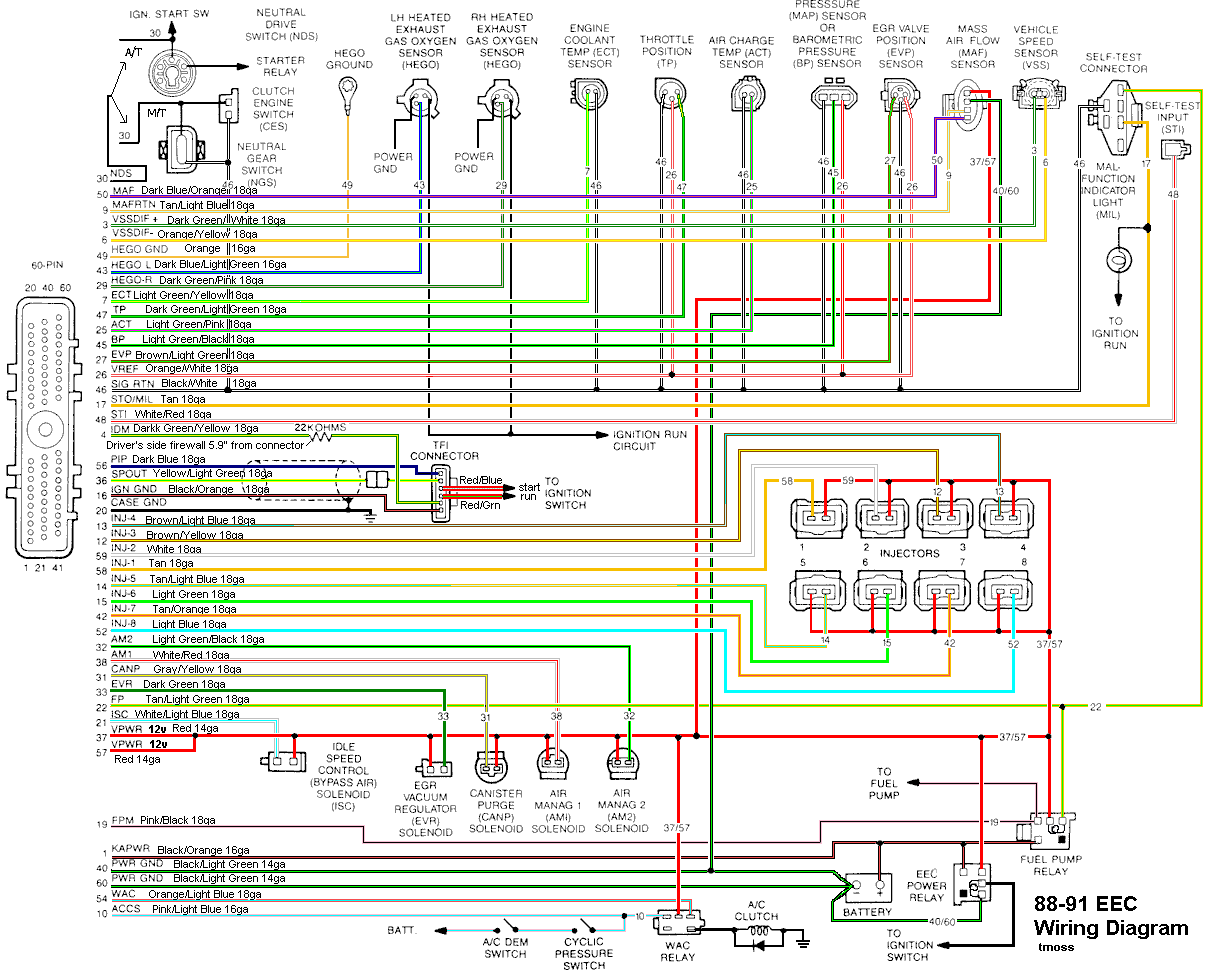
Using the above diagram, check the resistance between the injector and the
computer. Clean and check the 10 pin connectors since they are a potential
trouble source. Any resistance greater than 1.5 ohm between the injector to
computer wire and the matching pin on the computer connector is a problem.

See Ford Fuel Injection Wiring Harnesses for more help
Be sure to turn off the A/C, and put the transmission in neutral when dumping the codes. Fail to do this and you will generate a code 67 and not be able to dump the Engine Running codes.
Dumping the Engine Running codes: The procedure is the same, you start the engine with the test jumper in place. Be sure the A/C is off and the transmission is in neutral. You'll get an 11, then a 4 and the engine will speed up to do the EGR test. After the engine speed decreases back to idle, it will dump the engine running codes.
Here's the link to dump the computer codes with only a jumper wire or paper clip and the check engine light, or test light or voltmeter. I’ve used it for years, and it works great. You watch the flashing test lamp or Check Engine Light and count the flashes.
See Troublcodes.net Trouble Codes OBD & OBD2 Trouble Codes and Technical info & Tool Store. By BAT Auto Technical


If your car is an 86-88 stang, you'll have to use the test lamp or voltmeter method. There is no functional check engine light on the 86-88's except possibly the Cali Mass Air cars.

The STI has a gray connector shell and a white/red wire. It comes from the same bundle of wires as the self test connector.
89 through 95 cars have a working Check Engine light. Watch it instead of using a test lamp.

The STI has a gray connector shell and a white/red wire. It comes from the same bundle of wires as the self test connector.
There is a single dark brown connector with a black/orange wire. It is the 12 volt power to the under the hood light. Do not jumper it to the computer test connector. If you do, you will damage the computer.
What to expect:
You should get a code 11 (two single flashes in succession). This says that the computer's internal workings are OK, and that the wiring to put the computer into diagnostic mode is good. No code 11 and you have some wiring problems.
Code 42 is the RH side sensor,
Code 92 is the LH side sensor.
Testing the O2 sensors
Because the oxygen sensor generates its own voltage, never apply voltage and never measure resistance of the sensor circuit. To measure voltage signals, use an analog voltmeter with a high input impedance, at least 10 megohms. Remember, a digital voltmeter will average a changing voltage.
Measuring the O2 sensor voltage at the computer will give you a good idea of how well they are working. You'll have to pull the passenger side kick panel off to gain access to the computer connector. Remove the plastic wiring cover to get to the back side of the wiring. Use a safety pin or paper clip to probe the connections from the rear. The computer pins are 29 (LH O2 with a dark green/pink wire) and 43 (RH O2 with a dark blue/pink wire). Use the ground next to the computer to ground the voltmeter. The O2 sensor voltage should switch between .2-.9 volt at idle.
There is a fuse link for the O2 sensor heater power. According to Ranchero50, it is in the wiring near the passenger side hood hinge. Measuring the voltages will give a clue if it has shorted to the O2 sensor signal lead. The O2 sensor voltage should switch between .2-.9 volt at idle.
Fuel pressure OK, the injectors are not firing, OR one or more injectors stuck
open
Do a cylinder balance test: Warm the car's engine up to normal operating
temperature. With the Engine Off, Key OFF, use a jumper wire or paper clip to
put the computer into test mode. Start the engine and let it go through the
normal diagnostic tests, then quickly press the throttle to the floor. The
engine RPM should exceed 2500 RPM's for a brief second. The engine will shut
off power to each injector, one at a time. When it has sequenced through all
8 injectors, it will flash 9 or the number of the failing cylinder such as 2 for
cylinder #2. Quickly pressing the throttle again up to 2500 RPM’s will cause
the test to re-run with smaller qualifying figures. Do it a third time, and if the
same cylinder shows up, the cylinder is weak and isn’t putting out power like
it should. See the Chilton’s Shop manual for the complete test procedure
The red wire on each injector is powered up whenever the ignition switch is
in the Run position. The computer provides a ground to complete the circuit
and fire the injector. The injector must have a ground to squirt fuel on
command. A short to ground in the injector return wiring can cause one or
more injectors to be continually open or triggered
A.) A Noid light available from Autozone, is one way to test
the injector wiring. If the light stays on constantly, either the wiring has a
short to ground or the computer has failed
B.) I like to use an old injector with compressed air applied to the
injector where the fuel rail would normally connect. I hook the whole thing
up, apply compressed air to the injector and stick it in a paper cup of soapy
water. When the engine cranks with the ignition switch on, if the injector
fires, it makes bubbles An injector stuck open will release a continual stream
of bubbles. Cheap if you have the stuff laying around, and works good too.
The same trick works great to find leaking injectors too.
The wiring for the injectors may have some bare spots in it causing the the injector wiring. If the light stays on constantly, either the wiring has a
short to ground or the computer has failed
B.) I like to use an old injector with compressed air applied to the
injector where the fuel rail would normally connect. I hook the whole thing
up, apply compressed air to the injector and stick it in a paper cup of soapy
water. When the engine cranks with the ignition switch on, if the injector
fires, it makes bubbles An injector stuck open will release a continual stream
of bubbles. Cheap if you have the stuff laying around, and works good too.
The same trick works great to find leaking injectors too.
injector to computer control wire to ground out. This would cause the
injector to remain on anytime the key was in the Run position. Remove the
injector wiring connectors from the injector. Note that each injector has one
red wire for power and a non red wire (wire some color other than red) for
computer controlled ground. With the key off, disconnect the computer
connector from the computer. Use an Ohmmeter between the non red wire
and ground. You should see more than 100000 (100K) ohms resistance.
See the following website for some help from Tmoss (diagram designer) &
Stang&2Birds (website host) for help wiring Mustang FAQ - Engine Information
Diagram courtesy of Tmoss & Stang&2birds
Using the above diagram, check the resistance between the injector and the
computer. Clean and check the 10 pin connectors since they are a potential
trouble source. Any resistance greater than 1.5 ohm between the injector to
computer wire and the matching pin on the computer connector is a problem.
See Ford Fuel Injection Wiring Harnesses for more help
Be sure to turn off the A/C, and put the transmission in neutral when dumping the codes. Fail to do this and you will generate a code 67 and not be able to dump the Engine Running codes.
Dumping the Engine Running codes: The procedure is the same, you start the engine with the test jumper in place. Be sure the A/C is off and the transmission is in neutral. You'll get an 11, then a 4 and the engine will speed up to do the EGR test. After the engine speed decreases back to idle, it will dump the engine running codes.
Here's the link to dump the computer codes with only a jumper wire or paper clip and the check engine light, or test light or voltmeter. I’ve used it for years, and it works great. You watch the flashing test lamp or Check Engine Light and count the flashes.
See Troublcodes.net Trouble Codes OBD & OBD2 Trouble Codes and Technical info & Tool Store. By BAT Auto Technical
If your car is an 86-88 stang, you'll have to use the test lamp or voltmeter method. There is no functional check engine light on the 86-88's except possibly the Cali Mass Air cars.
The STI has a gray connector shell and a white/red wire. It comes from the same bundle of wires as the self test connector.
89 through 95 cars have a working Check Engine light. Watch it instead of using a test lamp.
The STI has a gray connector shell and a white/red wire. It comes from the same bundle of wires as the self test connector.
There is a single dark brown connector with a black/orange wire. It is the 12 volt power to the under the hood light. Do not jumper it to the computer test connector. If you do, you will damage the computer.
What to expect:
You should get a code 11 (two single flashes in succession). This says that the computer's internal workings are OK, and that the wiring to put the computer into diagnostic mode is good. No code 11 and you have some wiring problems.
idid the CBT test got a code 1 pause 1 fuel injestor wires are ok and fuel pressure is ok would a bad o2 sensor cause it to smoke and spudder on aload gonna do a compression test later also just bought a new computer and IAB valve ran fine for about a week

93 LX
Founding Member
I thought 9 was a CBT pass ok.....
You are correct. I need to edit the test path I posted to make it easier to understand. Thanks for pointing that out.
Joe R.
 wires areall new mechanic said i had no codes and to much blow by i htink hes fulla ****
Just because the wires are new does not mean that #1 wire can't be broken or defective. Measure the wire or swap it with a known good one.
If you are feeding information from this post to help a professional mechanic, there is a $100 charge for my help.
If you are doing it yourself, I will be glad to help you for free.
If you are feeding information from this post to help a professional mechanic, there is a $100 charge for my help.
If you are doing it yourself, I will be glad to help you for free.
Similar threads

- Replies
- 4
- Views
- 116


- Replies
- 3
- Views
- 117

- Replies
- 23
- Views
- 401

- Replies
- 0
- Views
- 131
- Replies
- 51
- Views
- 1K
