
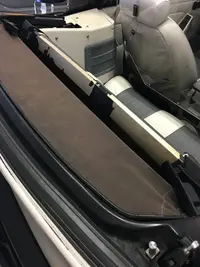
The top of my rear seat frame is looking pretty rough (see pictures). Most of the original black paint is long gone. Was thinking of rattle canning it. Does that top metal piece come off separately from the rest of the rear seat frame? Looks like the rear seat belts and the well liner attach to it. Would unbolting those items allow me to get just that piece out of the car, or does the entire frame have to come out?
You are using an out of date browser. It may not display this or other websites correctly.
You should upgrade or use an alternative browser.
You should upgrade or use an alternative browser.
Interior and Upholstery 93 Convertible-Top of rear seat frame
- Thread starter hello_newman
- Start date

JKWilson61
Active Member
That piece does indeed come off separately. Whatever Ford coated it with is REALLY thick! I'm sure you've probably already seen this where it has cracked and is flaking off. It also appeared there was no kind of physical prep for the coating. The metal underneath is pretty smooth.
I had thought about painting mine but was concerned about how well the paint would hold up with installing and removing the boot. I opted to have mine powder coated.
I had thought about painting mine but was concerned about how well the paint would hold up with installing and removing the boot. I opted to have mine powder coated.
So unbolt/unscrew the seatbelts and well-liner and it’s free?
That piece does indeed come off separately. Whatever Ford coated it with is REALLY thick! I'm sure you've probably already seen this where it has cracked and is flaking off. It also appeared there was no kind of physical prep for the coating. The metal underneath is pretty smooth.
I had thought about painting mine but was concerned about how well the paint would hold up with installing and removing the boot. I opted to have mine powder coated.
JKWilson61
Active Member
It's been a few months ago since I pulled mine apart. I don't recall if I had to take out the quarter trim panels and/or back seat first. I do know that I didn't have to take out the seat belts.
There are 7 screws across the bottom of the piece and 4 small one (2 on each side near the ends), located on the well liner side. The 4 screws on the ends just hold the guide for the seat belts. The 7 across the bottom are the main ones that hold it in. They also hold the front of the well liner up.
If you need me to I can snap a pic for you of my piece so you can see what it looks like when removed. It'd be in the evening because I haven't been on here during the daytime the past couple of days. I get up, have my coffee and head outside all day to get the final block sanding done so I can my car off to paint! I've posted some info on your dye thread that I just came across yesterday.
Last edited:
Thanks, mine came out just like you guys said, easy breezy. Think I will go the powder coating route. Kind of excited, that piece has been an eyesore for a while. Just assumed it was part of the seat frame, and the whole thing would have to come out. You can cover it up with the boot, but that boot ends up being more trouble than it’s worth I think,
It's been a few months ago since I pulled mine apart. I don't recall if I had to take out the quarter trim panels and/or back seat first. I do know that I didn't have to take out the seat belts.
There are 7 screws across the bottom of the piece and 4 small one (2 on each side near the ends), located on the well liner side. The 4 screws on the ends just hold the guide for the seat belts. The 7 across the bottom are the main ones that hold it in. They also hold the front of the well liner up.
If you need me to I can snap a pic for you of my piece so you can see what it looks like when removed. It'd be in the evening because I haven't been on here during the daytime the past couple of days. I get up, have my coffee and head outside all day to get the final block sanding done so I can my car off to paint! I've posted some info on your dye thread that I just came across yesterday.
Powder coated gloss black, reinstalled. Came out pretty good I think. Now I don’t have to put on the boot to cover up that hideousness. Thanks for steering me the right way, appreciated.
Attachments


- Mar 2, 2015
- 6,945
- 5,816
- 213
On my 89 I peeled that stuff off and sanded it one direction with 2000 grit then clear coated it. Looked great for what it was. Your choice to powder coat it was top notch. Rattle can paint doesn't like holding on to aluminum that well.
WadeInSavannah
Member
What is that part's name or part number? I'm in same boat and just curious how much a replacement would be (if available)? Otherwise I'll be painting / powder coating like y'all have done. Thanks.
What is that part's name or part number? I'm in same boat and just curious how much a replacement would be (if available)? Otherwise I'll be painting / powder coating like y'all have done. Thanks.
Have never seen that replacement part for sale as a stand alone. You'd most likely be looking at an old piece that still needed refinishing. Believe me, the piece is real easy to get off and back on. The only downside of getting it powder coated real pretty is that it gets a little scratched if/when you use the convertible top boot.
Thats cool mine looked the same. When I re did my top I took it off and painted it with black engine paint.Looks great now considering I have no luck with spraypaint. It separates on everything I try it on.
JKWilson61
Active Member
No idea of the Ford part name/number. Used would be your only option AFAIK and most likely also have a peeling finish (unless you got luck in finding one in really nice shape). I went the powder coating route on mine strictly for durability over a spray.What is that part's name or part number? I'm in same boat and just curious how much a replacement would be (if available)? Otherwise I'll be painting / powder coating like y'all have done. Thanks.
Just curious, SMC member?
WadeInSavannah
Member
No idea of the Ford part name/number. Used would be your only option AFAIK and most likely also have a peeling finish (unless you got luck in finding one in really nice shape). I went the powder coating route on mine strictly for durability over a spray.
Just curious, SMC member?
Yes. Active SMC member here. Thanks.
Similar threads
- Replies
- 2
- Views
- 587
Interior and Upholstery
Question on parts for convertible well liner attachment to rear seat
- Replies
- 11
- Views
- 1K
- Replies
- 3
- Views
- 532