Blue instrument panel lights PICS

danewers

Member
Dec 26, 2004
97
0
6
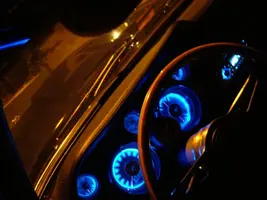
hey guys i just finished rewiring my instrument panel with BLUE LEDS! i originally got leds that fit the bayonette base bulbs in the instrument panel but they turned out to be way too dim, so i wired up 32 blue leds surrounding the two main gauges while the other 3 guages are still being lit by the bayonette bulbs. i'm very happy with how they came out so i thought i would share!

dscf00025me.webp


dscf00186bx.webp

the new dash lights match perfectly with the sony deck
 

Attachments

  • dscf00025me.webp
    dscf00025me.webp
    17.5 KB · Views: 152
  • dscf00186bx.webp
    dscf00186bx.webp
    38.2 KB · Views: 169
thats awsome i really like it...i want to do that with my underdash lights and in the trunk so when the door or the trunk are open its the blue kinda color rather than the dim normal lights/ no lights in the trunk
 
yeah i have the underdash neons hooked into the door light circuit. so when the doors open, the blue lights come on. anyone who gets a ride in my car at night loves it.
 
ahh i should have taken pictures before i put it all back together. they are the 3 volt led's so i have them wired in series of 4. surprisingly they actually work with the dimmer switch! but its nothing special underneath, i just glued the leds to the sides of the guage, all around it. the time consuming part was just wiring all the led's together, alot of soldering.:)
 
Lookin good!

This is actually the same sort of project that I did myself about 1.5 years ago.

LED's are nice cause they never burn out or loose their color. Mine still look as good today as they did the day I installed them.

I did do mine a little differently tho. I found that under the blue light, the orange guage needles didn't show up well at all. So I installed as many UV (blacklight) LED's as I did blue LED's. Then I painted my guage needles with a UV reactive paint. The needles now glow a bright yellow/orange color.
 
Looks good man!!! :) this is the route i went with, i just orderd a blue led coversion bulb for the tach and my other phantom gauges :)

The picture was takin when the old cloudy lenses were in and on a crappy picture phone, i cant in words describe how crisp and clear these are at night. you can get them for ALL years at www.mustangdepot.com I also recomend that spot for ANYONE mounting a tach who 1. dosent use the stock useless alt gauge, and 2. For those who dont want to drill holes or use a clamp for sopme reason, The tach bracket actually utilizes one of the stock dash board retaining screws from the bottem ;) And it looks good there, kind of "low profile" nd not IN YOUR FACE like on the A-pillar.....Plus i had to use the A-piller for the nitrous and furl pressure gauges :banana:


gauge.jpeg
 
70_Nitrous_Eater said:
Lookin good!

This is actually the same sort of project that I did myself about 1.5 years ago.

LED's are nice cause they never burn out or loose their color. Mine still look as good today as they did the day I installed them.

I did do mine a little differently tho. I found that under the blue light, the orange guage needles didn't show up well at all. So I installed as many UV (blacklight) LED's as I did blue LED's. Then I painted my guage needles with a UV reactive paint. The needles now glow a bright yellow/orange color.

Is this on a 70 and did you use the stock bulb holders and the printed circuit board? Just curious how you mounted the black light bulbs in there. If you have any pics, email them to me please :D [email protected]
 
jbuening said:
Is this on a 70 and did you use the stock bulb holders and the printed circuit board? Just curious how you mounted the black light bulbs in there. If you have any pics, email them to me please :D [email protected]


Yes, it's on the 70...sorry, no pictures.

Didn't use the stock bulb holders, I just took the bulbs out.

But I did use the rest of the circuit board/hardware.

I just soldered on a pair of wires to the bulb connectors and used those for my +12V LED power. I then wired the LED's in groups of 3. 3 LED's in series because they are only designed for 4V each.

I did the same as danewers in that I just epoxied the LED's into place. LED's are fairly focused, so I glued them so they were pretty much aimed right into the guage. Once you get the cluster apart, you'll see where they should be glued.

I agree with danewers.. it's pretty simple to do, only hard part is doing all the wiring and soldering (I also used shrink wrap).

I did find that the dimmer switch didn't work tho.... it's pretty much on/off. But my dimmer needs to be replaced anyway, so who knows..