Progress Thread Cobra II Resurrection

welder4956

20+ Year Stangneter :roc</strong><span class=
Nov 28, 2003
227
88
38
Birmingham, AL
Hello all. I've been a member here since 2003, but have not posted very often. We have a white/blue 1976 Cobra II that we bought in 1978 and are the second owner. The first owner was PHD Leasing in Los Angeles who had leased it to a magazine publisher for the first 2 years. My wife had always wanted a Charley's Angels Cobra II car and would never get rid of it. We drove it as a daily driver from 1978 thru the late 1990's and even pulled a 5 x 8 U-Haul trailer from San Diego, CA to Augusta, GA when I got out of the Navy in 1982. We finally parked it in the garage when the transmission started leaking and slipping pretty bad, and it has been there ever since.

I retired at the end of 2022, so my project has been to get the car back to a reliable driving car. Not looking to make it a show car, but just get it repainted and replace the worn driveline and suspension. Here's what it looked like when we finally parked it:

CBII 1.webp


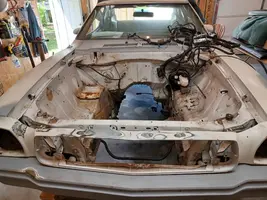
And here's where it is today:

20241122_142939.webp


I had to cut out the passenger floor pan and replace it due to leaks from the cowl area:
3a.webp


20230227_134551.webp


20230429_153606.webp


I'm working on cleaning up the engine compartment and front fender wells right now while the suspension is out. I had tried to replace the battery tray back in 1985 using a 110 volt AC stick welder and had wound up covering the mess with body filler so I could get it back on the road. So first up was removing the body filler and welding/patching up the gaps and holes.
20231023_160819.webp


20240317_153504.webp


20240317_153436.webp


I have a reman 1995 302 long block and Hughes rebuilt C-4 trans ready to go back in as soon as I finish cleaning up the engine compartment:
20240205_131836.webp


20240821_162703.webp
 

Attachments

  • 20230817_141732.webp
    20230817_141732.webp
    151.1 KB · Views: 68
Haven't got much done the last couple of weeks due to travel. I did get a few hours today, so I removed the motor mount brackets, sand blasted and primed them.
20250406_130848.webp


20250406_130859.webp


20250406_130907.webp


20250406_130918.webp


20250406_130931.webp


20250406_130938.webp


20250406_130945.webp


20250406_130954.webp


20250406_133801.webp


Then I removed the air conditioner vacuum canister in the passenger fenderwell and sandblasted it. It was looking good till I did the bottom side. I may just weld a new bottom on and use it anyway since it won't be seen. A new replacement is over $100.

20250406_135234.webp


20250406_135247.webp
 
  • Like
Reactions: LILCBRA
I made an attempt to repair my rotted out A/C vacuum canister, but I think it's too far gone. I cut and fitted a piece of 16 gauge sheet that I had available to replace the bottom, then removed the mounting bracket and the rusted out bottom:
20250407_112735.webp


Then I noticed holes in the top and around the bottom rim:
20250407_112808.webp


I was able to remove the check valve assembly on top in case I can find something to replace the rest of the canister, but there is a formed lip on the hole for an O-ring seal:
20250407_114103.webp


I searched around some more and found one that looks like it will work and should not corrode. I'm going to order one and give it a try.
2025-04-07 17_39_28-Amazon.com_ Dorman 47076 Vacuum Storage Canister Compatible with Select M...webp
 
  • Like
Reactions: LILCBRA
The can is 4-1/4" outside diameter x 3-1/2" tall. I suppose I could find something similar at the grocery, but it needs to fit the bracket and still needs the correct size hole drilled with a formed lip for the O-ring seal. The one I posted above has a mounting bracket that may work with the existing mounting holes.
 
Last edited:
  • Like
Reactions: 2Blue2
You could actually do without the lip and seal the one-way valve directly to the top of the can. No O-ring required.


Use the Black RTV that comes in the "Cheese Wiz" can (Ultra Black, I think it's called).
You could attach the bracket to the new can any 1 of a 100 different ways.

Even something like this that is similar in size to what you have:

 
  • Like
Reactions: welder4956
Well, I took a shot at welding up the holes in the rotten coffee can. Looking OK so far, but I still need to weld the new bottom in. I welded the holes with TIG brazing with the machine set on AC with the balance set to cleaning and using silicon bronze wire. I still melted thru in a few areas where it was corroded badly but was able to bridge the holes. After welding the top and sides I coated the inside with POR-15. I'll have to wait for it to dry before I can weld the bottom.

20250425_100524.webp


20250425_101051.webp


20250425_101101.webp


20250425_105232.webp
 
  • Like
Reactions: 2Blue2 and LILCBRA
Spent a couple of days repairing a cracked corner on the rear spoiler. It looks like it was repaired previously with bondo by the original owner early in its life. We bought the car in Feb. 1978, so the car was only 2 years old at that point. I removed all the bondo with a sanding pad on a die grinder, then stitched the corner back on with hot staples. I used a piece of wire mesh to reinforce the hole, covered the back side of the opening with masking tape, and patched it with epoxy filler,

20260320_113308.webp


20260320_113320.webp


20260327_114826.webp


20260318_154534.webp


20260327_120910.webp


20260328_123619.webp


20260328_131534.webp


20260328_141610.webp


20260328_141615.webp


Still have more sanding to do, but it's looking a whole lot better.
 
Spent a couple of days repairing a cracked corner on the rear spoiler. It looks like it was repaired previously with bondo by the original owner early in its life. We bought the car in Feb. 1978, so the car was only 2 years old at that point. I removed all the bondo with a sanding pad on a die grinder, then stitched the corner back on with hot staples. I used a piece of wire mesh to reinforce the hole, covered the back side of the opening with masking tape, and patched it with epoxy filler,

20260320_113308.webp


20260320_113320.webp


20260327_114826.webp


20260318_154534.webp


20260327_120910.webp


20260328_123619.webp


20260328_131534.webp


20260328_141610.webp


20260328_141615.webp


Still have more sanding to do, but it's looking a whole lot better. I also repaired one stud base that was broken and beefed up a couple that were starting to split. I no longer need this one.

If anyone is in need of a center section for a rear spoiler, send me a PM. I no longer need this one. It also has a broken stud repaired and a couple of others beefed up with epoxy.
 
Last edited:
  • Wow
Reactions: LILCBRA