Eleanor tail panel question

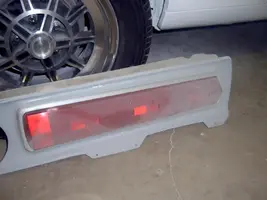
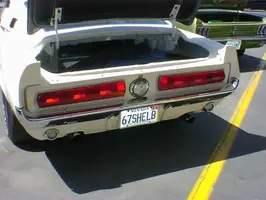
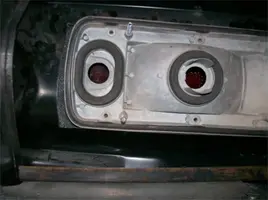
This is the taillight panel assembly. The trim rings have studs that go thru the Cougar buckets where the Cougar grilles mounted, sandwiching the 'glass panel in between the trim rings and the buckets. Then where the Cougar bucket assemblies mounted in the Cougar, you need to make some 1/4-20 studs out of all-thread that go through the boxes and hold the Shelby taillight assembly in the car. Once you get the nuts snug, the whole thing is very solid, but you still have to drill a few (6-8 or so in the whole panel) holes on the edges of the 'glass panel for small sheetmetal screws to hold the edges down. I'd also use seam sealer to help water-proof the whole thing. If you need better pics, or more pics or just advice, don't hesitate to ask!
Jim
 

Attachments

  • rear gls panel rsz.webp
    rear gls panel rsz.webp
    30.3 KB · Views: 145
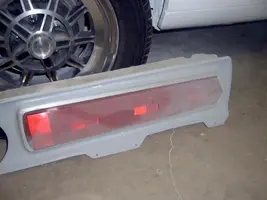
  • frnt gls panl rsz.webp
    frnt gls panl rsz.webp
    33.4 KB · Views: 148
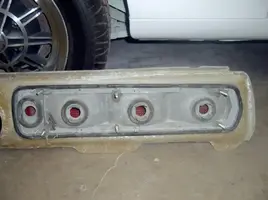
Nothing like posting two of the same pic! Here's a pic of the rear of the panel. The boxes are available from Branda, but I haven't been exactly over-joyed with their parts. They easily have the highest prices though! Anyway, I'll look up the user ID of the guy I bought mine from, he's always got stuff on ebay and I'm very happy with mine.
 

Attachments

  • tl panel back rsz.webp
    tl panel back rsz.webp
    31.6 KB · Views: 148
I just checked and unfortunately the guy I bought mine from hasn't sold anything on ebay for over a year. His user Id on ebay is tandjrwilliams if you want to try to email him, he was reproducing lots of Shelby brackets and such and his parts were both reasonable in price and high in quality.
 
Rear caps?

zookeeper said:
Nothing like posting two of the same pic! Here's a pic of the rear of the panel. The boxes are available from Branda, but I haven't been exactly over-joyed with their parts. They easily have the highest prices though! Anyway, I'll look up the user ID of the guy I bought mine from, he's always got stuff on ebay and I'm very happy with mine.

Zookeeper- do you have any close ups of the rear fiberglass panel attached to the car? Do the end caps still mount with studs or are they molded in? There would be about 1/2" gap between my panel and the end caps if they aren't molded. I did get boxes from Branda. Thanks. Mike
 
I can take pics of whatever you need, but I'm not sure what you want to see. Do you need pics of the taillight panel without the end caps bolted on? Anyway, the end caps bolt on with studs in the same holes your original parts came out of. All my rear 'glass came from Branda, but none of it fit very well. To mount the panel, you need to bolt on a flip-open gas cap, since that kind of dictates where the panel will go. To get mine to line up, I had to cut the upper lip off the taillight panel, then screw the lip to the car, then mount the panle where it needed to go, then glass it together. I also had to do a lot of grinding on the inside of the panel to get it closer to the body, so it didn't stick out farther than the caps. The caps need to line up with the bumper, and the trunk and will have a gap where they cover the end of the taillight panel. My end caps came from Branda and needed an insane amount of work just to get them on the car. I should have sent them back, but I didn't. They were nearly 1/2 too tall on top where they meet the quarter, the curve on the side was non-existent and they were '68 parts, not '67. Why? Because Tony D. Branda sells you what THEY want, not what you ask for. When my trunk and end caps got here, I noticed they were marked " '68 Shelby" on both the invoice and the part. When I called to ask why, the lady on the other end of the phone told me that since I was building a replica car, they sell the '68 parts and nobody would know the difference. BULLSTUFF!!! The '68 decklid is so short in the rear, you can easily see the mounting screws that hold the taillight panel on, and it's about 1/4" higher than the lower body line for the end caps. I fixed mine (with a ton of work) but still wonder why they weren't honest when I ordered their parts. Anyway, enough of my whining, let me know what pics you need and I'll get them to you ASAP.
Jim
 
Jim- the joys of crappy fiberglass suppliers. I'm doing it too. Glass sanding is the last thing I do before I quit for the day. Then I jump in a cold shower to get that crap off. You answered a couple of my questions. As I didn't want to glass the end caps onto the car permanently as some do. What I'm trying to see now is a close up of the gap between the tail panel and the end caps too see if mine is close. I'd also like to verify that the taillight lens slides through the glass panel. Got any pictures of that? Thanks- Mike
 
Mike, I agree wholeheartedly with not wanting to 'glass the end caps to the car. Not only does it look bad to me, but I have yet to see fiberglass bonded to steel last for long without cracking. Yes, I know there are wonderful hi-tech adhesives and body fillers have never been better, but I wouldn't do it. I'll get you the pics tomorrow of the size of my gap. I tried to make the gap about the same as the gap between the deck lid and the taillight panel and was more or less succesful. My endcaps and taillight panel aren't painted yet, but at least you'l be able to see what I have as far as fit. I was lucky enough to see and photo a real GT500 a few years ago and while it was a nice, low mileage, unrestored car. the fit around the taillight panel area was pretty bad, yet nobody else seemed to notice. I spent more than a few hours on mine and it's still nothing to write home about, but at least the gaps are even and tight and it "looks" like it should have to start with. As far as the taillight panel assembly, the lights (lenses and buckets) go through from the back and the only part on the outside of the panel is the trim rings, which hold the whole mess together.
Jim
 
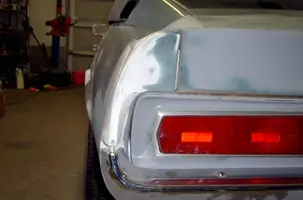
Good news, I found an older pic of my end cap as it fits on the car. It's tough to see, but if you look closely, you can see where I had to add fiberglass to the edge of the end cap to close up the huge gap between it and the taillight panel. Also, I measured my gap with a paint stirring stick all the way around the trunk lid and kinda "eyeballed" the end cap/taillight panel gap to make it look even. You may also notice that the gap between the bumper and the end cap is about twice as large as an original Mustang gap, but original '67 Shelbys have the huge gap as well, so I didn't sweat it. Hope this helps.
 

Attachments

  • end cap rsz.webp
    end cap rsz.webp
    27.8 KB · Views: 159
Don't feel bad zoo, it looks like the original ones had that gap too....

DSC00063.webp


Looks like we're victims of our own high standards. Higher than even the originals.
 

Attachments

  • DSC00063.webp
    DSC00063.webp
    30.5 KB · Views: 116
Jay, thanks for posting that pic! Now I know how many screws held the upper part of the taillight panel on! Believe it or not, I've looked through countless books and magazines and have never seen that view before. Usually when a pro photographer shoots a trunk, he gets so close all you can really see is the inside of the trunk area. I also bought the Shelby assembly manual from Branda, but it didn't specify the screws. Now for the next question: are they sheetmetal screws or pop rivets or what?
 
I'm not completely sure. I've seen both screws and rivets so I don't know for sure what belongs there.

I would think rivets would look better but screws would be more forgiving over time. ex. I've seen busted up tailpanels that used rivets. I would bond it on anyway so this is more for aesthetics.
 
Bring this old one alive

Hello again friends!

So I'm preassembling my 67 Shelby tail stuff and it's not making sense to me.

It appears that:

1-the lens tightens to the gasket and then light housing,
2- That the panel is cut large enough that the housing will fit through the hole,
3-the ring tightens against the fiberglass panel from bracketsthe outside, and,
4- the brackets hold the housings on the inside.

Please confirm if you know as I need to cut my holes a bit larger for the housings to fit through. You can see what I mean in the picture I attached.


THANKS!
 

Attachments

  • 101_0532sm.webp
    101_0532sm.webp
    27.5 KB · Views: 135
Hi Mike, unless I'm not seeing them (highly likely) I don't see the Shelby taillight boxes.You need them so the 'glass panel isn't supporting all the weight of those taillights. A any rate, you prety much have the assembly right, it just takes a bit of fussing with it to get all the peices right. Here's what I did: first, set the boxes in place. Mine went together wih the top lip inside the original taillight panel, and the lower one outside the taillight panel. Next loosely assemble the taillights the way you described (lights inside the panel, trim rings outside) so the you can wiggle the lights slightly to get them inside the boxes. Then you need to make some studs to mount the lights to the boxes (I used 1/4" all thread, cut to fit). Once you get the whole assembly in there, it should be solid as a rock, even without screwing the 'glass Shelby panel in place. If you need pics, I think I have some of my car when I put it together, I know it's no picnic to get all that crap in place and fittng correctly!
 
Thanks Zookeeper- I do have the boxes. I probably should have put them in the picture.

So it appears I just didn't cut my hole big enough for the lens to match up to housing.

I'd rather have cut too little than cut too much I guess. Mr Plasma will fix that in about a minute.

I'm getting close! I am putting this car completely together before I have it painted. I trashed my 72 assembling it because I'd never had it assembled...
 
I know what you mean about getting the boxes too tight. I thought I had mine fitting perfectly, but when I went to assemblethe whole thing, it was just too tight. Ever see a "real" Shelby? Last year a freind who works for a local shop was doing a complete restoration on a real '67 GT500 and he was havng trouble with the tailights, so he called to ask if I could help. I swear, it looked like they cut the stock panel out with a chainsaw! They likely used a jigsaw or sawzall, but the cut looked horrible! It was very wavy and bent in both directions, like the saw got hung up a time or two. Not only that, but the fit of the original Shelby fiberglass was very bad, maybe my repro fiberglass was alot closer to original than I thought! The car was paited but only half-assembeled when I saw it and I went home feeling like the bodyman of the year.I mean, here was a high-end, pro shop and my clone's bodywork was much, much better than they let go on a high-dollar Shelby.