Fuel Quantity gauge troubleshooting 87-93 Mustangs
The red/yellow wire (power supply to gauge & sender) should have 12 volts when the ignition is in the start or Run position.
Troubleshooting the gauge and sender circuit:
Since the sender uses a variable resistor, sum the resistor values of 22 Ohms (empty value) & 145 Ohms (full value). That gets you 167, which you divide by 2: that gets you 83.5. So in theory, 83.5 ohms is 1/2 full. A trip to Radio Shack for the closest combination of resistors to make 83.5 ohms gets you one 68 Ohm (Catalog #: 271-1106) + one 15 Ohm (Catalog #: 271-1102) for a total of 83 Ohms at the cost of $2 plus tax. Wire the resistors in series to make a resistor pack and cover it with heat shrink tubing or electrical tape. The 83 Ohms is close enough to the 83.5 Ohm figure that it shouldn't matter. Disconnect the electrical connector shown in your for the tank sender unit. Connect one end of the resistor pack to the yellow/white wire on the body side fuel sender electrical connector and the other end of the resistor pack to ground. Make sure nothing is touching that isn't supposed to and turn the ignition switch to Run. If I am correct, the fuel gauge will read 1/2 full, or very close to it. If it does not, then the odds are that the gauge or anti-slosh unit are bad.
How and why the test works…
Most of the fuel gauge failures give a stuck on full or stuck on empty as a problem symptom. Using a resistor combination that mimics 1/2 tank allows you to decide if the gauge and anti-slosh module are the problem source.
If the gauge reads about 1/2 tank with the resistor combination, that points to the sender as being the culprit.
If the gauge reads full or empty with the resistor pack in place of the sender, then the gauge or anti-slosh module is at fault.
Fuel gauge sender testing and replacement
The next steps require dropping the fuel tank and removal of the fuel level sender. Here are some useful tips...
I have done the tank removal three times, and the main issues are getting the car up on jack stands and getting the gas out of the tank. DO NOT try to do this job without jack stands. Becoming a pancake is not part of the repair process.
Pumping out the old gas:
If the old pump still works, you can use it to pump the tank out.
1.) Separate the pressure line (the one with the Schrader valve on it) using the fuel line tools.
Look in the A/C repair section for the fuel line tools. They look like little plastic top hats. You will need the 1/2" & 5/8" ones. The hat shaped section goes on facing the large part of the coupling. Then you press hard on the brim until it forces the sleeve into the coupling and releases the spring. You may need someone to pull on the line while you press on the coupling.
Use a piece of garden hose to run from the pressure line to your bucket or gas can. Make sure it is as leak proof as you can make it. Fire and explosion are not part of the repair process...
2.) Jumper the fuel pump test point to ground.
Turn the ignition switch to the Run position. the fuel pump will pump the tank almost dry unless the battery runs down first.
Some 5 gallon paint pails lined with garbage bags are good to hold the gas. The garbage bags provide a clean liner for the pails and keep the loose trash out of the gas so you can reuse it. If you decide to use a siphon, a piece of 1/2" garden hose stuck down the filler neck will siphon all but a gallon or so of the gas.
Remove the filler neck bolts and put them in a zip bag. Disconnect the supply & return lines by removing the plastic clips from the metal tubing. If you damage the clips, you can get new ones form the auto part store for just a few dollars. I have used tie-wraps, but that is not the best choice. Then you remove the two 9/16" nuts that hold the T bolts to the straps. Put the nuts in the zip bag with the filler bolts. Pull the plastic shield down and away from the tank. Once the tank drops a little bit you can disconnect the wiring for the pump & fuel quantity sender.
The fuel gauge sender assembly comes out by removing a large metal ring that unscrews from the tank. There is a separate mounting/access plate for the fuel pump and fuel gage. You are supposed to use a brass punch to tap on the ring so that you don't make sparks. Look closely at the rubber O ring gasket when you remove the fuel gauge sender.
When you install the metal ring that holds the sender in place, watch out for the gasket O ring. Some RTV may be helpful if the ring is not in excellent condition.
The tank to filler pipe seal is a large rubber grommet. Inspect it for hardening, tears and damage. At $20 from the Ford dealer, it might be a good idea to replace it.
I used a floor jack to help lift the tank back in place. You may find that it is the only time you really can make good use of a helper.
All resistance measurements should be made with the power off.
Note from bstrd86 - 86 and older fuel tank sender units are 73 ohms empty, 8-12 ohms full.
The yellow/white wire will show a voltage that varies with the movement of the float on the sender unit. To test the sender, set your Ohmmeter or DVM on low Ohms. Then disconnect the sender and connect the Ohmmeter or DVM to the yellow/white and black wires from the sender unit. Move the float arm while watching the Ohmmeter or DVM. You should see the reading change from 22 to 145 ohms +/- 10%.
If the Ohmmeter or DVM resistance readings are way off, replace the tank sender unit.
Use extreme caution if you do the next step. Fumes from the gas tank can easily ignite and cause a fire or explosion.
With the sender unit out of the tank and connected to the body wiring harness, turn the ignition switch to the Run position. Move the float arm and the fuel gauge indicator should move. If you are very careful, you can use a pair of safety pins inserted in the connector for the yellow/white and black wires to measure the voltage as you move the float arm. The voltage will change, but I have no specs for what it should be.
Do not short the safety pins together or to ground. If you do, you may damage the anti-slosh module or crate a spark. A spark with the fuel tank open could cause a fire or an explosion.
If the voltage does not change and the tanks sender passed the resistance tests, the anti-slosh module or gauge is bad.
Anti-Slosh module pictures courtesy of Saleen0679
Fuel pressure OK, the injectors are not firing, OR one or more injectors stuck
open
Do a cylinder balance test: Warm the car's engine up to normal operating
temperature. With the Engine Off, Key OFF, use a jumper wire or paper clip to
put the computer into test mode. Start the engine and let it go through the
normal diagnostic tests, then quickly press the throttle to the floor. The
engine RPM should exceed 2500 RPM's for a brief second. The engine will shut
off power to each injector, one at a time. When it has sequenced through all
8 injectors, it will flash 99 or the number of the failing cylinder such as 22 for
cylinder #2. Quickly pressing the throttle again up to 2500 RPM’s will cause
the test to re-run with smaller qualifying figures. Do it a third time, and if the
same cylinder shows up, the cylinder is weak and isn’t putting out power like
it should. See the Chilton’s Shop manual for the complete test procedure
The red wire on each injector is powered up whenever the ignition switch is
in the Run position. The computer provides a ground to complete the circuit
and fire the injector. The injector
must have a ground to squirt fuel on
command. A short to ground in the injector return wiring can cause one or
more injectors to be continually open or triggered
A.) A Noid light available from Autozone, is one way to test
the injector wiring. If the light stays on constantly, either the wiring has a
short to ground or the computer has failed
B.) I like to use an old injector with compressed air applied to the
injector where the fuel rail would normally connect. I hook the whole thing
up, apply compressed air to the injector and stick it in a paper cup of soapy
water. When the engine cranks with the ignition switch on, if the injector
fires, it makes bubbles An injector stuck open will release a continual stream
of bubbles. Cheap if you have the stuff laying around, and works good too.
The same trick works great to find leaking injectors too.
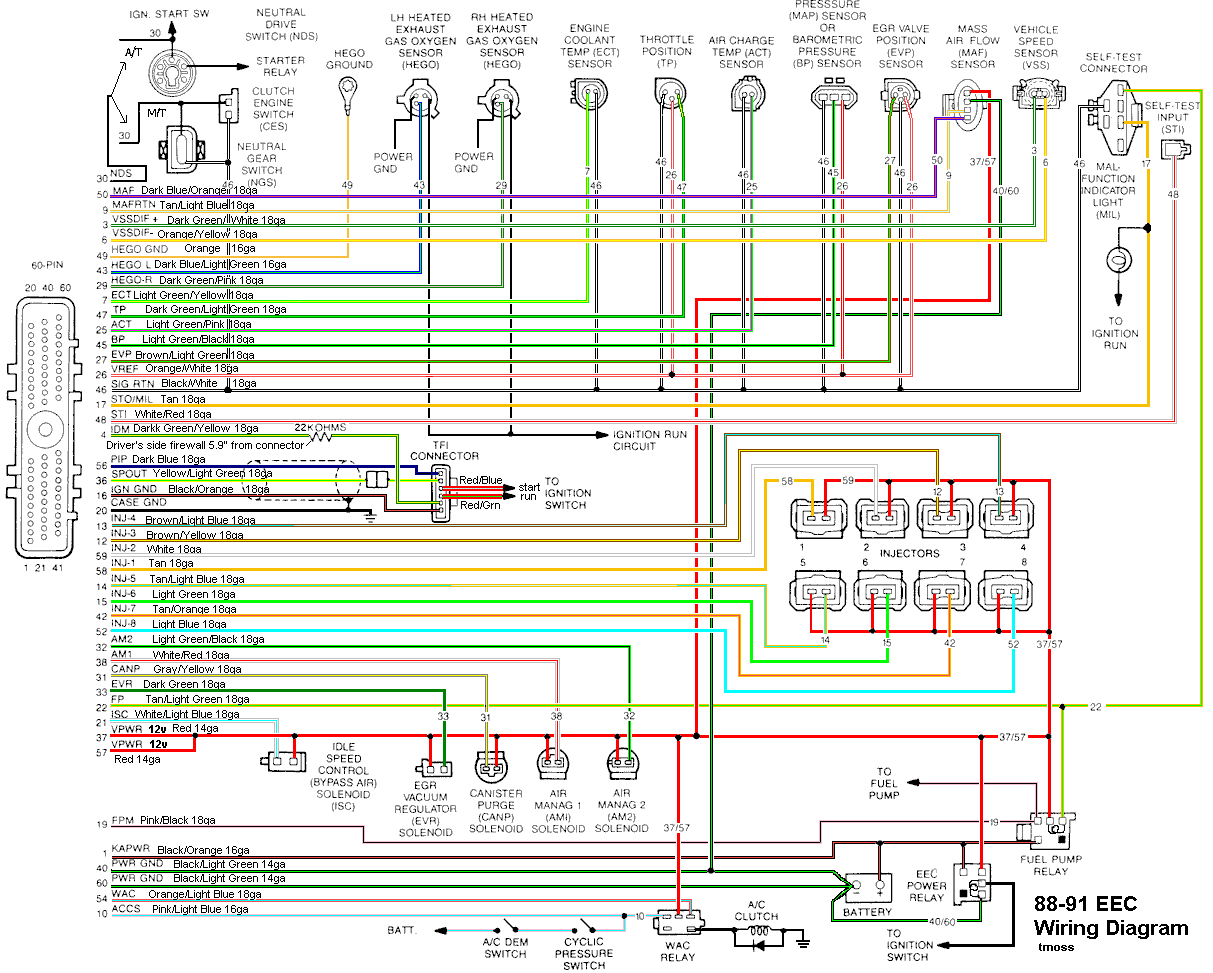
The wiring for the injectors may have some bare spots in it causing the
injector to computer control wire to ground out. This would cause the
injector to remain on anytime the key was in the Run position. Remove the
injector wiring connectors from the injector. Note that each injector has one
red wire for power and a non red wire (wire some color other than red) for
computer controlled ground. With the key off, disconnect the computer
connector from the computer. Use an Ohmmeter between the non red wire
and ground. You should see more than 100000 (100K) ohms resistance.
See the following website for some help from Tmoss (diagram designer) &
Stang&2Birds (website host) for help wiring
Mustang FAQ - Wiring & Engine Info
Diagram courtesy of Tmoss & Stang&2birds
Using the above diagram, check the resistance between the injector and the
computer. Clean and check the 10 pin connectors since they are a potential
trouble source. Any resistance greater than 1.5 ohm between the injector to
computer wire and the matching pin on the computer connector is a problem.
See
Ford Fuel Injection » Wiring Harnesses for more help
See
Troublcodes.net Trouble Codes OBD & OBD2 Trouble Codes and Technical info & Tool Store. By BAT Auto Technical
If your car is an 86-88 stang, you'll have to use the test lamp or voltmeter method. There is no functional check engine light on the 86-88's except possibly the Cali Mass Air cars.
The STI has a gray connector shell and a white/red wire. It comes from the same bundle of wires as the self test connector.
89 through 95 cars have a working Check Engine light. Watch it instead of using a test lamp.
The STI has a gray connector shell and a white/red wire. It comes from the same bundle of wires as the self test connector.
WARNING!!! There is a single dark brown connector with a black/orange wire. It is the 12 volt power to the under the hood light. Do not jumper it to the computer test connector. If you do, you will damage the computer.
What to expect:
You should get a code 11 (two single flashes in succession). This says that the computer's internal workings are OK, and that the wiring to put the computer into diagnostic mode is good. No code 11 and you have some wiring problems.