Troubleshooting the stock electric oil pressure gauge for 87-93 Mustangs
You will need a good Multimeter or DVM and know how to use it. Teaching you how to use it is beyond the scope of this test path.
Turn the ignition switch to Run and then remove the single wire from the oil pressure sender and jumper it to ground. If the gauge goes to full pressure, the gauge and the wiring for the sender are ok. That means that the oil pressure sender is bad.
If it goes partway or doesn't move at all, the wiring that connects the gauge to the sender or the gauge itself is bad.
Remove the instrument cluster (beware of the 1 sneaky hidden bolt on the lower RH side of the cluster). Then check the wiring.
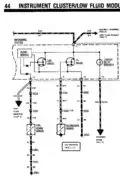
See
http://www.stangnet.com/tech/cluster87-93.pdf for information on the cluster connections and wiring differences between model years. The clusters are interchangeable, but you have to do some trimming & move some wires.
You will need the Adobe Acrobat viewer which is also a free download –
http://get.adobe.com/reader/
If the fuel gauge works OK, then the gauge 12 volt and power are good. That leaves only the actual gauge and the wiring between the gauge and the sender as possible trouble sources.
All the tests from this point on are done the with ignition switch in the OFF position.
Check the instrument cluster wiring and clean the contacts. Use the correct diagram from the above source to locate the oil pressure sender wire; it will be white wire with a red stripe.
With the instrument cluster removed and the oil pressure sender disconnected, ground one test of the Multimeter or DVM to the car body. Put the other test lead on the white/red wire and set the meter to low Ohms scale (this maybe the 200 Ohms scale).
You should see an infinite or open circuit indication on the Multimeter or DVM.
Next ground the oil pressure sender wire down by the oil pressure sender to clean bare metal. Then using the same test setup as above, run the test again. You should see a maximum of 1.5 Ohms. More than that indicates a bad connection or a broken wire.
If you get 1.5 Ohms or less on the above test, the only thing left is the oil pressure gauge itself.
Mechanical oil pressure gauge installation.
1.) Remove old pressure sender. It is located down by the oil filter and has 1 wire on a push on screw connector.
2.) Install ¼” pipe tee fitting with a short ¼” nipple on the place where you removed the oil pressure sender.
3.) Install the original oil pressure sender back in one of the tee ports.
4.) Install the gauge line restrictor in the remaining port of the tee.
5.) Connect the flex tubing or hydraulic hose to the gauge restrictor. Be sure to route the tubing or hose away from the exhaust manifolds. Be sure to either use hydraulic hose or oil and heat resistant flex tubing for the pressure line. Do not use copper tubing for the connection to the gauge restrictor or engine. Over a period of time, the vibration will work harden the tubing and cause it to crack and fail.
6.) If the gauge is going to mount under the hood, connect it to the end of the hose or flex tubing. Use some Tie-wraps to secure the gauge and its plumbing to the wiring harness on the driver’s side inner fender.
7.) If the gauge is going to mount in the passenger compartment you get to find a place to run the tubing through the firewall. I suggest that you pick your spot from the inside since that is the area with the most difficult access. Do not run the tubing through the exact same hole as the steering shaft. It will tangle up with the steering shaft and cause major problems.
8.) Install the gauge inside the car in the location of your choosing. Connect the pressure line to the gauge and secure it out of the way of moving parts with Tie-wraps.
9.) Be sure to ground the gauge lighting wire to clean, shiny bare metal. Connect the other wire from the gauge lighting to a light blue/red wire on the radio wiring harness. There are 2 connectors in the radio wiring harness, but only one of them has the light blue/red wire you need for gauge illumination. Solder the gauge lighting wire to the light blue/red wire on the radio harness and cover the soldered joint with heat shrink.
How to solder like a pro -
View: http://youtu.be/uaYdCRjDr4A
a must view for any automotive wiring job.
Be sure to use a gauge restrictor fitting in the pressure line going to the gauge. The restrictor will prevent all of the engine's oil supply from ending up on the pavement before you can stop it if the gauge line fails. I had a gauge line rupture, and the restrictor fitting saved my engine from serious damage.