
You are using an out of date browser. It may not display this or other websites correctly.
You should upgrade or use an alternative browser.
You should upgrade or use an alternative browser.
Hot stuff...
- Thread starter cappy
- Start date
Okay....this is really getting ridiculous...I hope someone finds this thread entertaining at least.
A shop had the car for a while. The ETC? and ACT sensors were changed along w/ the balancer which was wobbling a bit. They thought he car was now fine, idled for and hour at the shop. Took it home and it stalled half way there.
Managed to get it home and the next time I went to start it cranked but didn't start. Put in a new IAC and Ignition switch, just for the freaking heck of it. No start. There is 12v at the coil input, and a test light blinks as it cranks, but no spark. I can't believe the coil is bad...again. Nor can I believe the tfi or dizzy is bad....again. So here's the question...which I've seen in other posts but the answers were not so clear.....
If there is 12v at the coil input, and it is pulsed...does that definitely mean the coil is dead or can it be something else?...besides the dizzy/tfi? Because, I think I went through this already... post 36.
A shop had the car for a while. The ETC? and ACT sensors were changed along w/ the balancer which was wobbling a bit. They thought he car was now fine, idled for and hour at the shop. Took it home and it stalled half way there.
Managed to get it home and the next time I went to start it cranked but didn't start. Put in a new IAC and Ignition switch, just for the freaking heck of it. No start. There is 12v at the coil input, and a test light blinks as it cranks, but no spark. I can't believe the coil is bad...again. Nor can I believe the tfi or dizzy is bad....again. So here's the question...which I've seen in other posts but the answers were not so clear.....
If there is 12v at the coil input, and it is pulsed...does that definitely mean the coil is dead or can it be something else?...besides the dizzy/tfi? Because, I think I went through this already... post 36.

Cranks OK, but No Start Checklist for Fuel Injected Mustangs
A word about this checklist before you start: it is arranged in a specific order to put the most likely failure items first. That will save you time, energy and money. Start at the top of the list and work your way down. Jumping around will possibly cause you to miss just what you need to see to find and fix the problem. Don’t skip any steps because the next step depends on the last step working correctly.
Revised 12-Dec-2011 to replace 10 pin salt & pepper connector graphic.
All text applies to all models unless stated otherwise.
Note: 94-95 specific changes are in red
1.) Remove push on connector (small red/blue wire) from starter solenoid and turn ignition switch to the Run position. Place car in neutral or Park and set the parking brake. Remove the coil wire from distributor & and hold it 3/8” away from the engine block. Jumper the screw to the big bolt on the starter solenoid that has the battery wire connected to it. You should get a nice fat blue spark.
Most of the items are electrical in nature, so a test light, or even better, a voltmeter, is helpful to be sure they have power to them.
No spark, possible failed items in order of their probability:
A.) MSD or Crane ignition box if so equipped
B.) PIP sensor in distributor. The PIP sensor supplies the timing pulse to trigger the TFI and injectors. A failing PIP sensor will sometimes let the engine start if the SPOUT is removed. See paragraph 5A – Using a noid light will tell if the PIP is working by flashing when the engine is cranking.
C.) TFI module: use a test light to check the TFI module. Place one lead of the test light on the red/green wire on the ignition coil connector and the other lead on the dark green/yellow wire on the ignition coil connector. If the TFI is working properly, the test light will flash when the engine is cranked using the ignition switch.
D.) Coil
E.) No EEC or computer power - EEC or computer relay failure
86-93 models only: EEC relay next to computer - look for 12 volts at the fuel injector red wires.
94-95 models only: EEC or PCM power relay in the constant control relay module. Look for 12 volts at the fuel injector red wires.
Both 86-93 and 94-95 models: No 12 volts with the ignition switch in the run position on the fuel injector red wires. The relay has failed or there is no power coming from the ignition switch. Make sure that there is 12 volts on the red/green wire on the coil before replacing the relay.
F.) No EEC or computer power - fuse or fuse link failure
86-93 models only: Fuse links in wiring harness - look for 12 volts at the fuel injector red wires. All the fuse links live in a bundle up near the starter solenoid. Look for a 20 gauge blue fuse link connected to 2 black/orange 14 gauge wires.
94-95 models only: 20 amp EEC fuse in the engine compartment fuse box. Look for 12 volts at the fuel injector red wires.
G.) Ignition switch - look for 12 volts at the ignition coil red/lt green wire. No 12 volts, blown fuse link or faulty ignition switch. Remove the plastic from around the ignition switch and look for 12 volts on the red/green wire on the ignition switch with it in the Run position. No 12 volts and the ignition switch is faulty. If 12 volts is present in the Run position at the ignition switch but not at the coil, then the fuse or fuse link is blown.
Note: fuses or fuse links blow for a reason. Don’t replace either a fuse or fuse link with one with a larger rating than stock. Doing so invites an electrical fire.
Ignition fuse links may be replaced with an inline fuse holder and 5 amp fuse for troubleshooting purposes.
94-95 models only: Check inside fuse panel for fuse #18 blown – 20 amp fuse
H.) Missing or loose computer power ground. The computer has its own dedicated power ground that comes off the ground pigtail on the battery ground wire. Due to it's proximity to the battery, it may become corroded by acid fumes from the battery.
In 86-90 model cars, it is a black cylinder about 2 1/2" long by 1" diameter with a black/lt green wire.
In 91-95 model cars it is a black cylinder about 2 1/2" long by 1" diameter with a black/white wire.
You'll find it up next to the starter solenoid where the wire goes into the wiring harness
I.) Computer. Don’t replace the computer just because you don’t understand how it works. Computers seldom fail, it usually is a sensor or wiring problem that causes the problems.
J.) Bad or missing secondary power ground. It is located between the back of the intake manifold and the driver's side firewall. It supplies ground for the alternator, A/C compressor clutch and other electrical accessories such as the gauges.
K.) Engine fires briefly, but dies immediately when the key is released to the Run position. Crank the engine & when it fires off, pull the small push on connector (red/blue wire) off the starter relay (Looks like it is stuck on a screw). Hold the switch in the crank position: if it continues to run there is a problem with either the ignition switch or TFI module. Check for 12 volts at the red/green wire on the coil with the switch in the Run position. Good 12 volts, then replace the TFI. No 12 volts, replace the ignition switch.
Wiring Diagrams:
See the following website for some help from Tmoss (diagram designer) & Stang&2Birds (website host) for help on 88-95 wiring Mustang FAQ - Engine Information Everyone should bookmark this site.
Ignition switch wiring
http://www.veryuseful.com/mustang/tech/engine/images/IgnitionSwitchWiring.gif
Fuel, alternator, A/C and ignition wiring
http://www.veryuseful.com/mustang/tech/engine/images/fuel-alt-links-ign-ac.gif
Complete computer, actuator & sensor wiring diagram for 88-91 Mass Air Mustangs
http://www.veryuseful.com/mustang/tech/engine/images/88-91_5.0_EEC_Wiring_Diagram.gif
Complete computer, actuator & sensor wiring diagram for 91-93 Mass Air Mustangs
http://www.veryuseful.com/mustang/tech/engine/images/91-93_5.0_EEC_Wiring_Diagram.gif
Complete computer, actuator & sensor wiring diagram for 94-95 Mass Air Mustangs
http://www.veryuseful.com/mustang/tech/engine/images/94-95_5.0_EEC_Wiring_Diagram.gif
AutoZone wiring diagrams: You can navigate to the diagrams yourself via Repair Info | AutoZone.com and select the car year, make, model and engine. That will enable you to bring up the wiring diagram for your particular car.
2.) Spark at coil wire, pull #1 plug wire off at the spark plug and check to see spark. No spark, possible failed items in order of their probability: [/b]
A.) Moisture inside distributor – remove cap, dry off & spray with WD40
B.) Distributor cap
C.) Rotor
D.) Spark Plug wires
E.) Coil weak or intermittent - you should see 3/8" fat blue spark with a good coil
3.) Spark at spark plug, but no start.
Next, get a can of starting fluid (ether) from your local auto parts store: costs a $1.30 or so. Then pull the air duct off at the throttle body elbow, open the throttle, and spray the ether in it. Reconnect the air duct and try to start the car. Do not try to start the car without reconnecting the air duct.
Two reasons:
1.) If it backfires, the chance for a serious fire is increased.
2.) On Mass Air cars, the computer needs to measure the MAF flow once the engine starts.
If it starts then, you have a fuel management issue. Continue the checklist with emphasis of fuel related items that follow. If it doesn’t, then it is a computer or timing issue: see Step 4.
Clue – listen for the fuel pump to prime when you first turn the ignition switch on. It should run for 2-4 seconds and shut off. To trick the fuel pump into running, find the EEC test connector and jump the connector in the Upper RH corner to ground. The EEC connector is near the wiper motor and LH hood hinge.

If the relay & inertia switch are OK, you will have power to the pump. Check fuel pressure – remove the cap from the Schrader valve behind the alternator and depress the core. Fuel should squirt out, catch it in a rag. Beware of fire hazard when you do this. In a pinch, you can use a tire pressure gauge to measure the fuel pressure. It may not be completely accurate, but you will have some clue as to how much pressure you have. If you have any doubts about having sufficient fuel flow/pressure, rent a fuel pressure test gauge from the auto parts store. That will tell you for sure if you have adequate fuel pressure.
4.) No fuel pressure, possible failed items in order of their probability:
A.) Tripped inertia switch – Coupe & hatch cars hide it under the plastic trim covering the driver's side taillight. Use the voltmeter or test light to make sure you have power to both sides of the switch
B.) Fuel pump power relay – located under the driver’s seat in most stangs built before 92. On 92 and later model cars it is located below the Mass Air Flow meter. Look for 12 volts at the Pink/Black wire on the fuel pump relay.
C.) Clogged fuel filter
D.) Failed fuel pump
E.) 86-90 models only: Blown fuse link in wiring harness. Look for 12 volts at the Orange/Lt Blue wire on the fuel pump relay.
91-93 models only Blown fuse link in wiring harness. Look for 12 volts at the Pink/Black wire on the fuel pump relay.
The fuse links for all model years 86-93 live in the wiring harness near the starter solenoid.
94-95 models only: 20 amp fuel pump fuse in the engine compartment fuse box. Look for 12 volts at the Dark green/yellow wire on the constant control relay module.
F.) Engine seem to load up on fuel and may have black smoke at the tailpipe. Fuel pressure regulator failed. Remove the vacuum line from the regulator and inspect for fuel escaping while the pump is running. If fuel is coming out the vacuum port, the regulator has failed. Check the regulator vacuum line for fuel too. Disconnect it from the engine and blow air though it. If you find gas, the regulator has failed.
5.) Fuel pressure OK, the injectors are not firing.
A.) The PIP sensor in the distributor tells the computer when to fire the injectors. A failing PIP sensor will sometimes let the engine start if the SPOUT is removed.
A noid light available from any auto parts store, is one way to test the injector circuit to see if the injectors are firing. The noid light plugs into the fuel injector harness in place of any easily accessible injector. Plug it in and try to start the engine: it will flash if the injector is firing.
I like to use an old injector with compressed air applied to the injector where the fuel rail would normally connect. I hook the whole thing up, apply compressed air to the injector and stick it in a paper cup of soapy water. When the engine cranks with the ignition switch on, if the injector fires, it makes bubbles. Cheap if you have the stuff laying around, and works good too.
B.) Pull an injector wire connector off and look for 12 volts on the red wire when the ignition switch is on.
C.) No power, then look for problems with the 10 pin connecter (salt & pepper shakers at the rear of the upper manifold).
See the graphic for the 10 pin connector circuit layout.

The injector power pin is the VPWR pin in the black 10 pin connector.
D.) No power and the 10 pin connections are good: look for broken wiring between the orange/black wire on the EEC relay and the red wire for the 10 pin connectors.
E.) TPS voltage exceeds 3.7 volts with the throttle closed. This will shut off the injectors, since the computer uses this strategy to clear a flooded engine. Use a DVM, a pair of safety pins, and probe the black/white and green wires to measure the TPS voltage.
On a 94-95 Mustang, probe the black/white and grey/white wires to measure the TPS voltage.
It should be .5-.1.0 volts with the key on, engine not running. Note that if the black/white wire (signal ground) has a bad connection, you will get some strange readings. Make a second measurement using the battery post as the ground to eliminate any ground problems. If the readings are different by more than 5%, you may have a high resistance condition in the black/white signal ground circuit.
6.) Spark & fuel pressure OK.
A.) Failed IAB or improperly set base idle (no airflow to start engine). Press the throttle ¼ way down and try to start the car. See the "Surging Idle Checklist for help with all your idle/stall problems.
B.) Failed computer (not very likely)
C.) Engine ignition or cam timing off: only likely if the engine has been worked on recently. If you removed the distributor, there is a good probability that you installed it 180 degrees out of time.
D.) Firing order off: HO & 351 use a different firing order from the non HO engines.
HO & 351W 1-3-7-2-6-5-4-8
Non HO 1-5-4-2-6-3-7-8
E.) No start when hot - Press the throttle to the floor & try starting it if you get this far. If it starts, replace the ECT.
F. ) Engine that has had the heads off or valves adjusted. Do a compression test to make sure the valves are not adjusted too tight. You should have a minimum of 90 PSI on a cold engine.
A word about this checklist before you start: it is arranged in a specific order to put the most likely failure items first. That will save you time, energy and money. Start at the top of the list and work your way down. Jumping around will possibly cause you to miss just what you need to see to find and fix the problem. Don’t skip any steps because the next step depends on the last step working correctly.
Revised 12-Dec-2011 to replace 10 pin salt & pepper connector graphic.
All text applies to all models unless stated otherwise.
Note: 94-95 specific changes are in red
1.) Remove push on connector (small red/blue wire) from starter solenoid and turn ignition switch to the Run position. Place car in neutral or Park and set the parking brake. Remove the coil wire from distributor & and hold it 3/8” away from the engine block. Jumper the screw to the big bolt on the starter solenoid that has the battery wire connected to it. You should get a nice fat blue spark.
Most of the items are electrical in nature, so a test light, or even better, a voltmeter, is helpful to be sure they have power to them.
No spark, possible failed items in order of their probability:
A.) MSD or Crane ignition box if so equipped
B.) PIP sensor in distributor. The PIP sensor supplies the timing pulse to trigger the TFI and injectors. A failing PIP sensor will sometimes let the engine start if the SPOUT is removed. See paragraph 5A – Using a noid light will tell if the PIP is working by flashing when the engine is cranking.
C.) TFI module: use a test light to check the TFI module. Place one lead of the test light on the red/green wire on the ignition coil connector and the other lead on the dark green/yellow wire on the ignition coil connector. If the TFI is working properly, the test light will flash when the engine is cranked using the ignition switch.
D.) Coil
E.) No EEC or computer power - EEC or computer relay failure
86-93 models only: EEC relay next to computer - look for 12 volts at the fuel injector red wires.
94-95 models only: EEC or PCM power relay in the constant control relay module. Look for 12 volts at the fuel injector red wires.
Both 86-93 and 94-95 models: No 12 volts with the ignition switch in the run position on the fuel injector red wires. The relay has failed or there is no power coming from the ignition switch. Make sure that there is 12 volts on the red/green wire on the coil before replacing the relay.
F.) No EEC or computer power - fuse or fuse link failure
86-93 models only: Fuse links in wiring harness - look for 12 volts at the fuel injector red wires. All the fuse links live in a bundle up near the starter solenoid. Look for a 20 gauge blue fuse link connected to 2 black/orange 14 gauge wires.
94-95 models only: 20 amp EEC fuse in the engine compartment fuse box. Look for 12 volts at the fuel injector red wires.
G.) Ignition switch - look for 12 volts at the ignition coil red/lt green wire. No 12 volts, blown fuse link or faulty ignition switch. Remove the plastic from around the ignition switch and look for 12 volts on the red/green wire on the ignition switch with it in the Run position. No 12 volts and the ignition switch is faulty. If 12 volts is present in the Run position at the ignition switch but not at the coil, then the fuse or fuse link is blown.
Note: fuses or fuse links blow for a reason. Don’t replace either a fuse or fuse link with one with a larger rating than stock. Doing so invites an electrical fire.
Ignition fuse links may be replaced with an inline fuse holder and 5 amp fuse for troubleshooting purposes.
94-95 models only: Check inside fuse panel for fuse #18 blown – 20 amp fuse
H.) Missing or loose computer power ground. The computer has its own dedicated power ground that comes off the ground pigtail on the battery ground wire. Due to it's proximity to the battery, it may become corroded by acid fumes from the battery.
In 86-90 model cars, it is a black cylinder about 2 1/2" long by 1" diameter with a black/lt green wire.
In 91-95 model cars it is a black cylinder about 2 1/2" long by 1" diameter with a black/white wire.
You'll find it up next to the starter solenoid where the wire goes into the wiring harness
I.) Computer. Don’t replace the computer just because you don’t understand how it works. Computers seldom fail, it usually is a sensor or wiring problem that causes the problems.
J.) Bad or missing secondary power ground. It is located between the back of the intake manifold and the driver's side firewall. It supplies ground for the alternator, A/C compressor clutch and other electrical accessories such as the gauges.
K.) Engine fires briefly, but dies immediately when the key is released to the Run position. Crank the engine & when it fires off, pull the small push on connector (red/blue wire) off the starter relay (Looks like it is stuck on a screw). Hold the switch in the crank position: if it continues to run there is a problem with either the ignition switch or TFI module. Check for 12 volts at the red/green wire on the coil with the switch in the Run position. Good 12 volts, then replace the TFI. No 12 volts, replace the ignition switch.
Wiring Diagrams:
See the following website for some help from Tmoss (diagram designer) & Stang&2Birds (website host) for help on 88-95 wiring Mustang FAQ - Engine Information Everyone should bookmark this site.
Ignition switch wiring
http://www.veryuseful.com/mustang/tech/engine/images/IgnitionSwitchWiring.gif
Fuel, alternator, A/C and ignition wiring
http://www.veryuseful.com/mustang/tech/engine/images/fuel-alt-links-ign-ac.gif
Complete computer, actuator & sensor wiring diagram for 88-91 Mass Air Mustangs
http://www.veryuseful.com/mustang/tech/engine/images/88-91_5.0_EEC_Wiring_Diagram.gif
Complete computer, actuator & sensor wiring diagram for 91-93 Mass Air Mustangs
http://www.veryuseful.com/mustang/tech/engine/images/91-93_5.0_EEC_Wiring_Diagram.gif
Complete computer, actuator & sensor wiring diagram for 94-95 Mass Air Mustangs
http://www.veryuseful.com/mustang/tech/engine/images/94-95_5.0_EEC_Wiring_Diagram.gif
AutoZone wiring diagrams: You can navigate to the diagrams yourself via Repair Info | AutoZone.com and select the car year, make, model and engine. That will enable you to bring up the wiring diagram for your particular car.
2.) Spark at coil wire, pull #1 plug wire off at the spark plug and check to see spark. No spark, possible failed items in order of their probability: [/b]
A.) Moisture inside distributor – remove cap, dry off & spray with WD40
B.) Distributor cap
C.) Rotor
D.) Spark Plug wires
E.) Coil weak or intermittent - you should see 3/8" fat blue spark with a good coil
3.) Spark at spark plug, but no start.
Next, get a can of starting fluid (ether) from your local auto parts store: costs a $1.30 or so. Then pull the air duct off at the throttle body elbow, open the throttle, and spray the ether in it. Reconnect the air duct and try to start the car. Do not try to start the car without reconnecting the air duct.
Two reasons:
1.) If it backfires, the chance for a serious fire is increased.
2.) On Mass Air cars, the computer needs to measure the MAF flow once the engine starts.
If it starts then, you have a fuel management issue. Continue the checklist with emphasis of fuel related items that follow. If it doesn’t, then it is a computer or timing issue: see Step 4.
Clue – listen for the fuel pump to prime when you first turn the ignition switch on. It should run for 2-4 seconds and shut off. To trick the fuel pump into running, find the EEC test connector and jump the connector in the Upper RH corner to ground. The EEC connector is near the wiper motor and LH hood hinge.
If the relay & inertia switch are OK, you will have power to the pump. Check fuel pressure – remove the cap from the Schrader valve behind the alternator and depress the core. Fuel should squirt out, catch it in a rag. Beware of fire hazard when you do this. In a pinch, you can use a tire pressure gauge to measure the fuel pressure. It may not be completely accurate, but you will have some clue as to how much pressure you have. If you have any doubts about having sufficient fuel flow/pressure, rent a fuel pressure test gauge from the auto parts store. That will tell you for sure if you have adequate fuel pressure.
4.) No fuel pressure, possible failed items in order of their probability:
A.) Tripped inertia switch – Coupe & hatch cars hide it under the plastic trim covering the driver's side taillight. Use the voltmeter or test light to make sure you have power to both sides of the switch
B.) Fuel pump power relay – located under the driver’s seat in most stangs built before 92. On 92 and later model cars it is located below the Mass Air Flow meter. Look for 12 volts at the Pink/Black wire on the fuel pump relay.
C.) Clogged fuel filter
D.) Failed fuel pump
E.) 86-90 models only: Blown fuse link in wiring harness. Look for 12 volts at the Orange/Lt Blue wire on the fuel pump relay.
91-93 models only Blown fuse link in wiring harness. Look for 12 volts at the Pink/Black wire on the fuel pump relay.
The fuse links for all model years 86-93 live in the wiring harness near the starter solenoid.
94-95 models only: 20 amp fuel pump fuse in the engine compartment fuse box. Look for 12 volts at the Dark green/yellow wire on the constant control relay module.
F.) Engine seem to load up on fuel and may have black smoke at the tailpipe. Fuel pressure regulator failed. Remove the vacuum line from the regulator and inspect for fuel escaping while the pump is running. If fuel is coming out the vacuum port, the regulator has failed. Check the regulator vacuum line for fuel too. Disconnect it from the engine and blow air though it. If you find gas, the regulator has failed.
5.) Fuel pressure OK, the injectors are not firing.
A.) The PIP sensor in the distributor tells the computer when to fire the injectors. A failing PIP sensor will sometimes let the engine start if the SPOUT is removed.
A noid light available from any auto parts store, is one way to test the injector circuit to see if the injectors are firing. The noid light plugs into the fuel injector harness in place of any easily accessible injector. Plug it in and try to start the engine: it will flash if the injector is firing.
I like to use an old injector with compressed air applied to the injector where the fuel rail would normally connect. I hook the whole thing up, apply compressed air to the injector and stick it in a paper cup of soapy water. When the engine cranks with the ignition switch on, if the injector fires, it makes bubbles. Cheap if you have the stuff laying around, and works good too.
B.) Pull an injector wire connector off and look for 12 volts on the red wire when the ignition switch is on.
C.) No power, then look for problems with the 10 pin connecter (salt & pepper shakers at the rear of the upper manifold).
See the graphic for the 10 pin connector circuit layout.
The injector power pin is the VPWR pin in the black 10 pin connector.
D.) No power and the 10 pin connections are good: look for broken wiring between the orange/black wire on the EEC relay and the red wire for the 10 pin connectors.
E.) TPS voltage exceeds 3.7 volts with the throttle closed. This will shut off the injectors, since the computer uses this strategy to clear a flooded engine. Use a DVM, a pair of safety pins, and probe the black/white and green wires to measure the TPS voltage.
On a 94-95 Mustang, probe the black/white and grey/white wires to measure the TPS voltage.
It should be .5-.1.0 volts with the key on, engine not running. Note that if the black/white wire (signal ground) has a bad connection, you will get some strange readings. Make a second measurement using the battery post as the ground to eliminate any ground problems. If the readings are different by more than 5%, you may have a high resistance condition in the black/white signal ground circuit.
6.) Spark & fuel pressure OK.
A.) Failed IAB or improperly set base idle (no airflow to start engine). Press the throttle ¼ way down and try to start the car. See the "Surging Idle Checklist for help with all your idle/stall problems.
B.) Failed computer (not very likely)
C.) Engine ignition or cam timing off: only likely if the engine has been worked on recently. If you removed the distributor, there is a good probability that you installed it 180 degrees out of time.
D.) Firing order off: HO & 351 use a different firing order from the non HO engines.
HO & 351W 1-3-7-2-6-5-4-8
Non HO 1-5-4-2-6-3-7-8
E.) No start when hot - Press the throttle to the floor & try starting it if you get this far. If it starts, replace the ECT.
F. ) Engine that has had the heads off or valves adjusted. Do a compression test to make sure the valves are not adjusted too tight. You should have a minimum of 90 PSI on a cold engine.
Well, got to say Jrichker....when I saw your post I was like....man, seen that post so many times and thought I went through it enough or to my ability to be more precise....I was really looking for more "insight". Did new coil, dizzy, tfi then down the checklist the steps seem to get more involved...wasn't looking forward to it. I thought okay, I think I'm at step E under NO SPARK. Okay, I can check a voltage at an injector, its got to be it! Nope had 12v. Went back in the house to look at the list again and saw step A) Ignition Box. Hmmm....a while back at the 2nd of 4 shops i took it to said they bypassed it and changed the coil. After a couple of weeks of driving, I hooked the ignition up again thinking how were two parts failed???? the box should be good....and it ran okay for a while except for continued hesitation and loss of power. Then the stalling started to happen again. So then at different times while trying to chase problems I did swap it in and out without results and have kept it hook up. Well, this is the first time bypassing it really did anything. It has not been starting at all for at least a month but now started on the first try...and it idled better than it has in a while too. Maybe it has been slowly failing and combined w/ coil and other issues it has been throwing an intermitant variable in the mix??? Maybe completely failing was a blessing! But, one of the things I was trying to fix before the stalling/bucking was a hesitation...I did not get to drive it on the road yet and will report back. Let's see if the hesitation or even stalling for that matter comes back while actually driving. Thanks again.
Went for a ride tonight...and it didn't stall! First time in a loonnnng time.
Wish i had more insight to share to help anyone else out because I find it hard to believe this long winded thread will help anyone. The check list stickies on the other hand should help you out....maybe even more than dropping your car off at a garage. (4 shops looked at mine, including a dealer and a mustang specific shop).
Under TROUBLESHOOTING
http://www.stangnet.com/mustang-forums/threads/technical-thread-how-to-index.808661/
FWIW in my situation over the last couple of years the coil, tfi, distributor, aftermarket ignition, air & enging temp sensor all went bad. A couple of these were changed because they threw codes, but didn't solve the stalling problem. Other parts were changed just because i was reaching for a solution like the ignition switch and idle air controller, I should have diagnosed those more before I changed them...at least I have spares now. It is good to have spare parts to swap out to check like the dizzy, tfi, and coil. The Chiltons service manual actually suggests "swap w/ a known to be good part" for the coil to diagnose.
Now it still doesn't run perfect....there is a very very slight miss or skip, which was my original problem, but like I said is much much less. Jricker is there a check list for poor running or hesitation? Is chasing that type of problem different than the 'surging' or 'no crank' check list?
Thanks!!!
Wish i had more insight to share to help anyone else out because I find it hard to believe this long winded thread will help anyone. The check list stickies on the other hand should help you out....maybe even more than dropping your car off at a garage. (4 shops looked at mine, including a dealer and a mustang specific shop).
Under TROUBLESHOOTING
http://www.stangnet.com/mustang-forums/threads/technical-thread-how-to-index.808661/
FWIW in my situation over the last couple of years the coil, tfi, distributor, aftermarket ignition, air & enging temp sensor all went bad. A couple of these were changed because they threw codes, but didn't solve the stalling problem. Other parts were changed just because i was reaching for a solution like the ignition switch and idle air controller, I should have diagnosed those more before I changed them...at least I have spares now. It is good to have spare parts to swap out to check like the dizzy, tfi, and coil. The Chiltons service manual actually suggests "swap w/ a known to be good part" for the coil to diagnose.
Now it still doesn't run perfect....there is a very very slight miss or skip, which was my original problem, but like I said is much much less. Jricker is there a check list for poor running or hesitation? Is chasing that type of problem different than the 'surging' or 'no crank' check list?
Thanks!!!
Cylinder balance test: use this to find dead or weak cylinders:
Revised 25 March 2012 to add necessity allowing the KOEO tests to finish before starting the engine and the need for a properly functioning IAB/IAC to run the cylinder balance test.
The computer has a cylinder balance test that helps locate cylinders with low power output. You’ll need to dump the codes out of the computer and make sure that you have the A/C off, clutch depressed to the floor and the transmission in neutral. Fail to do this and you can’t do the engine running dump codes test that allows you to do the cylinder balance test.
Here's the way to dump the computer codes with only a jumper wire or paper clip and the check engine light, or test light or voltmeter. I’ve used it for years, and it works great. You watch the flashing test lamp or Check Engine Light and count the flashes.
Be sure to turn off the A/C clutch depressed to the floor, and put the transmission in neutral when dumping the codes. Fail to do this and you will generate a code 67 and not be able to dump the Engine Running codes.
Here's how to dump the computer codes with only a jumper wire or paper clip and the check engine light, or test light or voltmeter. I’ve used it for years, and it works great. You watch the flashing test lamp or Check Engine Light and count the flashes.
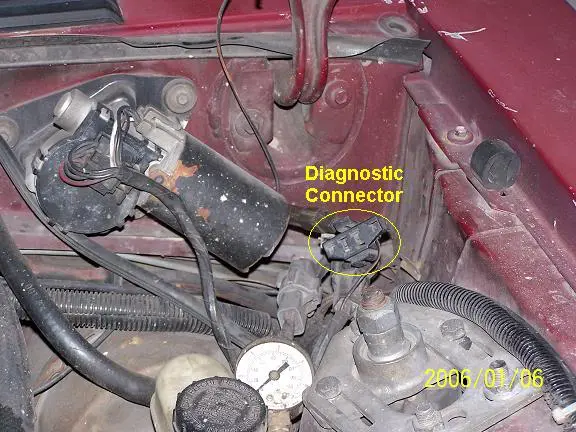
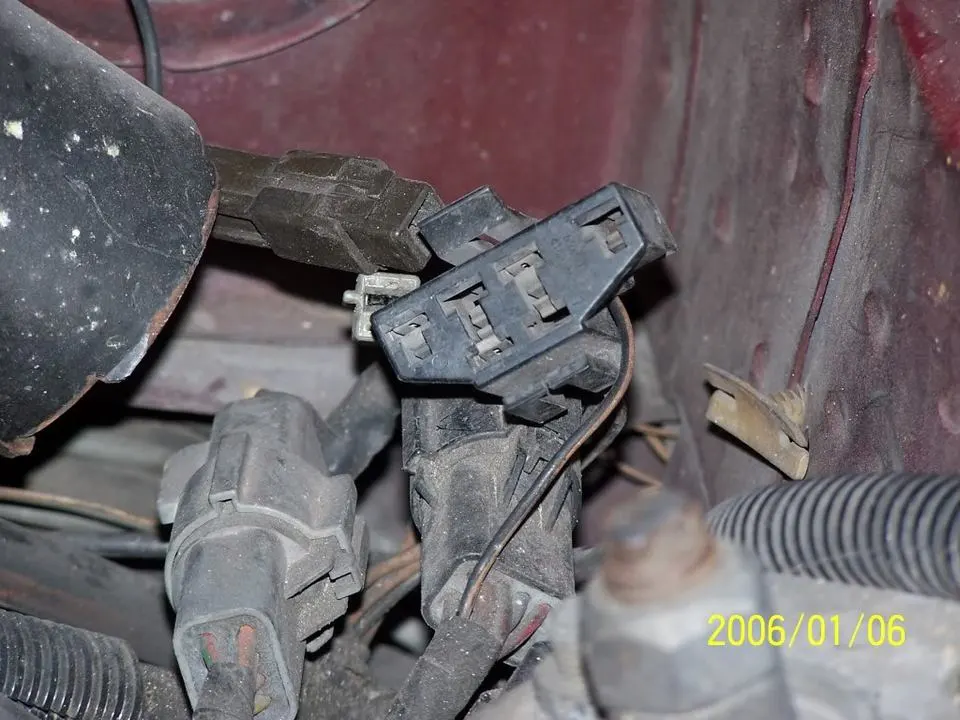
If your car is an 86-88 stang, you'll have to use the test lamp or voltmeter method. There is no functional check engine light on the 86-88's except possibly the Cali Mass Air cars.

The STI has a gray connector shell and a white/red wire. It comes from the same bundle of wires as the self test connector.
89 through 95 cars have a working Check Engine light. Watch it instead of using a test lamp.

The STI has a gray connector shell and a white/red wire. It comes from the same bundle of wires as the self test connector.
WARNING!!! There is a single dark brown connector with a black/orange wire. It is the 12 volt power to the under the hood light. Do not jumper it to the computer test connector. If you do, you will damage the computer.
What to expect:
You should get a code 11 (two single flashes in succession). This says that the computer's internal workings are OK, and that the wiring to put the computer into diagnostic mode is good. No code 11 and you have some wiring problems. This is crucial: the same wire that provides the ground to dump the codes provides signal ground for the TPS, EGR, ACT and Map/Baro sensors. If it fails, you will have poor performance, economy and drivability problems
Some codes have different answers if the engine is running from the answers that it has when the engine isn't running. It helps a lot to know if you had the engine running when you ran the test.
Dumping the Engine Running codes: The procedure is the same, you start the engine with the test jumper in place. Be sure the A/C is off, clutch depressed to the floor and the transmission is in neutral. You'll get an 11, then a 4 and the engine will speed up to do the EGR test. After the engine speed decreases back to idle, it will dump the engine running codes.
Trouble codes are either 2 digit or 3 digit, there are no cars that use both 2 digit codes and 3 digit codes.
Cylinder balance test
If you have idle or IAC/IAB problems and the engine will not idle on its own without mechanically adjusting the base idle speed above 625-750 RPM, this test will fail with random cylinders pointed out every time it runs. The IAC/IAB must be capable of controlling the engine speed to run in the 1400-1600 RPM range. Playing with the base idle speed by adjusting it upwards will not work, the computer has to be able to control the engine speed using the IAC/IAB.
Warm the car's engine up to normal operating temperature. Use a jumper wire or paper clip to put the computer into test mode. Let it finish the Key On Engine Off (KOEO) code dump. Start the engine and let it go through the normal diagnostic tests, then quickly press the throttle to the floor. Remember to keep the clutch pedal (5 speed) depressed to the floor during the test. The engine RPM should exceed 2500 RPM's for a brief second. The engine RPM's will increase to about 1450-1600 RPM and hold steady. The engine will shut off power to each injector, one at a time. When it has sequenced through all 8 injectors, it will flash 9 for everything OK, or the number of the failing cylinder such as 2 for cylinder #2. Quickly pressing the throttle again up to 2500 RPM’s will cause the test to re-run with smaller qualifying figures.
Do it a third time, and if the same cylinder shows up, the cylinder is weak and isn’t putting out power like it should. See the Chilton’s Shop manual for the complete test procedure
Do a compression test on all the cylinders.
Take special note of any cylinder that shows up as weak in the cylinder balance test. Low compression on one of these cylinders rules out the injectors as being the most likely cause of the problem. Look at cylinders that fail the cylinder balance test but have good compression. These cylinders either have a bad injector, bad spark plug or spark plug wire. Move the wire and then the spark plug to another cylinder and run the cylinder balance test again. If it follows the moved wire or spark plug, you have found the problem. If the same cylinder fails the test again, the injector is bad. If different cylinders fail the cylinder balance test, you have ignition problems or wiring problems in the 10 pin black & white electrical connectors located by the EGR.
How to do a compression test:
Only use a compression tester with a screw in adapter for the spark plug hole. The other type leaks too much to get an accurate reading. Your local auto parts store may have a compression tester to rent. If you do mechanic work on your own car on a regular basis, it would be a good tool to add to your collection.
With the engine warmed up, remove all spark plugs and prop the throttle wide open with a plastic screwdriver handle between the throttle butterfly and the throttle housing. Crank the engine until it the gage reading stops increasing. On a cold engine, it will be hard to tell what's good & what's not. Some of the recent posts have numbers ranging from 140-170 PSI. If the compression is low, squirt some oil in the cylinder and do it again – if it comes up, the rings are worn. There should be no more than 10% difference between cylinders. Use a blow down leak test (puts compressed air inside cylinders) on cylinders that have more than 10% difference.
I generally use a big screwdriver handle stuck in the TB between the butterfly and the TB to prop the throttle open. The plastic is soft enough that it won't damage anything and won't get sucked down the intake either.
A battery charger (not the trickle type) is a good thing to have if you haven't driven the car lately or if you have any doubts about the battery's health. Connect it up while you are cranking the engine and it will help keep the starter cranking at a consistent speed from the first cylinder tested to the last cylinder.
See the link to my site for details on how to build your own blow down type compression tester.
Revised 25 March 2012 to add necessity allowing the KOEO tests to finish before starting the engine and the need for a properly functioning IAB/IAC to run the cylinder balance test.
The computer has a cylinder balance test that helps locate cylinders with low power output. You’ll need to dump the codes out of the computer and make sure that you have the A/C off, clutch depressed to the floor and the transmission in neutral. Fail to do this and you can’t do the engine running dump codes test that allows you to do the cylinder balance test.
Here's the way to dump the computer codes with only a jumper wire or paper clip and the check engine light, or test light or voltmeter. I’ve used it for years, and it works great. You watch the flashing test lamp or Check Engine Light and count the flashes.
Be sure to turn off the A/C clutch depressed to the floor, and put the transmission in neutral when dumping the codes. Fail to do this and you will generate a code 67 and not be able to dump the Engine Running codes.
Here's how to dump the computer codes with only a jumper wire or paper clip and the check engine light, or test light or voltmeter. I’ve used it for years, and it works great. You watch the flashing test lamp or Check Engine Light and count the flashes.
If your car is an 86-88 stang, you'll have to use the test lamp or voltmeter method. There is no functional check engine light on the 86-88's except possibly the Cali Mass Air cars.
The STI has a gray connector shell and a white/red wire. It comes from the same bundle of wires as the self test connector.
89 through 95 cars have a working Check Engine light. Watch it instead of using a test lamp.
The STI has a gray connector shell and a white/red wire. It comes from the same bundle of wires as the self test connector.
WARNING!!! There is a single dark brown connector with a black/orange wire. It is the 12 volt power to the under the hood light. Do not jumper it to the computer test connector. If you do, you will damage the computer.
What to expect:
You should get a code 11 (two single flashes in succession). This says that the computer's internal workings are OK, and that the wiring to put the computer into diagnostic mode is good. No code 11 and you have some wiring problems. This is crucial: the same wire that provides the ground to dump the codes provides signal ground for the TPS, EGR, ACT and Map/Baro sensors. If it fails, you will have poor performance, economy and drivability problems
Some codes have different answers if the engine is running from the answers that it has when the engine isn't running. It helps a lot to know if you had the engine running when you ran the test.
Dumping the Engine Running codes: The procedure is the same, you start the engine with the test jumper in place. Be sure the A/C is off, clutch depressed to the floor and the transmission is in neutral. You'll get an 11, then a 4 and the engine will speed up to do the EGR test. After the engine speed decreases back to idle, it will dump the engine running codes.
Trouble codes are either 2 digit or 3 digit, there are no cars that use both 2 digit codes and 3 digit codes.
Cylinder balance test
If you have idle or IAC/IAB problems and the engine will not idle on its own without mechanically adjusting the base idle speed above 625-750 RPM, this test will fail with random cylinders pointed out every time it runs. The IAC/IAB must be capable of controlling the engine speed to run in the 1400-1600 RPM range. Playing with the base idle speed by adjusting it upwards will not work, the computer has to be able to control the engine speed using the IAC/IAB.
Warm the car's engine up to normal operating temperature. Use a jumper wire or paper clip to put the computer into test mode. Let it finish the Key On Engine Off (KOEO) code dump. Start the engine and let it go through the normal diagnostic tests, then quickly press the throttle to the floor. Remember to keep the clutch pedal (5 speed) depressed to the floor during the test. The engine RPM should exceed 2500 RPM's for a brief second. The engine RPM's will increase to about 1450-1600 RPM and hold steady. The engine will shut off power to each injector, one at a time. When it has sequenced through all 8 injectors, it will flash 9 for everything OK, or the number of the failing cylinder such as 2 for cylinder #2. Quickly pressing the throttle again up to 2500 RPM’s will cause the test to re-run with smaller qualifying figures.
Do it a third time, and if the same cylinder shows up, the cylinder is weak and isn’t putting out power like it should. See the Chilton’s Shop manual for the complete test procedure
Do a compression test on all the cylinders.
Take special note of any cylinder that shows up as weak in the cylinder balance test. Low compression on one of these cylinders rules out the injectors as being the most likely cause of the problem. Look at cylinders that fail the cylinder balance test but have good compression. These cylinders either have a bad injector, bad spark plug or spark plug wire. Move the wire and then the spark plug to another cylinder and run the cylinder balance test again. If it follows the moved wire or spark plug, you have found the problem. If the same cylinder fails the test again, the injector is bad. If different cylinders fail the cylinder balance test, you have ignition problems or wiring problems in the 10 pin black & white electrical connectors located by the EGR.
How to do a compression test:
Only use a compression tester with a screw in adapter for the spark plug hole. The other type leaks too much to get an accurate reading. Your local auto parts store may have a compression tester to rent. If you do mechanic work on your own car on a regular basis, it would be a good tool to add to your collection.
With the engine warmed up, remove all spark plugs and prop the throttle wide open with a plastic screwdriver handle between the throttle butterfly and the throttle housing. Crank the engine until it the gage reading stops increasing. On a cold engine, it will be hard to tell what's good & what's not. Some of the recent posts have numbers ranging from 140-170 PSI. If the compression is low, squirt some oil in the cylinder and do it again – if it comes up, the rings are worn. There should be no more than 10% difference between cylinders. Use a blow down leak test (puts compressed air inside cylinders) on cylinders that have more than 10% difference.
I generally use a big screwdriver handle stuck in the TB between the butterfly and the TB to prop the throttle open. The plastic is soft enough that it won't damage anything and won't get sucked down the intake either.
A battery charger (not the trickle type) is a good thing to have if you haven't driven the car lately or if you have any doubts about the battery's health. Connect it up while you are cranking the engine and it will help keep the starter cranking at a consistent speed from the first cylinder tested to the last cylinder.
See the link to my site for details on how to build your own blow down type compression tester.
Similar threads

- Replies
- 21
- Views
- 1K

- Replies
- 3
- Views
- 216
Electrical
Brown Connector #31
- Replies
- 2
- Views
- 193
- Replies
- 7
- Views
- 358
- Replies
- 8
- Views
- 468
