
Hello everyone. Recently I posted that I ordered a complete lock cylinder kit for my '95 Cobra. I finally had a chance to install it today since the rain has died down. Unfortunately, I wasn't able to get to the trunk lock cylinder as it's riveted on (I don't have any replacement rivets). I'll take care of that one at a later date.
I purchased a complete lock kit from Mustangs Unlimited for $264.95. This is probably overpriced, but I'm currently located in Germany. Simply having the locks rekeyed would likely have been cheaper, but locksmiths are ridiculously expensive here; assuming I could find one that could work on American-style locks. Anyway, on to the write-up.
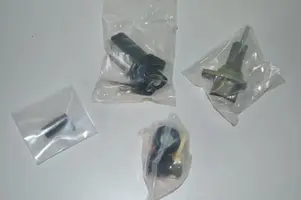
Here is a picture of the lock kit. It's an OEM set.

This is what passes for a garage in Germany.

I started with the door locks. The right and left sides are pretty much the same, so I only took pictures of the right side. It should also be noted that the negative battery cable should be disconnected when working near the steering column or any associated wiring to avoid inadvertently setting off the airbags.
The first thing you want to do is remove the door panel. You'll need to detatch the door handle cup and remove the window/lock switches (if equipped).

There will be two small screws and a panel clip (not pictured, as it was missing on my car) just forward of them. You can see in the previous picture where the clip would be. Remove the screws and the clip (use a panel clip tool if you have one; if not, screwdrivers and patience work just fine).

Remove the interior mirror trim cover (or Mach 460 tweeter if equipped).

Remove one more panel clip from the front of the panel near the bottom.

You can also make it easier to remove the panel by removing the interior door handle bezel. Reach into the panel where the door handle cup resides and push the tab with your fingers or a screwdriver.

The door panel should be ready to remove now. Simply pull up and outward.

The door lock cylinder is held in by a small clip on the inside of the door. This should be pretty easy to remove and install by hand. Apoligies as I couldn't get a better picture of it installed.


Remove the lock cylinder with the lock rod attached. You can then remove the old cylinder from the rod by sliding it off the top and installing the new one the same way. I didn't get a picture of this, but it's incredibly simple.
Installation of the door panels is the reverse of the removal. You're done with the door locks now.
This lock kit even came with a new glovebox lock, so we'll take care of that next.
Start by removing the glove box. There are three 9/32" hex-head screws on the bottom hinge. Remove these, then open the glovebox and work the rubber stops past the dash. Remove the box.
Remove the lock/handle assembly cover on the inside of the glovebox. Then remove the three screws pictured.

Insert the key into the lock and turn it ½-turn. You can then use screwdrivers to pull back the clips holding it in. Drop the new lock into place, and installation is reverse of the removal. I didn't get a picture of the removal as my camera battery died.
Next is the ignition lock cylinder. This is arguably the easiest part, but I made it a little more difficult for myself just so I could get some pictures.
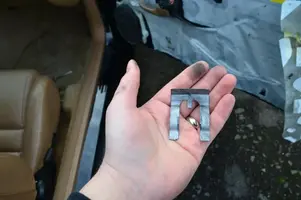
You can see in the following picture that there are three screws visible on the underside of the steering column cover. The fourth hole on the right side that is out of line with the others is for access to remove the lock cylinder without removing the column cover.

If you want to remove the cover anyway as I did, you'll need to remove the knee bolster to access a fourth screw which is underneath it. There are two 5/16" hex-head bolts for the bolster trim piece, and two more for the reinforcement panel underneath it.

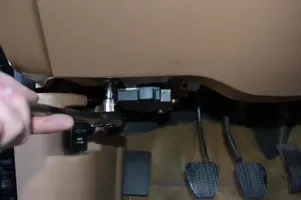
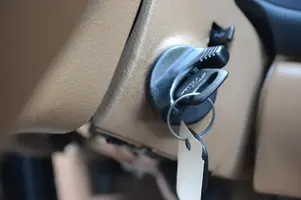
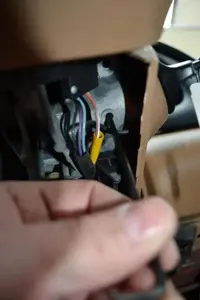
You will not need to remove the tilt-wheel handle to remove the bottom of the column cover. Once the cover is removed, you'll be able to see a small button/pin directly underneath the ignition lock cylinder. Insert the key and turn it to the "RUN" position (pictured with the new cylinder already installed since I didn't get a picture of the old one before I removed it).

Press the button/pin using a 1/8" punch (or a 1/8" allen wrench if you don't have a punch). Remove the lock cylinder by simply pulling it out.

Turn the new cylinder to the run position. Depress the pin on the cylinder, and insert it into the steering column. Remove the key, and reinstall any other components that were removed. Reconnect the negative battery cable, and you're done.
The locks were a little stiff at first, but I cured that with a little bit of oil.
The best part of the kit I bought is that it's an OEM kit, so the keys say "Ford" on them! Little details like that are important to me.

Hope this helps anyone. I realize that replacing locks is a rather rudimentary exercise, but I figured a how-to write-up can't hurt.
—John.
I purchased a complete lock kit from Mustangs Unlimited for $264.95. This is probably overpriced, but I'm currently located in Germany. Simply having the locks rekeyed would likely have been cheaper, but locksmiths are ridiculously expensive here; assuming I could find one that could work on American-style locks. Anyway, on to the write-up.
Here is a picture of the lock kit. It's an OEM set.
This is what passes for a garage in Germany.
I started with the door locks. The right and left sides are pretty much the same, so I only took pictures of the right side. It should also be noted that the negative battery cable should be disconnected when working near the steering column or any associated wiring to avoid inadvertently setting off the airbags.
The first thing you want to do is remove the door panel. You'll need to detatch the door handle cup and remove the window/lock switches (if equipped).
There will be two small screws and a panel clip (not pictured, as it was missing on my car) just forward of them. You can see in the previous picture where the clip would be. Remove the screws and the clip (use a panel clip tool if you have one; if not, screwdrivers and patience work just fine).
Remove the interior mirror trim cover (or Mach 460 tweeter if equipped).
Remove one more panel clip from the front of the panel near the bottom.
You can also make it easier to remove the panel by removing the interior door handle bezel. Reach into the panel where the door handle cup resides and push the tab with your fingers or a screwdriver.
The door panel should be ready to remove now. Simply pull up and outward.
The door lock cylinder is held in by a small clip on the inside of the door. This should be pretty easy to remove and install by hand. Apoligies as I couldn't get a better picture of it installed.
Remove the lock cylinder with the lock rod attached. You can then remove the old cylinder from the rod by sliding it off the top and installing the new one the same way. I didn't get a picture of this, but it's incredibly simple.
Installation of the door panels is the reverse of the removal. You're done with the door locks now.
This lock kit even came with a new glovebox lock, so we'll take care of that next.
Start by removing the glove box. There are three 9/32" hex-head screws on the bottom hinge. Remove these, then open the glovebox and work the rubber stops past the dash. Remove the box.
Remove the lock/handle assembly cover on the inside of the glovebox. Then remove the three screws pictured.
Insert the key into the lock and turn it ½-turn. You can then use screwdrivers to pull back the clips holding it in. Drop the new lock into place, and installation is reverse of the removal. I didn't get a picture of the removal as my camera battery died.
Next is the ignition lock cylinder. This is arguably the easiest part, but I made it a little more difficult for myself just so I could get some pictures.
You can see in the following picture that there are three screws visible on the underside of the steering column cover. The fourth hole on the right side that is out of line with the others is for access to remove the lock cylinder without removing the column cover.
If you want to remove the cover anyway as I did, you'll need to remove the knee bolster to access a fourth screw which is underneath it. There are two 5/16" hex-head bolts for the bolster trim piece, and two more for the reinforcement panel underneath it.
You will not need to remove the tilt-wheel handle to remove the bottom of the column cover. Once the cover is removed, you'll be able to see a small button/pin directly underneath the ignition lock cylinder. Insert the key and turn it to the "RUN" position (pictured with the new cylinder already installed since I didn't get a picture of the old one before I removed it).
Press the button/pin using a 1/8" punch (or a 1/8" allen wrench if you don't have a punch). Remove the lock cylinder by simply pulling it out.
Turn the new cylinder to the run position. Depress the pin on the cylinder, and insert it into the steering column. Remove the key, and reinstall any other components that were removed. Reconnect the negative battery cable, and you're done.
The locks were a little stiff at first, but I cured that with a little bit of oil.
The best part of the kit I bought is that it's an OEM kit, so the keys say "Ford" on them! Little details like that are important to me.
Hope this helps anyone. I realize that replacing locks is a rather rudimentary exercise, but I figured a how-to write-up can't hurt.
—John.
Attachments
-
 DSC_0084_zps110dc050.webp15.2 KB · Views: 227
 -
 DSC_0085_zps6fe10380.webp65.3 KB · Views: 256
 -
 DSC_0086_zpse7d90566.webp49.7 KB · Views: 243
 -
 DSC_0087_zps9f89a2a5.webp26.3 KB · Views: 262
 -
 DSC_0090_zps4f33a447.webp42.7 KB · Views: 229
 -
 DSC_0089_zps113a269d.webp23 KB · Views: 221
 -
 DSC_0088_zpsa4e17abc.webp18.6 KB · Views: 227
 -
 DSC_0093_zpsd265512e.webp60.1 KB · Views: 236
 -
 DSC_0092_zps0a8d2dd0.webp8.2 KB · Views: 246
 -
 DSC_0091_zpsea34e199.webp26.6 KB · Views: 232
 -
 DSC_0103_zps18123c73.webp39.2 KB · Views: 219
 -
 DSC_0095_zps483d12b4.webp12.3 KB · Views: 234
 -
 DSC_0096_zpsfddf2ae0.webp22 KB · Views: 225
 -
 DSC_0097_zpse02ccf16.webp23.2 KB · Views: 227
 -
 DSC_0100_zps08227ea8.webp12.9 KB · Views: 248
 -
 DSC_0104_zpsd98d9bac.webp21.2 KB · Views: 238


