New door panels.....the hard way

LX Dave

5 Year Member
Jul 2, 2017
199
131
53
As the restoration/customization of my '84 is coming to a close, I decided it was time to get to the door panels. I would have just left things stock because I really don't listen to music in the Mustangs, but since someone already hacked up the dash for an aftermarket radio, I figured why not.

The stock door panels were a little wavy, but overall in pretty good shape.
20200329_143505.jpg


Just couldn't bring myself to cut holes in these for speakers. Factory has those piddly little 3 1/2" dash speakers that just won't cut it, and I wanted to run 6 1/2" speakers up front for better sound.

First off was a trip to the scrap yard to get some really nasty panels off of an aero. All I really needed was the aluminum top and maybe a template for the backer board. Well, that's exactly what I got.

Welcome water-logged template.
20200329_143405.jpg


Picked up some 1/8" hard board and layed out a pattern.

20200329_143608.jpg


Started drilling holes and came up with this
20200329_153317.jpg


All cut out

20200329_154654.jpg


The holes for the door panel clips were drilled with 1/2 and 1/4" forstner bits. Used the jig saw to connect the two holes to make it correct. I don't have any pictures of the actual making these (I forgot to take some). Sorry.

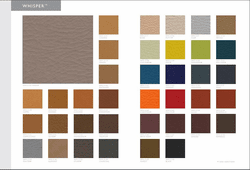
Picked up some fabrics from yourautotrim.com and got to it.


Continued....hit the limit....
 
  • Sponsors (?)


After a full day of sewing

20200502_160002.jpg


Got both basic panels stitched up. I am by no means an upholsterer, so was kind of winging it, thinking along the way the best way of making these....without screwing up too bad.

Here's the first one done and installed

20200502_181758.jpg


Not too shabby. A few crooked stitches, but over all, I'm pretty happy with the results. Ignore the three silver screws, these are temporary until I can get to the hardware store for better screws.

To get the "depth" around the stitching, I got 3/16" foam with cloth on one side. Found out I should have gotten 3/8 or 1/2" foam. Had to double up the foam to get this effect. Good thing I ordered extra. The part the speaker is sitting in is just 3/4" plywood wrapped in vinyl and screwed on. The Mustang emblem is off a set of door panels I found in the scrap yard for a '69 Mustang. Figured I would incorporate them and glad I did.

And for those wondering, yes this was a real pain to do. I don't do upholstery and I suck at sewing, but to save the original door panels, it was worth a try. To this point, I have probably 4 to 5 days into the panels. Just had to take the time, think things through and hopefully do it right the first time.

Total cost is approximately $125 with vinyl, foam, carpet, hard board, etc...

Worth the headaches? I think so.
 
  • Like
  • Love
  • Winner
Reactions: 11 users
After a full day of sewing

20200502_160002.jpg


Got both basic panels stitched up. I am by no means an upholsterer, so was kind of winging it, thinking along the way the best way of making these....without screwing up too bad.

Here's the first one done and installed

20200502_181758.jpg


Not too shabby. A few crooked stitches, but over all, I'm pretty happy with the results. Ignore the three silver screws, these are temporary until I can get to the hardware store for better screws.

To get the "depth" around the stitching, I got 3/16" foam with cloth on one side. Found out I should have gotten 3/8 or 1/2" foam. Had to double up the foam to get this effect. Good thing I ordered extra. The part the speaker is sitting in is just 3/4" plywood wrapped in vinyl and screwed on. The Mustang emblem is off a set of door panels I found in the scrap yard for a '69 Mustang. Figured I would incorporate them and glad I did.

And for those wondering, yes this was a real pain to do. I don't do upholstery and I suck at sewing, but to save the original door panels, it was worth a try. To this point, I have probably 4 to 5 days into the panels. Just had to take the time, think things through and hopefully do it right the first time.

Total cost is approximately $125 with vinyl, foam, carpet, hard board, etc...

Worth the headaches? I think so.
Always interested in this. Did you use a regular sewing machine, or did you have to have something more heavy duty?
 
For the sewing machine, it's just a standard one. That's part of what made this hard. No walking foot on it and it wasn't too happy all the time. Once it was going, it seemed to have no problems punching through the vinyl and foam, even multiple layers. It was also a pain to get the panel into the foot because it was so thick and the foot barely opened far enough to get it in place. Also had to help things along because of the foam backer is so pliable which caused stitch length to be all over the place. The vinyl I used is the Whisper line which is much softer and flexible than standard vinyls.

 
Thanks everybody. :)

Thought I'd put some updates here too.

Here's how the hardboard is attached to the aluminum.
20200503_110035.jpg

Drilled between the crimps that were holding on the factory board and just used rivets. After that, the rivets were smashed down with a hammer to make them flatter. It got pretty rigid after that. The aluminum flexed more than the joint. Also put the hardboard on the front side of the aluminum to get rid of the step in it. Came out flatter on the front side.

Back side picture of the panel to show what was done
20200503_110049.jpg


After everything was cut, the entire hardboard panel was painted with oil based paint on both sides. Gotta give it more of a fighting chance from moisture.

Wrapping the speaker spacer
20200503_111612.jpg

20200503_112910.jpg

Lots of staples just to make sure it stays in place. Staples were also set with a hammer to make them tighter.
 
Last edited:
Spacer and panel going on
20200503_115055.jpg

If you are putting in door speakers, I highly recommend these foam baffles. Keeps the sound out of the doors and helps project it into the car and also helps keep things dry (my main concern). Can be found on E-bay or Crutchfield, and are relatively cheap. I looked at the more expensive silicone ones and wasn't impressed with what they were at the price they wanted for them.
20200503_121834.jpg

All done. This one came out with some...wrinkles?? I learned when working with this stuff, keep it as flat as possible at all times. Hopefully they will come out once it warms up and the car gets outside.
 
  • Like
Reactions: 3 users
Spacer and panel going on
20200503_115055.jpg

If you are putting in door speakers, I highly recommend these foam baffles. Keeps the sound out of the doors and helps project it into the car and also helps keep things dry (my main concern). Can be found on E-bay or Crutchfield, and are relatively cheap. I looked at the more expensive silicone ones and wasn't impressed with what they were at the price they wanted for them.
20200503_121834.jpg

All done. This one came out with some...wrinkles?? I learned when working with this stuff, keep it as flat as possible at all times. Hopefully they will come out once it warms up and the car gets outside.
Spray with a light mist and use a heat gun should get the wrinkles out be very careful on the use of the heat gun. Use to install headlines and that was our final touch to really smooth them out Oh they look great awesome DIY
 
That is the real fun of our cars. You dont have to be super talented to work on them, and you can do most things with basic tools. I like the way you did that with the new backing. I need to do the same because my holes are blown out for my fasteners. Good job and thanks for showing the ease of operation. Going to do mine.
 
Looks like you had some of the same fun that I did. The lower part of the board backing for the upholstery got water damaged around the speaker mount. I used a piece of thin Lexan which is unbreakable (I tried to break it), and that worked very well.

I found out that a transparent shower curtain makes a great replacement for the water barrier plastic sheet. Spray some adhesive on the door, stick the shower curtain on and trim to fit with scissors and an Exacto knife. It beats spending $22+ from LRS for a replacement.. If you are careful with the layout you can get 2 water barriers out of a $6 shower curtain.
 
  • Useful
  • Agree
  • Like
Reactions: 3 users
Looks like you had some of the same fun that I did. The lower part of the board backing for the upholstery got water damaged around the speaker mount. I used a piece of thin Lexan which is unbreakable (I tried to break it), and that worked very well.

I found out that a transparent shower curtain makes a great replacement for the water barrier plastic sheet. Spray some adhesive on the door, stick the shower curtain on and trim to fit with scissors and an Exacto knife. It beats spending $22+ from LRS for a replacement.. If you are careful with the layout you can get 2 water barriers out of a $6 shower curtain.
Thats the fun of our cars. Would you do that with a 2015?? Maybe.
 
This looks amazing! I need to the the same sort of repair to the door panels in my 1990 Grand Marquis. They’re constructed in much the same way and are similarly waterlogged at the bottom.