Progress Thread Nicholase "lights out" build- TKX install

I got to say goodbye to my shiny piston tops today! If all goes well I'll never see em again.

Studs all in. Thread sealant on the water jacket studs.
1ba5300d-d8d8-4eb8-aa95-7a993f3605de.webp


All torqued down
5ebaafaa-343f-48b2-8df4-7401f70e214a.webp


I put some spark plugs in just to make sure there was no fitment issues with my JBA headers. All looks good so those are going out to JetHot this week.

Next up is port matching my intake to heads. Looking down through it's awfully close. So I'm not going to have to remove much at all. May as well though, I'm in no hurry.

Really happy how the Eastwood AlumaBlast turned out. Matches the cast heads just about perfect and should be easy to keep clean.
23618859-9f8e-40bf-81d8-8218c81735d6.webp


9bf6cfa2-0f70-497a-a115-990208682daa.webp
 
Last edited:
Rockers ready to go on. I cleaned them up with some acetone then lubed the rollers and contact points with assembley lube.
746d697f-ff76-4a94-a124-de9a8f502e6f.webp


I talked with a knowledgeable guy at the Ford Performance tech line about lifter preload. I alway read how many turns past zero lash. I was looking for preload range in inches.

He was really helpful and suggested setting preload at .020-.030" on the cam baseline. Which should equate between 1/4-1/2 turn. To put this to test i set up a dial indicator on one lifter plunger. I read .030" with 1/2 turn past zero lash. With that known I set each up one that way.

Marked zero lash center line with silver sharpie on the pushrod side of the poly lock body
05d93631-0531-4749-b097-97f9782f7889.webp


Then give each one half turn lining the sharpie mark centered on the valve spring side. When they are all done it's nice to be able to see all your marks lined up in the preload position. That way I know nothing moved when I torqued the set screw.
0d49170b-3007-41d0-819c-c0cff1274c14.webp


Got em all set and adjusted and torqued
aead5faf-defd-4f88-abe1-1344666c4c1f.webp


434f95dd-c3d2-463f-bbfb-6a21ff280a28.webp
 
Front cover parts ready for install. The LRS-8501BHDW front cover bolt kit from LMR is actually pretty decent. All the regular bolts are stamped ARP. The weird stud bolts have no branding but have the same finish as all the ARP stuff. Seem of good quality. The pamphlet with bolt placement is useful.

89199c80-dd16-4a42-84ac-d0ddbad4e8cc.webp


Got everything installed and sealed up.
32755dd1-b687-4ad3-8764-254ddbbc2bc1.webp


a11b79d7-e0a1-423e-b463-8d7bffd12c2f.webp


I had the oil pan temporarily installed so I could prime the oil system and check for rear main leaks (still dry). So I removed it and reinstalled with a new gasket, Ford Performamce pan rails and ARP bolt kit.

5ce1303d-6a40-4155-bd62-a61cbf419cb0.webp


Also earlier I mentioned about having the ProM crank trigger mount and balancer modified but didn't have any assembled pictures at the time. If anyone decides to go with this kit, the instructions call to cut off the front portion of the pan rails. Tip, if you machine .200" from the crank trigger oil pan mount pads (same thickness as the pan rails) everything lines up perfectly and the pan rails don't need to be cut.


The reason for machining is the mount uses two oil pan bolts and one front cover bolt to attach. Without cutting the oil pan rails the front cover bolt wouldn't line up. Machining the mount allows use of full pan rails and keeps the front cover bolt mount in the correct relationship.

Pic pro m mount after machining from earlier post:
f7904638-556e-4777-9b65-a60367dfe3f9.webp


Here are a few pics of it all mounted up"
720a587e-c23f-4ab4-8eaf-c3889ed5f47e.webp


e40d1e3c-d374-41e8-8659-98d0faad4318.webp


I also had the balancer machined for the trigger wheel. It's designed to be sandwiched betwen the balamcer and crank pulley. So it kicks all the accessories out of line the thickness of the trigger wheel. By machining the balancer the thickness of the trigger wheel all the other belt driven items remain in line.

Pic balancer after machining from earlier post:
5388096f-e0af-469c-a9dc-c6d50a74cb22.webp


Theres plenty of adjustment in the bracket to line up the wheel and sensor perfectly.

d0d09c8c-8146-4880-9863-219bafe9879e.webp
 
Intake on and torqued down. I didn't have to do any porting at all. It matched up super nice. I did port match the gaskets though.

ad285483-4333-43bb-9b83-cbb0eb5702c6.webp


Then I cleaned up and polished the original distributor
fb1bad84-3500-4f67-8423-7bfd0a8c90a8.webp


7a9e7aa4-fcfd-42e8-ad3e-abaee5a8d5d2.webp


I found a NOS distributor adapter at NPD and also grabbed a new motorcraft cap and rotor.
a4c089c0-0962-43d6-ab69-55f1efa289b9.webp


I swapped over all my old sensors and installed a new "cobra" coolant tube. It doesn't have the fitting for the EGR cooler. Also using some Anderson fuel rails. They are made to clear a factory distributor.

5f3099be-87b9-416e-b4bc-2f708b671878.webp


I made up some fuel fittings and a short peice of PTFE braided hose for the rail to rail connection and pressure tested it.Then got it all mounted up. Distributor back in and lined up.

eb3af9c1-0e93-4fdb-b9ba-1d87efca6261.webp


a960ee93-a7c9-42a6-a3ca-1b1b5369af11.webp


Valve covers in just to keep the dust out. Still have to decide on my PCV plumbing and what fittings I want to install into the valve covers. So I'm gonna hold off on drilling anything for a bit.

01417bab-0ff5-4879-a5b2-b1e71f38743d.webp
 
  • Like
Reactions: gkomo
Right now I installed my old 24lb injectors. I'm going to drop the engine in and get it idling on the old factory computer and calibrated MAF before I do the ProM install. I don't a want too many variables to trouble shoot if I do have any issues. It will run and idle fine with the 24's. I'll at least be able know all my work here is good. Then I'll move on to the ProM when it gets here.

When I do that I'll swap out the 24's with these DeatschWerks 50lbers.
3f452395-0c87-4c98-8f4a-b22d876bca9d.webp


Then I'll see if I can sell the old calibrated MAF and injectors.
 
  • Like
Reactions: gkomo
ProM engine management system
I gotta say man, between your OCD, your picture quality, garage quality, etc... I'd swear you are related to our long lost member (he just went away, doubt he died) RacEoHolic330 and his build linked below. It was one of Stangnet's all time best builds IMO.

 
Today I started off with the engine mounts. They are the "convertable" mounts. Left mount on left, right on right.

76bc7181-993f-4a64-8c0b-5571e60195b0.webp


I set them on the chassis and measured the height of the old mounts and new convertible mounts. They are the same as far as I can tell. Glad I didn't toss the old ones yet because I would have been wondering that.


77d804f2-1f95-437f-aabc-8c1487e1fa79.webp


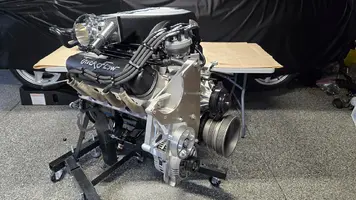
Then I moved on to the intake. I'm using a 75mm Accufab TB with the solid spacer. The ProM EMS I'm going to be using doesn't support EGR or SMOG, so there's no point in putting any of that stuff back on. I also blocked the EGR at the lower intake gasket.

3ecdb50f-ccdc-439a-b49a-e1c711a8b8ec.webp


I swapped over my vacuum fittings from my old intake. I cleaned them up and painted one of them because now it's exposed on the side. Like pipe thread usually do, they didn't want to line up exactly how I wanted them. So I ran a 3/8" NPT tap through them little by little until they were cut just enough to clock them right. Some grease onto the tap keeps any shards from getting in the intake.

ef8940f0-6362-46dc-9cde-6e986085d671.webp


I also got the plugs gapped and installed as well as the plug wires. I'm using some DEI titanium boot covers. They're really nice. There is a metal ring on the boot end sewn into the fabric that locks around the end of the boot. Really cool design. I also got the crank pulley on and clocked the trigger wheel to the correct position. Then set up the sensor according to the directions with a .050" gap. Also swapped over the TPS, and cleaned up the original IAC solenoid.

162cb096-7649-465c-a243-325a1b50ee0d.webp


521ba5d1-6000-405a-a0ae-04906aac3961.webp


I'm doing some figuring on my fuel lines. The Anderson fuel rails come with ORB swivel fittings with -8AN male ends. Looks like I'll have plenty of room to run them around the heater hoses. I have some heat wrap for them when the time comes.

d0a23402-3260-4890-b8da-1b91c9b0df55.webp


Then I moved to the accessory drive Vortech side. I'm using a UPR smog delete and PA performance 130a alt. I had the alt for a few summers and last summer in this bracket. It works great. There was a fitment issue with the smog pump and big alternator in the Vortech bracket. They want to occupy the same space. If anyone ever comes across this issue you can seem my old smog pump and the clearancing I had to do to get it to fit.

c3043280-4c79-4561-b6fd-f61b5c87c81a.webp


Also in the above picture is a Dayco laser belt alignment tool which is super handy. It's two magnetic peices that sit in a groove on your pullies. One shines a laser, the other one has a center mark on it.

76fc7d3e-2c98-4252-9979-e6ad0013b0ba.webp


So I've been filing and sanding washers to make shims and get everything prefect. So far I got the crank pulley lined up with the alternator, smog delete tensioner and waterpump.

841c09b3-29c7-4141-88b9-11308087fc87.webp


Then I moved to the A/C. I found out when I pulled the engine my A/C was out of cold juice. So my repair last summer didn't hold. I had put dye in it and did a dye check and found out the evaporator and compressor are leaking. Boooo. So I decided to just retrofit it properly. I'm using an all inclusive kit from Classic air. It comes with a Sanden compressor. It requires some modifications to the factory bracket. I want to get that done so I can take all these little brackets to the powdercoater next week.

Looks something like this
438839f9-07f6-4c6a-9dd2-adb7bbc00e2e.webp


Then you can cut off the ear of you choose. I thought it would look dumb on there so I cut it off with a bandsaw and ran it on my belt sander to smooth it out.

b250f13b-f7bf-47ce-8245-878e0f298194.webp


Thats enough for one day.


ec2fca51-4c2e-4274-a211-88290066982a.webp
 

Attachments

  • 1a582654-ae5c-4d9e-9417-fbb07d4b8f88.webp
    1a582654-ae5c-4d9e-9417-fbb07d4b8f88.webp
    386.6 KB · Views: 60
  • c812cb29-d4ef-4be8-8ebc-1a579e5980e1.webp
    c812cb29-d4ef-4be8-8ebc-1a579e5980e1.webp
    492.2 KB · Views: 62
Last edited:
I decided to paint all the brackets rather than powder coating. So I'll align and shim the P/S and A/C once my brackets dry.

I checked the belt alignment for the Vortech. Everything looked good there.
6050f85e-0081-4c6a-902b-8a4bfc11f386.webp


This struck me as a cool angle
dde28c6d-9d87-4b46-acea-f3f20d62eb32.webp


I want to make belt tension adjustment easier. The 1/2" ratchet squares are in a tough spot to reach. I know they sell a threaded tension adjuster, I just like feeling it manually. It seems easy to overdo with the treaded style. So I checked where I have room to add something.

d03f9419-6ead-4b6d-9936-fac06fbf13ab.webp


I got a bunch of lug nuts kicking around. Think I'll weld one here. Still pondering about it....

7bd58ef7-db26-4537-98eb-e103a893e914.webp


I also want to relocate the dip stick bracket. I'm not a fan of how it piggybacks with a header bolt. It also just makes an already tight access space even tighter. I'll need to get into there and retorque the the headers several times after heat cycles. When I put the headers on a few years back the dip stick was always needing to be resealed at the block after moving it out of the way to retorque. So it's getting re engineered

This is the one that came with my pan. What the....

48701c84-9870-418e-ab3d-8d1fe37fe496.webp


So original it is. I cut the bracket off the original
8b3097e9-c269-4dbd-8806-9f18238be862.webp


Then welded it to a different spot.

76a9da40-a633-40c8-a591-de7b5ca07e57.webp


I drilled and tapped a hole on the passenger engine mount to attach the new dipstick mounting tab.

99969f1a-7be4-4d7d-ba31-44902f892871.webp


Looks like this. Needs paint though.

e8812ece-31f9-4dad-a3ac-c4b9c3db7ee3.webp


Then I moved under the hood and pulled out the greasy rack. It's original but works fine and has no leaks so it's staying. I did order a set of stainless steel lines for it and will be replacing all the hoses. But I'll leave the old lines on for cleanup to keep the nasties out of it.

What a mess
e4337764-cf64-4f44-a954-8aace23f073c.webp


6977311d-4d51-4165-ba90-5012f7efff3c.webp


After a few rounds of degreaser and scotchbrite.

0156cdc1-282d-4a50-9a22-f9a580898a33.webp


Like Christmas ornimamets

65bb81e6-7d6e-44d2-8156-93cab4d3bdb6.webp