Power steering pressure hose removal

Miles

Founding Member
Aug 14, 2001
1,225
0
0
Burlington, ON
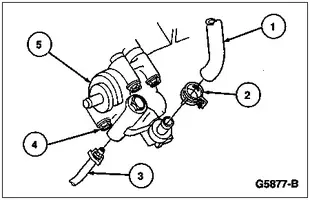
Trying to get this little ****** off so i can pull off the front engine cover. I have 3 of the 4 bolts off that are holding the power steering pump to the side of the engine on the drivers side.

The 4th bolt is blocked by the power steering pressure hose, which is a 18mm nut. I can only use an open ended wrench on it, but the bugger wont come off...

Any ideas? It's already dosed in bolt remover oil...

It's #3 in the photo attached

:nonono:
 

Attachments

  • Untitled-1.webp
    Untitled-1.webp
    16.3 KB · Views: 1,231
Miles:

Sorry, this note appears to come after you got the little fella out!

A ratcheting box-end wrench will help to get that 4th bolt off. I'd leave the hose in place (it's a messy job and you will need another Teflon(?) washer when it goes back together). Also, as you loosen the [4th] bolt, lift the pump to take the weight off the bolt. You will be able to loosen the bolt with your fingers if there is no weight on it! You can leave that bolt out during re-assembly.

Chris
 
Yea, that last bolt is a PITA to get out. Be sure to put some rags on the floor or a bucket. underneath the pump after you remove it because my continued to slowly leak for the next few days. FYI...if you haven't already done so, remove your radiator overflow tank. It's really easy to remove and will give you lots more room. I didn't realize this until I was far into my disassembly. One more pointer....when you remove all the nuts, bolts, and studs from the timing chain cover you'll need to have some way to remember where they all go back. I used a piece of cardboard and pushed each bolt through it in the pattern i took them off. This made reassembly real easy.
 
Cool - thanks guys. Once the high pressure hose was removed, the last bolt to the engine came out no problem. Damn that 1 hose took a long time though.

Had some rags down, and even though I drained the power steering reservoir, lots of red juice was still flowin'.. quite a mess.

I did already take out the radiator overflow tank.. need all the room I can get in the little engine bay!

I've been relying on the attached graphic for the engine cover bolts.. and a few w/ masking tape w/ notes on 'em.

Thanks for all the help guys... just about ready to start the actual swapping of heads *geesh*
 

Attachments

  • 4.6L-2V-Engine-Cover.webp
    4.6L-2V-Engine-Cover.webp
    33.6 KB · Views: 6,967
Hey Miles, nice graphic. Yea, that will definitely help with keeping track of what goes where. Just don't forget to remove the 4 bolts attaching the oil pan to the bottom of the time chain cover. Are you doing a head swap or cams? I'm thinking of doing heads next year. Fox Lake or VT Stage II probably. When I took my driver's side head off I decided to get some Comp Cams 262AHs and install them (since everything was apart anyways). I'm really happy with the cams. In regards to engine bay room....I went to the Ford dealer a couple of weeks ago and looked at a 2006 Mustang and I couldn't believe how much room there was around the sides to get at the header bolts. Too bad I can't afford one because it would be fun to work on that engine.
 
Can't take credit for the gfx, courtesy of fords service manuals... very helpful combined with all the gearheads on this site.

I'm doing the PI heads, cams and intake. I was thinking about after-market cams, but I'm saving for a house right now, so even doing the headswap is a bit of a hit. I was going to do the comp 262AH's as well.

Yeah, I mean there's room in our bays compared to most domestics and imports, it just never feels like enough... especially when trying to get those valve cover bolts near the firewall. It just seemed easier back in the day when you drove a boat with a boat sized engine bay :)
 
I slid my L/T headers on while I did the headswap, and there still wasnt enough room..haha..

Good luck o nthe PI swap though miles. It is one of the best mods I did for my car. I would do it again!