
Update 4/1/07: New Idler... Agian, see Bottom of post, old one bent.
Update 2/14/07: Fixed Broken Idler Pulley, See bottom of post!
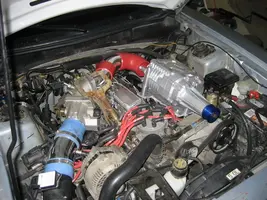
Update!: its mounted And started some piping
Note: WIll be updated as project comes along.
Ok first off, Some of you might think that the M90 isnt big enough for our 5.0. The fact of the matter is that it is. It has been done a few times with custom applications and BBK even had a kit out a few years back called the Instacharger which used the M90 but it was made only for the fox bodies. From what ive read, it does run out of boost a little in the upper rpms, but makes a ton of low end torque. For me only going to the track a few times a season, it will work out for me well. This should be a fun project and it hasnt been done that much on our SN95's, ive only seen 1 or 2.
Now for my Project: (This is the planning stage)
Mounting:
After Discussion with my dad and a little brainstroming my and my dad come up with the idea of putting on overtop of the drivers side valve cover and just pushing it forward enough to hit the belt
Driving the Supercharger:
I decided to Drive it off the stock Acc. Belt. I know not Ideal but it has been done and has worked, for now thats what im gonna do. Ive ordered a 2.3" pulley and witht he 6.625" Diameter of my Stock crank pulley it will trun around 15,850 RPM and produce about 730cfm all at 5500rpm. Now my shift light is set to 5300 rpm so it wont see quite that high of an RPM but these things can spin up to 18,000rpm.
Piping it in:
We are going to sping around the top discharge plate of the M90 so it faces back towards the intake and make a custom sheetmetal upper intake and just 90 in the upper intake. As for the other side, im leaving my entier CAI Intact including the elbow for the EGR and such and just piping sriaght over then 90 into the back of the supercharger. Possibly piping in a bypass valve somewhere too.
Supporting Mods:
Ive added in a T-Rex In-line Fuel pump, An Msd Boost timing master to retard my timing back and a Vortech FMU. I know not the best way to get this thing tuned well but its what ive went with. I picked up a Wideband Gauge and am going to use that to monitor what my engine is doing.
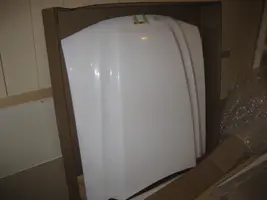
And to make it all fit I got a Cobra RR Hood 4" over stock. Ive wanted one of these things for awhile, even before this project.
---------------------------------------------------------------------------------------------------------------------------------------------
PARTS
-Eaton M90 I paid $200, it came with the lower intake and most of the piping off the supercoupe.
-3 inch piping kit off ebay (around $100 shipped) Came with 2 90's 2 75's, 2 45's, and 2 striaghts, all pretty nice tubing
-By-pass valve around $100
-42# Injectors $300 off ebay brand new
-Tweecer R/T $450 used. (If you dont get this you'll need a chip and a dyno tune)
-Wideband $280 new (dont "need" this, BUT is a good monitoring tool and if you plan to self tune it is a MUST)
-90mm LMAF $90 new
-Various Pieces of Auminum plate and a little machine work (free, my dad knows people)
-Custom Fabbed upper for now... free, probly going to a spyder lower intake down the road.
-Gauges & Gauge pod, around $80 or so new
-T-rex In-line pump $150, if you have a 255 in-tank you'll be fine. new but off ebay
-Smaller Pulley $70 new (pulleyboys.com "4.0L & 5.0L X-Charger" section, I went with 2.3")
-Cobra RR Hood 4" $300 +shipping (ABC Exclusive, pretty nice hood)
Comes to a little over 2 grand, to get all supporting mods, if you already have some of these things obviously it'll be cheaper, just supercharger parts to bolt it up... around $500 or $600 without the hood. But with out the supporting mods and a good tune you'll blow your engine.
Stuff I didnt need but bought at the time to "save money" it was a kinda bandaid way of tuning, didnt work to well.
-FMU $170 (tweecer allows you to adjust the amount of fuel you get)
-MSD Timing Master around $150 (tweecer allows you to take out the timing)
----------------------------------------------------------------------------------------------------------------------------
If Pics dont show up for some reason click this link below:
ALL PICS HERE: http://profile.imageshack.us/user/tjh566/
Now for a few pics") I know I know, Dirty, its still a work in progress
I know I know, Dirty, its still a work in progress


Pic Update: (New Hood Just Arrived)

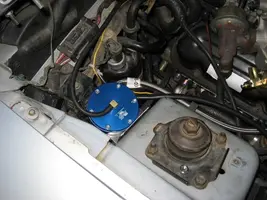
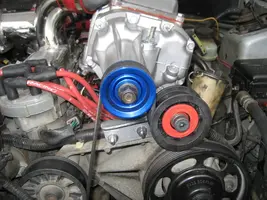
Its Mounted!!! tommorrow im going to sand downt he blower and give it a nice coat of paint and clean it up a bit but heres the idea of thats going to happen:


Painted:

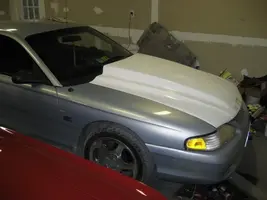
And Pic of hood installed:

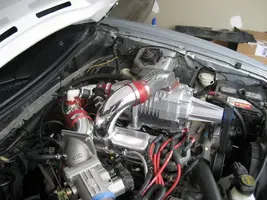
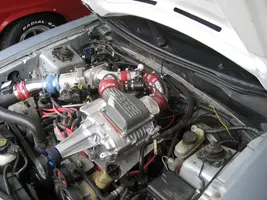
And the Semi-Finished Product!!:


Test Drive:
All I can say is wow. What an improvement, cant even floor it in first, just spins, and in 2nd your doin 75 before you know it (stock 2.73 rear). Boost comes in at like 1800. from 1800-4000 its runs as 7 psi, and from 4000-5300 (where I shift) it runs at 4-5 psi. Big power increase, got a little leak around the bypass valve that I need to fix, and I need to turn back my timing, never reset it from 14* cus i was too excited to test drive so it has a little sparkknock before you start makin boost. Im gonna turn it down to 8* and I should be all set. Vids and Numbers Coming soon. Stay Tuned.
Test Drive 2:
Belt slips bad. Added a belt that is 2 inches shorter. Problem fixed.
Test Drive 3:
Awsome, 7.5 psi up to like 3500 rom then from 3500-5500 its at 6 psi, doesnt drop off, so much more power and that thing is makin more of a supercharger noise now.
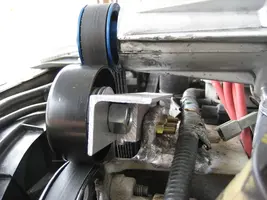
But the fricken idler pulley we put on snapped off and now its fuxxed, gotta do some more welding to fix that, bleh!
The Carnage:

And the Fixed:

Reinforced it with 1/4" Aluminum Plate So it wouldnt snap this time
And for the 10 mins I got to drive it before the snow came it was hittin 8psi, then hangin around the 7 psi Mark and runnin awsome. Just made Transaction for a Tweecer R/T and am gonna order a 90mm LMAF. Got ECC Analyzer As Well.
Vids As soon as this snow is gone, in-car ones at least.
Update: Idler Bent back and and ate a belt. So I just took it off and ran a shorter belt for awhile and it slipped on the charger so I was losin psi, so....(see below)
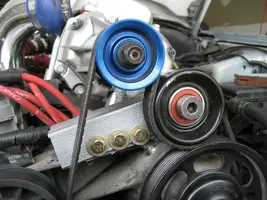
Idler Pulley Revision 3:


Took some 3/8" plate and some 1/4" plate I had layin around and used them to space out a piece of 1/4" angle iron, then bolted it down with 3-5/16" grade 8 Bolts. Hopefully it Will hold this time. Havent got a chance to drive it yet becuase of the need for a diff belt.
Update 2/14/07: Fixed Broken Idler Pulley, See bottom of post!
Update!: its mounted And started some piping
Note: WIll be updated as project comes along.
Ok first off, Some of you might think that the M90 isnt big enough for our 5.0. The fact of the matter is that it is. It has been done a few times with custom applications and BBK even had a kit out a few years back called the Instacharger which used the M90 but it was made only for the fox bodies. From what ive read, it does run out of boost a little in the upper rpms, but makes a ton of low end torque. For me only going to the track a few times a season, it will work out for me well. This should be a fun project and it hasnt been done that much on our SN95's, ive only seen 1 or 2.
Now for my Project: (This is the planning stage)
Mounting:
After Discussion with my dad and a little brainstroming my and my dad come up with the idea of putting on overtop of the drivers side valve cover and just pushing it forward enough to hit the belt
Driving the Supercharger:
I decided to Drive it off the stock Acc. Belt. I know not Ideal but it has been done and has worked, for now thats what im gonna do. Ive ordered a 2.3" pulley and witht he 6.625" Diameter of my Stock crank pulley it will trun around 15,850 RPM and produce about 730cfm all at 5500rpm. Now my shift light is set to 5300 rpm so it wont see quite that high of an RPM but these things can spin up to 18,000rpm.
Piping it in:
We are going to sping around the top discharge plate of the M90 so it faces back towards the intake and make a custom sheetmetal upper intake and just 90 in the upper intake. As for the other side, im leaving my entier CAI Intact including the elbow for the EGR and such and just piping sriaght over then 90 into the back of the supercharger. Possibly piping in a bypass valve somewhere too.
Supporting Mods:
Ive added in a T-Rex In-line Fuel pump, An Msd Boost timing master to retard my timing back and a Vortech FMU. I know not the best way to get this thing tuned well but its what ive went with. I picked up a Wideband Gauge and am going to use that to monitor what my engine is doing.
And to make it all fit I got a Cobra RR Hood 4" over stock. Ive wanted one of these things for awhile, even before this project.
---------------------------------------------------------------------------------------------------------------------------------------------
PARTS
-Eaton M90 I paid $200, it came with the lower intake and most of the piping off the supercoupe.
-3 inch piping kit off ebay (around $100 shipped) Came with 2 90's 2 75's, 2 45's, and 2 striaghts, all pretty nice tubing
-By-pass valve around $100
-42# Injectors $300 off ebay brand new
-Tweecer R/T $450 used. (If you dont get this you'll need a chip and a dyno tune)
-Wideband $280 new (dont "need" this, BUT is a good monitoring tool and if you plan to self tune it is a MUST)
-90mm LMAF $90 new
-Various Pieces of Auminum plate and a little machine work (free, my dad knows people)
-Custom Fabbed upper for now... free, probly going to a spyder lower intake down the road.
-Gauges & Gauge pod, around $80 or so new
-T-rex In-line pump $150, if you have a 255 in-tank you'll be fine. new but off ebay
-Smaller Pulley $70 new (pulleyboys.com "4.0L & 5.0L X-Charger" section, I went with 2.3")
-Cobra RR Hood 4" $300 +shipping (ABC Exclusive, pretty nice hood)
Comes to a little over 2 grand, to get all supporting mods, if you already have some of these things obviously it'll be cheaper, just supercharger parts to bolt it up... around $500 or $600 without the hood. But with out the supporting mods and a good tune you'll blow your engine.
Stuff I didnt need but bought at the time to "save money" it was a kinda bandaid way of tuning, didnt work to well.
-FMU $170 (tweecer allows you to adjust the amount of fuel you get)
-MSD Timing Master around $150 (tweecer allows you to take out the timing)
----------------------------------------------------------------------------------------------------------------------------
If Pics dont show up for some reason click this link below:
ALL PICS HERE: http://profile.imageshack.us/user/tjh566/
Now for a few pics
I know I know, Dirty, its still a work in progressPic Update: (New Hood Just Arrived)
Its Mounted!!! tommorrow im going to sand downt he blower and give it a nice coat of paint and clean it up a bit but heres the idea of thats going to happen:
Painted:
And Pic of hood installed:
And the Semi-Finished Product!!:
Test Drive:
All I can say is wow. What an improvement, cant even floor it in first, just spins, and in 2nd your doin 75 before you know it (stock 2.73 rear). Boost comes in at like 1800. from 1800-4000 its runs as 7 psi, and from 4000-5300 (where I shift) it runs at 4-5 psi. Big power increase, got a little leak around the bypass valve that I need to fix, and I need to turn back my timing, never reset it from 14* cus i was too excited to test drive so it has a little sparkknock before you start makin boost. Im gonna turn it down to 8* and I should be all set. Vids and Numbers Coming soon. Stay Tuned.
Test Drive 2:
Belt slips bad. Added a belt that is 2 inches shorter. Problem fixed.
Test Drive 3:
Awsome, 7.5 psi up to like 3500 rom then from 3500-5500 its at 6 psi, doesnt drop off, so much more power and that thing is makin more of a supercharger noise now.
But the fricken idler pulley we put on snapped off and now its fuxxed, gotta do some more welding to fix that, bleh!
The Carnage:
And the Fixed:
Reinforced it with 1/4" Aluminum Plate So it wouldnt snap this time
And for the 10 mins I got to drive it before the snow came it was hittin 8psi, then hangin around the 7 psi Mark and runnin awsome. Just made Transaction for a Tweecer R/T and am gonna order a 90mm LMAF. Got ECC Analyzer As Well.
Vids As soon as this snow is gone, in-car ones at least.
Update: Idler Bent back and and ate a belt. So I just took it off and ran a shorter belt for awhile and it slipped on the charger so I was losin psi, so....(see below)
Idler Pulley Revision 3:
Took some 3/8" plate and some 1/4" plate I had layin around and used them to space out a piece of 1/4" angle iron, then bolted it down with 3-5/16" grade 8 Bolts. Hopefully it Will hold this time. Havent got a chance to drive it yet becuase of the need for a diff belt.
Attachments
-
 img0020nv8.webp2.8 KB · Views: 375
 -
 img0023mn9.webp65.1 KB · Views: 391
 -
 img0024nq9.webp105.4 KB · Views: 454
 -
 img0025vq3.webp56.1 KB · Views: 410
 -
 img0029jz0.webp23.2 KB · Views: 422
 -
 img0044ck3.webp2.8 KB · Views: 389
 -
 img0045tm1.webp2.8 KB · Views: 376
 -
 img0046di6.webp93.2 KB · Views: 2,815
 -
 img0050ig4.webp32.4 KB · Views: 391
 -
 img00533rm.webp80.6 KB · Views: 440
 -
 img00541gr.webp77.6 KB · Views: 387
 -
 img00556hn.webp79.6 KB · Views: 473
 -
 img0106sb5.webp2.8 KB · Views: 368
 -
 img0102kc8.webp2.8 KB · Views: 379
 -
 img0118te3.webp60.7 KB · Views: 371
 -
 img0117hw2.webp77.2 KB · Views: 406


