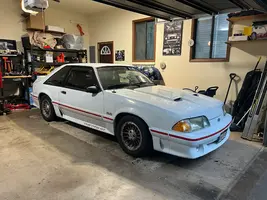
Progress Thread Finally got my first Fox Body - 1988 GT

I just saw you responded. Haven't been here in a while. Things have been great for me. Very busy but great ! Working on a bunch of home projects.

I like to take the caliper off first. Before anything else. Just to avoid stretching the rubber brake hose.

You should notice a difference in sound when the ball joint comes loose. I hope you've gotten that all sorted out by now.
 
  • Like
Reactions: DudeStang
I made a little progress tonight, on the driver side, finally.

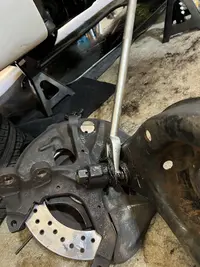
I got the outer tie rod end disconnected from the spindle and removed the strut hardware, then managed to get the spring out without killing myself.
IMG_5862.jpeg

I’m not confident I got the ball joint moved enough but I assume (hope?) I can find a way to sort that out once I get the old LCA hardware out and pull the LCA and spindle out.
 
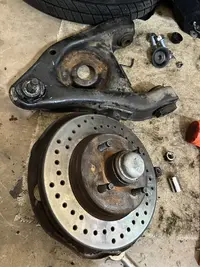
I managed to get the lower control arm, strut, and factory cc plate removed last weekend:


Still need to separate the spindle from the LCA…any suggestions on the best way to do that now that since it’s out of the car? :oops:

I might have a little bit of garage time tonight but I suspect even getting this one side done will be a long process due to time limitations/adult responsibilities this month. :confused:
 
I know you’re replacing the control arm.. but for future reference if you just whack the spindle with a hammer the ball joint will separate. It’s super easy and I noticed a lot of people recommended it. The benefit is that you don’t rip the grease boot. And it’s easier.
 
  • Like
Reactions: DudeStang
I know you’re replacing the control arm.. but for future reference if you just whack the spindle with a hammer the ball joint will separate. It’s super easy and I noticed a lot of people recommended it. The benefit is that you don’t rip the grease boot. And it’s easier.
Thanks. Yeah..I tried that multiple times while I still had the spindle/LCA on the car and off ether car. I don’t know if I just didn’t have the right hammer or couldn’t get a good angle on it (or both). I will try that again when I do the passenger side.

Here’s my latest short vlog explaining how I managed to get it separated finally but basically it was a combo of the pickle fork, a hammer, and elbow grease. The pickle fork also proved surprisingly helpful in breaking loose the outer tie rod end, even though that was also not connected to the spindle.

 
On the passenger side do this. Remove the cotter pin on the ball joint, loosen the ball joint castle nut and get about a 1/4" of a space between it and the top of the spindle. Loosen the strut to spindle bolts but do not remove them and leave the nuts on them just barely loose. Smack the spindle where the ball joint passes through the spindle with a minimum of a 3 pound hammer. Be a man and hit that mofo. If you cannot access it directly with the hammer then use a large brass drift. Did I mention you should be wearing some good gloves for this? The pressure of the coil spring and the shock of the hammer will overcome the frictional force holding the ball joint and spindle together. When this happens the 1/4" gap will disappear immediately and now you need to place a jack under the end of the control arm with the ball joint. Jack the control arm up to relieve the pressure on the castle nut and remove it. Now remove the strut and move on to spring removal.

Removing the spring as you have experienced is dangerous. If I am replacing them I use the torch and heat them up which will collapse the coils and they will drop out. If you are not replacing them or do not have access to a torch then I would recommend an internal spring compressor that you can rent at any parts store or use a strap to control the spring because it will want to launch out of the control arm. You can also opt to put a jack under the lower control arm spring pocket, remove the lower control arm bolts at the k-member, and then lower the control arm very slowly. I am not fan of this job as it just sucks any way you do it. Lowering springs solve all of this as they are shorter and do not have all these issue and coil overs solve all the problems.
 
Thanks for the detailed suggestions. I’m definitely going to try and do it “the right way” when I get to the passenger side.

I avoided the outer tie rod end for another day and instead started putting the driver side caster camber plate in place:


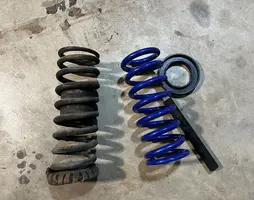
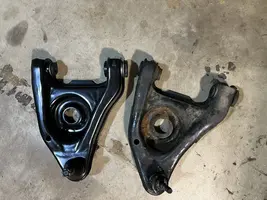
Here’s some comparisons of old and new parts:

IMG_6465.webp
IMG_6467.webp

I really just need a whole weekend of uninterrupted time in the garage but I’ve got too much going on at the moment.
 
Recently managed to wrap up the front suspension on the driver’s side, documented in my latest vlog:


View: https://youtu.be/J-yzOq9-cc0?si=i9imdzPLF4tLA-vC


I’m actually looking forward to doing the passenger side without having to take any time to record any of it, once I can get more garage time.

If I ever even think about doing suspension stuff again, I’m definitely doing coilovers.
 
  • Like
Reactions: General karthief
Couple of things.

One, get/rent an internal spring compressor from the auto parts store. Makes dropping the spring in a lot easier. You will put the hooks a couple coils in from the ends and the hex head of the compressor needs to go to the bottom. Once the spring is installed then you can remove it through the control arm opening. Takes some work but I have done it a few times.

Two, I do not think that was a caliper bleeder replacement. I believe it’s a grease zerk for the ball joint. Installs on the bottom where you had the jack.

Three, pull the rotor and dust shield off the spindle and you will find it easier to do the work. You won’t have to fight the weight or how bulky it is.

Great job and your patience is really good.
 
  • Like
Reactions: DudeStang
Couple of things.

One, get/rent an internal spring compressor from the auto parts store. Makes dropping the spring in a lot easier. You will put the hooks a couple coils in from the ends and the hex head of the compressor needs to go to the bottom. Once the spring is installed then you can remove it through the control arm opening. Takes some work but I have done it a few times.

Two, I do not think that was a caliper bleeder replacement. I believe it’s a grease zerk for the ball joint. Installs on the bottom where you had the jack.

Three, pull the rotor and dust shield off the spindle and you will find it easier to do the work. You won’t have to fight the weight or how bulky it is.

Great job and your patience is really good.
Thanks for weighing in. I was convinced I would be good with just the spring tool but that was before I figured out the height limits imposed by the red Pittsburg jack. At that point I was so focused on getting the car just a little bit higher, I apparently forgot that spring compressors exist and are available to rent at the Auto Zone I frequent.

Will definitely be giving that approach a try when I do the passenger side.

I think you’re right about the grease zerk but haven’t had a chance to take a closer look.

Good call on a different approach to the spindle too. :eek:
 
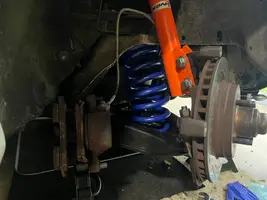
Yesterday (Happy Father’s Day, dads!) I finally got a chance to make some significant progress on my Fox and I mostly got the front passenger side suspension wrapped up. Same as what I was working on previously but to recap: New (OEM) lower control arms, SR lowering springs, SVE caster camber plates, and SVE bump steer kit.
IMG_4974.webp
IMG_4980.webp

I actually ended up renting one of the internal spring compressors this time to try and do what AeroCoupe recommended but I couldn’t get it to work the way I needed. I ended up using the Maximum Motorsports tool again and getting the spring in ended up being a lot easier this time around, once I stopped wasting my time trying to install the lower spring isolator.

Getting the spindle/rotor back onto the control arm was a pain again, and I think this might legitimately be the last time I ever do something control arm related for the rest of my life. :cautious:

I still need to torque down the control arm bolts and figure out how to get the car aligned or find a shop reasonably close they can align a lowered car that still leaks too much oil. I think I’ve only gotten fatter the last few months because getting under the car with the suspension loaded is close to impossible now (I imagine the presence of lowering springs on all four corners now doesn’t help too).

I know it needs to be done with the suspension loaded (and I think the sway bar end links too?) but could I just do it with the car on ramps to give myself a little bit extra space to make sure everything is torqued down accurately? Any reason that wouldn’t work?

Also, any insight on attempting to do my own alignment? :oops:
 
  • Like
Reactions: 85GT4V
Happy Fathers Day! Glad to see you make some progress on the stang.
When I did my suspension, I got the front up on the ramps I have, and then jacked up the rear by the differential, and put Jack stands under the axle tubes. That gave me enough space to get everything tight with the suspension loaded.
I also did my own “home alignment” with string, tape measure, and a small level. My intent was to do this to get it good enough to eventually get it professionally aligned, but it tracks straight down the road, and with as little as I drive it, that’s how it stayed.
 
  • Like
Reactions: DudeStang