
I keep watching this section to see if anybody is gonna post anything remotely like the title. I decided that I'll start.
I swapped an 02' 2v in my car. I chose to make it as easy as I could. Easy for me meant that I would accept certain sacrifices. Those sacrifices were: Manual brakes; Manual steering; and a carburetor.
There are several other swaps out there that have kept the entire conversion entirely factory, and the F/I, power steering, and power brakes transferring over, this isn't one of those.
So if your interested on how I did it, read along.
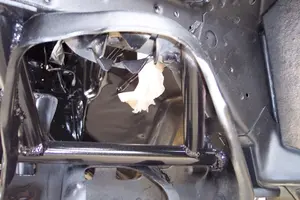
THE K MEMBER:
Simple route: swap in a SN 95 K member, or buy one of the aftermarket Fox body tubular units that are available modified to accept 4.6 mounts. You will be happiest w/ future clearance issues, if you just pony up and buy a tubular unit, as your exhaust options will be better if you do.
The factory fox body k member requires extensive modification to make it work. Since I have more time than money, this was the path I chose.


Basically, I used the stock k member as the frame for my tubular skeleton, and I cut away as much of the factory unit as could be done after the reinforcement was in place. I found out that the steering rack mount points left alone placed the rack way too high to allow me to sit the engine as low as I wanted it, so I cut the entire center out of the k member and re-built the rack mount points 3/4" lower.
* Moving the rack down 3/4" will cause bumpsteer issues. I'll deal w/ that later, I just need to point that out at this juncture.
With the k member modified to allow the engine to fit, I mocked up the steering rack, and dropped the engine in to get a location for the mount pads. Once that was determined, I welded the mount pads in permanently and dropped the engine to determine the fitment of the rest of the issues.
Bottom line: I built the k member to allow me to sit the engine where I wanted it to sit, both side to side, front to back, as well as how high. An aftermarket k member is going to have the mount pads welded, and you will have to accept the fitment of the engine as it is. Again, there are plenty of guys (99%) using this approach as opposed to going what I went through. If $300-400.00, is in your budget and you can work around the placement issues, save your self a bunch of time and buy one.
Withe the engine in and sitting on the mount pads you can see how I biased the side to side to give myself more room on the drivers's side to make room for the master cylinder, but I'm gonna talk about that later.


STEERING:
A manual rack was chosen again to simplify things. The plumbing and clearance issues disappear w/ a manual rack. So I chose a Jegs manual rack w/ the standard 20:1 stock ratio.
There are two ratios offered for most manual racks; a standard 20:1, and a "sport" 15:1 option.
While the sport ratio takes less turns to fully come "lock to lock", the effort to drive the car in a parking lot goes up significantly. So if you choose to use a manual rack, be wary of your intended usage.
I also made my steering shaft out of double d bar stock, and two double d universal joints. Compared w/ the premade units being offered this saves about 100.00. There is no welding required, and the U joints use set screws to hold them in place.
BUMPSTEER: Depending on whether or not you did what I did, or you simply chose to lower your car, you are gonna have to deal w/ bumpsteer. Bumpsteer occurs when the swing arc relationship between the inner tie rods and the lower control arm pivot points get changed from their stock relationship. Making a change in ride height or changing where your rack is located will affect bumpsteer more or less in either regard. You'll know if you have it when the steering moves when you go over a dip or bump. Your front end alignment dude will more than likely advise you of it as well. There are kits available to deal w/ it out there. I am not going to go into the procedure of trying to measure and adjust for it in this, just know I had a buttload of it.
EXHAUST:
I used Afterburner 1 5/8" long tubes for a 94/98 Mustang. The passenger side fit w/ no issues. The drivers' side may have fit as well, but the header I had was butchered from a previous project and it required rebuilding to put it in place. If I had it to do over, (and when I replace these mild steel pieces w/ stainless units later), I would of just tried the fit on the drivers' side. Maybe it'll fit , maybe I'll be welding stainless some time in the future.
Unfortunately, I can't show you the headers mounted from the side (for obvious reasons) I can show you them Looking up at the bottom of the engine w/ the headers installed

THE CROSSMEMBER:
Since it's obvious we'll talk about the ramifications of using headers that are intended to fit a different car. Using the stock crossmember w/ long tubes placed the collector on the drivers' side right against the stock crossmember. Using shorties, and building the exhaust pipes accordingly to accommodate the stock crossmember would be the easy approach to this problem, but I wanted to use the long tubes so modifications were made to allow for them. Again, I took the unorthodox approach and cut the stock crossmember away completely using a cut off wheel. I then plated both sides of the floor w/ 1/8" plate and built this crossmember instead:

Now that the exhaust was solved and the transmission was supported we'll move on to getting it fed.
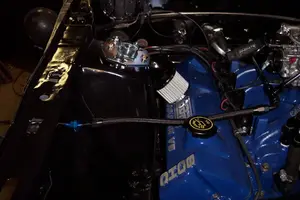
INDUCTION/IGNITION:
I didn't have a harness, or ECU, and like I said before I wanted it simple. For me, a carb was the solution. MSD/Edelbrock makes a packaged solution to allow this, part number is 2839 for the ign module, and the intake as a package for 799.00

Allows laptop programmability for your ignition timing. Comes w/ all the necessary wiring to accommodate the coil packs and sensors. pretty much plug and play.
I'm not a fan of the intake option as there is only one, and the power band is 3500 to 7500 RPM but for now, it's the only option:

The carburetor for the motor should be small, 550-600 cfm. Based on the formula for a carb that matches engine size/ vs rpm range/ vs engine volumetric efficiency or VE for short
The math formula is: CARB CFM = CU.IN. X RPM divided by 3456 X VE%
So we'll plug in a few things:,...4.6= 281; we'll really spin the motor, and we'll shoot fro the high side of a street driven stock engine VE @ *85%
* Note as you make performance mods, your engine VE goes up. Race engines can exceed 100% VE, Supercharged engines even more. Street engines range between 75 and 85%.
So based on the above,.... 281 x 6500 / 3456 x 85% =449 CFM
I have a 600 CFM Summit carb on my engine, and I can testify that out of the box, w/ the stock engine it is too big. I have since, added cams and heads to that engine, so we'll revisit that after i get some more run time on the new combo.

FUEL PUMP/TANK:
If you had a F/I system on your car before the conversion, and you go to a carburetor, you are going to have to change your pump and pick up. You cannot "safely" regulate the F/I pressure down to carburetor pressure, (in other words, down from 40 to 60psi, to 4 to 6 psi). Expect that you'll have to deal w/ this. As for me, I built a custom tank, and used an external carb pump, You can buy a number of plastic or aluminum fuel cells and mount them where the tank used to be, or you can buy a stock tank from a carbureted year mustang (79- 85) and get the job done that way as well. Just be sure that the carb pump you use is either factory set not to exceed 7 psi, or that you use a regulator.
MASTER CYLINDER
As a standard Fox power brake system was obviously never gonna fit, a manual brake system was my next choice. Some guys get Hydroboost to work, but again in my case, (no power steering). When and if you convert to a manual brake system there are two considerations you'll have to deal with:
#1 Your brake pedal will have to have it's pedal ratio modified.
#2 You will have to use a manual brake master cylinder w/ a 7/8" bore diameter.
Modifying the brake pedal ratio requires that you remove the pedal and move the intersect point of the master cylinder pushrod closer to the pivot point (there by increasing your leverage and reducing the effort to bring your car to a stop). You can buy and entire manual brake conversion kit from companies like MM that already have the pedal modified, and come w/ a more "manual friendly" master cylinder bore (15/16" stock Cobra M/C I believe), but again, depending on how skilled you are, you can opt to convert it your self.
The only problem I have w/ the MM kit is that the brake lines exit from the engine side of the master cylinder, and you will find that there simply isn't enough room between the M/C and the valve covers if you use any other valve cover other than stock. I have these high aluminum units that increase the width of the combination to the point of the brake lines were actually touching the valve covers, despite being bent as tightly as possible. I have sinced replaced the stock Ford master cylinder w/ a Wilwood unit that has lines that exit towards the shock towers, and free up a little room between the M/C and valve cover.
AND, why do you need a 7/8" bore M/C? The smaller piston generates the higher line pressure that is gonna be required to adequately clamp the rotor. Anything bigger will require a massive amount of leg effort/or will not generate (at all) pressure enough to adequately stop the vehicle. The 15/16" M/C that comes in the MM kit is the biggest size that will work, and still not require a Hur-culeg to get your car to stop.
CHARGING:
I used the stock 02' alternator, and ran a wire to a light circuit to excite the alternator. In other words, my 02' alternator is a "one wire" unit that only had to have a little light mounted in my dash that operates as a resistor between switched 12v.
ELECTRONICS/GAUGES:
I used all aftermarket gauges to monitor the engine and speed. Tach, oil pressure, water temp, speed, and volts all came w/ their respective senders, and I ran dedicated lines from the gauges to each respectively.
When I filled and purged the tank and lines w/ gas, and after I loaded an intial timing curve in the MSD computer, the car started on the first try ran at fast idle until I patted the throttle 30 seconds later. Eventually It dropped to 800 RPM where it Idled and allowed me to fine tune the idle mixture. Like I said earlier, It needs to be leaned down but w/ the new heads I'll see if that requirement has changed.
This should give you some idea of all the concerns/bridges you'll have deal with if you are entertaining this swap. The biggest hurdle is the sheer size of the motor. The fact that the outside dimensions do not justify the internal ones probably need to be considered in earnst before you attempt this swap. Other than difference and visual impact I cannot for the life of me figure out why I went this way.
but what can I say, I've always been a little different, even on an all Mustang web forum
I swapped an 02' 2v in my car. I chose to make it as easy as I could. Easy for me meant that I would accept certain sacrifices. Those sacrifices were: Manual brakes; Manual steering; and a carburetor.
There are several other swaps out there that have kept the entire conversion entirely factory, and the F/I, power steering, and power brakes transferring over, this isn't one of those.
So if your interested on how I did it, read along.
THE K MEMBER:
Simple route: swap in a SN 95 K member, or buy one of the aftermarket Fox body tubular units that are available modified to accept 4.6 mounts. You will be happiest w/ future clearance issues, if you just pony up and buy a tubular unit, as your exhaust options will be better if you do.
The factory fox body k member requires extensive modification to make it work. Since I have more time than money, this was the path I chose.
Basically, I used the stock k member as the frame for my tubular skeleton, and I cut away as much of the factory unit as could be done after the reinforcement was in place. I found out that the steering rack mount points left alone placed the rack way too high to allow me to sit the engine as low as I wanted it, so I cut the entire center out of the k member and re-built the rack mount points 3/4" lower.
* Moving the rack down 3/4" will cause bumpsteer issues. I'll deal w/ that later, I just need to point that out at this juncture.
With the k member modified to allow the engine to fit, I mocked up the steering rack, and dropped the engine in to get a location for the mount pads. Once that was determined, I welded the mount pads in permanently and dropped the engine to determine the fitment of the rest of the issues.
Bottom line: I built the k member to allow me to sit the engine where I wanted it to sit, both side to side, front to back, as well as how high. An aftermarket k member is going to have the mount pads welded, and you will have to accept the fitment of the engine as it is. Again, there are plenty of guys (99%) using this approach as opposed to going what I went through. If $300-400.00, is in your budget and you can work around the placement issues, save your self a bunch of time and buy one.
Withe the engine in and sitting on the mount pads you can see how I biased the side to side to give myself more room on the drivers's side to make room for the master cylinder, but I'm gonna talk about that later.
STEERING:
A manual rack was chosen again to simplify things. The plumbing and clearance issues disappear w/ a manual rack. So I chose a Jegs manual rack w/ the standard 20:1 stock ratio.
There are two ratios offered for most manual racks; a standard 20:1, and a "sport" 15:1 option.
While the sport ratio takes less turns to fully come "lock to lock", the effort to drive the car in a parking lot goes up significantly. So if you choose to use a manual rack, be wary of your intended usage.
I also made my steering shaft out of double d bar stock, and two double d universal joints. Compared w/ the premade units being offered this saves about 100.00. There is no welding required, and the U joints use set screws to hold them in place.
BUMPSTEER: Depending on whether or not you did what I did, or you simply chose to lower your car, you are gonna have to deal w/ bumpsteer. Bumpsteer occurs when the swing arc relationship between the inner tie rods and the lower control arm pivot points get changed from their stock relationship. Making a change in ride height or changing where your rack is located will affect bumpsteer more or less in either regard. You'll know if you have it when the steering moves when you go over a dip or bump. Your front end alignment dude will more than likely advise you of it as well. There are kits available to deal w/ it out there. I am not going to go into the procedure of trying to measure and adjust for it in this, just know I had a buttload of it.
EXHAUST:
I used Afterburner 1 5/8" long tubes for a 94/98 Mustang. The passenger side fit w/ no issues. The drivers' side may have fit as well, but the header I had was butchered from a previous project and it required rebuilding to put it in place. If I had it to do over, (and when I replace these mild steel pieces w/ stainless units later), I would of just tried the fit on the drivers' side. Maybe it'll fit , maybe I'll be welding stainless some time in the future.
Unfortunately, I can't show you the headers mounted from the side (for obvious reasons) I can show you them Looking up at the bottom of the engine w/ the headers installed
THE CROSSMEMBER:
Since it's obvious we'll talk about the ramifications of using headers that are intended to fit a different car. Using the stock crossmember w/ long tubes placed the collector on the drivers' side right against the stock crossmember. Using shorties, and building the exhaust pipes accordingly to accommodate the stock crossmember would be the easy approach to this problem, but I wanted to use the long tubes so modifications were made to allow for them. Again, I took the unorthodox approach and cut the stock crossmember away completely using a cut off wheel. I then plated both sides of the floor w/ 1/8" plate and built this crossmember instead:
Now that the exhaust was solved and the transmission was supported we'll move on to getting it fed.
INDUCTION/IGNITION:
I didn't have a harness, or ECU, and like I said before I wanted it simple. For me, a carb was the solution. MSD/Edelbrock makes a packaged solution to allow this, part number is 2839 for the ign module, and the intake as a package for 799.00
Allows laptop programmability for your ignition timing. Comes w/ all the necessary wiring to accommodate the coil packs and sensors. pretty much plug and play.
I'm not a fan of the intake option as there is only one, and the power band is 3500 to 7500 RPM but for now, it's the only option:
The carburetor for the motor should be small, 550-600 cfm. Based on the formula for a carb that matches engine size/ vs rpm range/ vs engine volumetric efficiency or VE for short
The math formula is: CARB CFM = CU.IN. X RPM divided by 3456 X VE%
So we'll plug in a few things:,...4.6= 281; we'll really spin the motor, and we'll shoot fro the high side of a street driven stock engine VE @ *85%
* Note as you make performance mods, your engine VE goes up. Race engines can exceed 100% VE, Supercharged engines even more. Street engines range between 75 and 85%.
So based on the above,.... 281 x 6500 / 3456 x 85% =449 CFM
I have a 600 CFM Summit carb on my engine, and I can testify that out of the box, w/ the stock engine it is too big. I have since, added cams and heads to that engine, so we'll revisit that after i get some more run time on the new combo.
FUEL PUMP/TANK:
If you had a F/I system on your car before the conversion, and you go to a carburetor, you are going to have to change your pump and pick up. You cannot "safely" regulate the F/I pressure down to carburetor pressure, (in other words, down from 40 to 60psi, to 4 to 6 psi). Expect that you'll have to deal w/ this. As for me, I built a custom tank, and used an external carb pump, You can buy a number of plastic or aluminum fuel cells and mount them where the tank used to be, or you can buy a stock tank from a carbureted year mustang (79- 85) and get the job done that way as well. Just be sure that the carb pump you use is either factory set not to exceed 7 psi, or that you use a regulator.
MASTER CYLINDER
As a standard Fox power brake system was obviously never gonna fit, a manual brake system was my next choice. Some guys get Hydroboost to work, but again in my case, (no power steering). When and if you convert to a manual brake system there are two considerations you'll have to deal with:
#1 Your brake pedal will have to have it's pedal ratio modified.
#2 You will have to use a manual brake master cylinder w/ a 7/8" bore diameter.
Modifying the brake pedal ratio requires that you remove the pedal and move the intersect point of the master cylinder pushrod closer to the pivot point (there by increasing your leverage and reducing the effort to bring your car to a stop). You can buy and entire manual brake conversion kit from companies like MM that already have the pedal modified, and come w/ a more "manual friendly" master cylinder bore (15/16" stock Cobra M/C I believe), but again, depending on how skilled you are, you can opt to convert it your self.
The only problem I have w/ the MM kit is that the brake lines exit from the engine side of the master cylinder, and you will find that there simply isn't enough room between the M/C and the valve covers if you use any other valve cover other than stock. I have these high aluminum units that increase the width of the combination to the point of the brake lines were actually touching the valve covers, despite being bent as tightly as possible. I have sinced replaced the stock Ford master cylinder w/ a Wilwood unit that has lines that exit towards the shock towers, and free up a little room between the M/C and valve cover.
AND, why do you need a 7/8" bore M/C? The smaller piston generates the higher line pressure that is gonna be required to adequately clamp the rotor. Anything bigger will require a massive amount of leg effort/or will not generate (at all) pressure enough to adequately stop the vehicle. The 15/16" M/C that comes in the MM kit is the biggest size that will work, and still not require a Hur-culeg to get your car to stop.
CHARGING:
I used the stock 02' alternator, and ran a wire to a light circuit to excite the alternator. In other words, my 02' alternator is a "one wire" unit that only had to have a little light mounted in my dash that operates as a resistor between switched 12v.
ELECTRONICS/GAUGES:
I used all aftermarket gauges to monitor the engine and speed. Tach, oil pressure, water temp, speed, and volts all came w/ their respective senders, and I ran dedicated lines from the gauges to each respectively.
When I filled and purged the tank and lines w/ gas, and after I loaded an intial timing curve in the MSD computer, the car started on the first try ran at fast idle until I patted the throttle 30 seconds later. Eventually It dropped to 800 RPM where it Idled and allowed me to fine tune the idle mixture. Like I said earlier, It needs to be leaned down but w/ the new heads I'll see if that requirement has changed.
This should give you some idea of all the concerns/bridges you'll have deal with if you are entertaining this swap. The biggest hurdle is the sheer size of the motor. The fact that the outside dimensions do not justify the internal ones probably need to be considered in earnst before you attempt this swap. Other than difference and visual impact I cannot for the life of me figure out why I went this way.
but what can I say, I've always been a little different, even on an all Mustang web forum
Attachments
-
 mustangengineswap001.webp107.3 KB · Views: 3,895
 -
 mustangengineswap004.webp73.5 KB · Views: 927
 -
 mustangengineswap002.webp124.9 KB · Views: 3,482
 -
 mustangengineswap003.webp155.1 KB · Views: 1,527
 -
 mustangengineswap008.webp92.9 KB · Views: 840
 -
 mustangengineswap009.webp122.2 KB · Views: 1,014
 -
 mustangengineswap014.webp87.9 KB · Views: 716
 -
 mustangengineswap012.webp53.5 KB · Views: 721
 -
 6011_full.webp7.5 KB · Views: 681
 -
 EDL-2839.webp7.6 KB · Views: 727
 -
 sum-m08750vs_w.webp26.4 KB · Views: 695
