1.) Remove the belt from the A/C, and rotate the pulley. If it has any runout, you will need to replace it.
2.) I is any runout or slack in the hub replace the hub assembly. The hub is available as a separate part.
3.) If after replacing the defective parts on the clutch assembly you still have the A/C cutting off, it is probably because it is low on refrigerant.
WARNING!!! Do not add R134 to a system that has not been converted to R134. You will destroy the compressor in short order. R134 is not compatible with the mineral oil lubricant used with R12 Freon, and the oil will not circulate in the system like it is supposed to do.
Systems converted to R134 are supposed to have a blue low pressure and red high pressure service adapter on them.
Typical low pressure side R134 coupling
Typical high pressure side R134 coupling
If your A/C has not been converted to R134, you have three choices: either buy some R12 off of eBay or Get a can of Freeze 12 or convert to R134. When done properly, the conversion to R134 involves a flush of the system with a solvent to remove the mineral oil. Then you get to replace all the O rings and accumulator/dryer. The final steps are pulling a vacuum and refiling the system with the proper lubricant and R134 refrigerant.
If your A/C system has already been converted to R134, go buy a can from Walmart and a low pressure charging hose and add it to the system.
The A/C clutch is about $100 new or you can buy a compressor from the junkyard with a working clutch for about $50. The puller is about $16 if you have to buy one, Autozone will rent you one for free.
The clutch hub is usually what fails, the rubber shock damper shears off from the steel hub and plate. The pulley turns, but the hub doesn't when you power up the A/C.
www.rockauto.com Ford MOTORCRAFT Part # YB289A $39.00
The hub comes off without much problem if you have the puller. You don’t have to do anything with the refrigerant (R12 or R134a), you can replace the clutch without draining and refilling the system. The snap ring hiding inside the hub is the only tricky part.
Remove the nut; remove the snap ring (if present) and then remove the washer. Loosen the puller tool center bolt so that you can get the larger threaded section of the puller screwed into the clutch hub. Tighten up the center bolt on the puller and the clutch hub will come off.
Clutch hub puller tool
AutoZone and most other major auto parts chain stores will rent or loan the puller
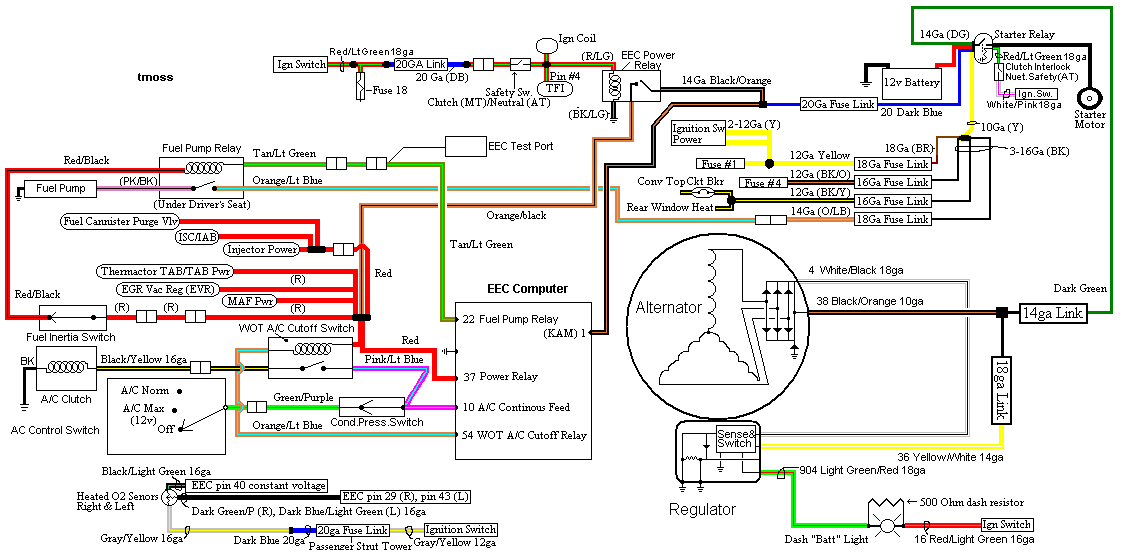
A few simple electrical tests are advised before popping out the wallet to buy a clutch assembly. With the engine running, use a test light connected to the 2 wires on the A/C clutch harness to make sure you have voltage when you turn the A/C on. If the system is low on refrigerant, the clutch will not engage (safety feature, keeps you from burning up the compressor due to no oil). There is an aluminum canister on the firewall with a large hose leading to the A/C compressor. There is a pressure switch on it with a 2 wire connector: pull the connector off and jumper the wires. The compressor circuit will power up, and the test light will light if the electrical circuit is good. This test is also a good way to check the compressor & clutch if the system is low on refrigerant. You can jumper the wires and the compressor will turn if the clutch is good.
The clutch also has a relay that shuts off when you go to WOT (wide open throttle). It is located on the passenger side inner fender well. The close proximity of the relay to the headers can cause the insulation on the wiring and the relay socket to deteriorate. The relay can become non functional when this happens.
Diagram courtesy of Tmoss & Stang&2birds
See the following website for some help from Tmoss (diagram designer) & Stang&2Birds (website host) for help on 88-95 wiring
http://www.veryuseful.com/mustang/tech/engine/ Everyone should bookmark this site.
Ignition switch wiring
http://www.veryuseful.com/mustang/tech/engine/images/IgnitionSwitchWiring.gif
Fuel, alternator, A/C and ignition wiring
http://www.veryuseful.com/mustang/tech/engine/images/fuel-alt-links-ign-ac.gif
Complete computer, actuator & sensor wiring diagram for 88-91 Mass Air Mustangs
http://www.veryuseful.com/mustang/tech/engine/images/88-91_5.0_EEC_Wiring_Diagram.gif
Complete computer, actuator & sensor wiring diagram for 91-93 Mass Air Mustangs
http://www.veryuseful.com/mustang/tech/engine/images/91-93_5.0_EEC_Wiring_Diagram.gif
Vacuum diagram 89-93 Mustangs
http://www.veryuseful.com/mustang/tech/engine/images/mustangFoxFordVacuumDiagram.jpg
HVAC vacuum diagram
http://www.veryuseful.com/mustang/tech/engine/images/Mustang_AC_heat_vacuum_controls.gif
TFI module differences & pinout
http://www.veryuseful.com/mustang/tech/engine/images/TFI_5.0_comparison.gif
Fuse box layout
http://www.veryuseful.com/mustang/tech/engine/images/MustangFuseBox.gif