
You are using an out of date browser. It may not display this or other websites correctly.
You should upgrade or use an alternative browser.
You should upgrade or use an alternative browser.
BUILDING MY OWN ROTISSERIE
- Thread starter Nemesis67
- Start date

xoxbxfx
Founding Member
Well, It's been a long haul and the end is in sight. I still have to put some holes in these things so I can put pins and bolts into the sliding parts, but most of it is complete. It's been fun doing all the fabricating and welding. And I am really looking forward to monting the car and testing these things. Hopefully nothing will break or collapse, that would be bad. 
I'll keep you all posted.
<a href="http://photobucket.com" target="_blank"><img src="http://i158.photobucket.com/albums/t104/meldhast1707/DSC01155.jpg" border="0" alt="Photo Sharing and Video Hosting at Photobucket"></a>
<a href="http://photobucket.com" target="_blank"><img src="http://i158.photobucket.com/albums/t104/meldhast1707/DSC01154.jpg" border="0" alt="Photo Sharing and Video Hosting at Photobucket"></a>
I'll keep you all posted.
<a href="http://photobucket.com" target="_blank"><img src="http://i158.photobucket.com/albums/t104/meldhast1707/DSC01155.jpg" border="0" alt="Photo Sharing and Video Hosting at Photobucket"></a>
<a href="http://photobucket.com" target="_blank"><img src="http://i158.photobucket.com/albums/t104/meldhast1707/DSC01154.jpg" border="0" alt="Photo Sharing and Video Hosting at Photobucket"></a>

1320stang
Founding Member
I'm assuming you're running some of those sleeves over the ends of the rotating part and welding angle to their sides for your attachment to the car, correct?
The sleeves for the rotating part don't look like they're welded in the same position in relation to the pivot. The top one looks like it's in the middle and the bottom looks like it's at the end, I'd flip the bottom one over.
You may end up needing to use a piece of square tube to put between the ram and the pivot tube so that you can get your height. My rotisserie uses two legs on the ends as opposed to the center leg. There are pro's & con's of both. Mine doesn't have the jacks, but I was thinking of adding screw actuators inside the uprights and then I could raise or lower both ends at the same time without any help.
Looks good.
The sleeves for the rotating part don't look like they're welded in the same position in relation to the pivot. The top one looks like it's in the middle and the bottom looks like it's at the end, I'd flip the bottom one over.
You may end up needing to use a piece of square tube to put between the ram and the pivot tube so that you can get your height. My rotisserie uses two legs on the ends as opposed to the center leg. There are pro's & con's of both. Mine doesn't have the jacks, but I was thinking of adding screw actuators inside the uprights and then I could raise or lower both ends at the same time without any help.
Looks good.
lauras70mach1
Member
I'm no expert, but it looks like you'll have the weight of the car hanging pretty far off the main upright.
1320stang
Founding Member
Yeah, but he's supporting that with the jack.
Here's a couple pics of my Whirly Jig. I welded up the teeth on the gear, it's as good as new now. In the 1st pic, you can see that the base has the outer tube and the part that raises has the inner tube, this is why I'm talking about putting a screw actuator inside there. I'd use a couple of extension cords connected to a switch box that has an extension cord to a wall, it'd be sweet.
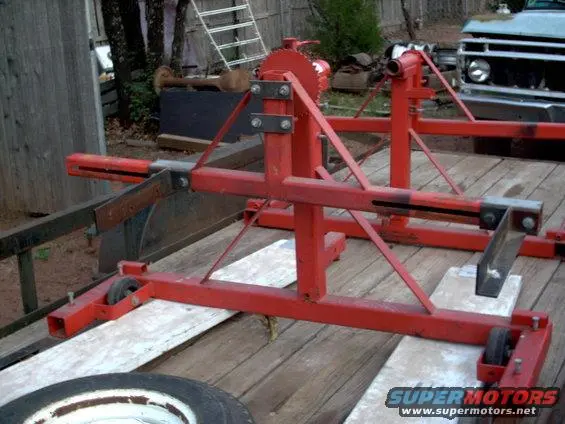
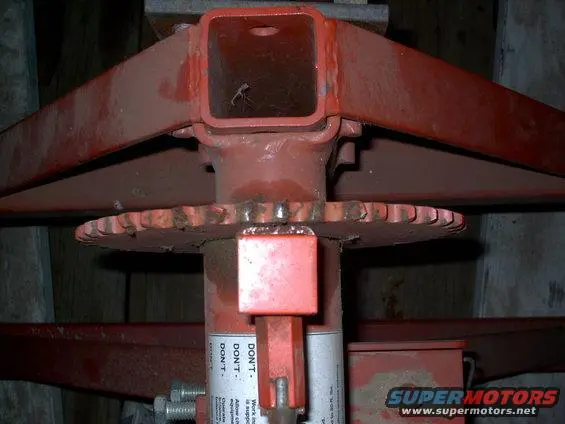
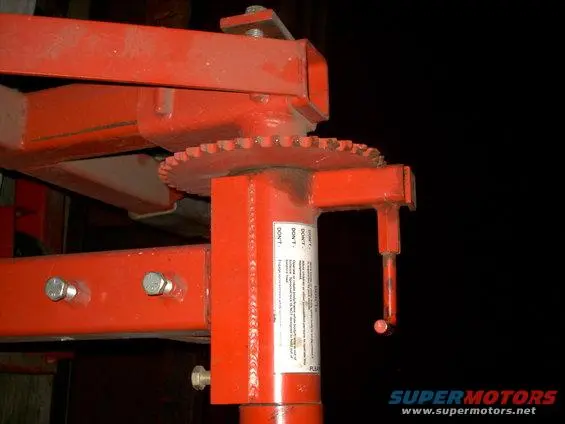
Here's a couple pics of my Whirly Jig. I welded up the teeth on the gear, it's as good as new now. In the 1st pic, you can see that the base has the outer tube and the part that raises has the inner tube, this is why I'm talking about putting a screw actuator inside there. I'd use a couple of extension cords connected to a switch box that has an extension cord to a wall, it'd be sweet.
I'm assuming you're running some of those sleeves over the ends of the rotating part and welding angle to their sides for your attachment to the car, correct?
The sleeves for the rotating part don't look like they're welded in the same position in relation to the pivot. The top one looks like it's in the middle and the bottom looks like it's at the end, I'd flip the bottom one over.
You may end up needing to use a piece of square tube to put between the ram and the pivot tube so that you can get your height. My rotisserie uses two legs on the ends as opposed to the center leg. There are pro's & con's of both. Mine doesn't have the jacks, but I was thinking of adding screw actuators inside the uprights and then I could raise or lower both ends at the same time without any help.
Looks good.
Your right, I screwed up one end when I started the first rotating part. I thought of turning the bottom one over too. Yep, the sleeves will go over the horizontal bar that rotates and then I'll attach the bars that attach to the car to them. That way I have flexibility in attaching the car or other cars to the rotisserie.
I'm not completely happy with the rotating mechanism, but hey, this is my first time.
Learn from experience.I'm no expert, but it looks like you'll have the weight of the car hanging pretty far off the main upright.
Yeah, it's going to pretty far out, but it's only on one of the assemblies, which I consider the front one. I've also prechecked the rotation with the rotating assembly. It clears the horizontal bar. Plus my garage has 30 foot ceilings, so clearance there is not an issue. Plus I hate bending over a lot with a bad back. The jacks are going to take a lot of the weight on the front end so I'm not too worried about that either.
lauras70mach1
Member
Are you going to have some sort of lockout system? Personally, I wouldn't feel comfortable with only those hydraulic cylinders holding up the car.
1320stang
Founding Member
Are you going to have some sort of lockout system? Personally, I wouldn't feel comfortable with only those hydraulic cylinders holding up the car.
You could drill a couple holes and weld a couple nuts on the tube like I have in that last pic, but with your tubing thickness, I'd maybe move them closer to the corner.
After comparing my pics to your pics, my pivot is a lot closer the the horizontal bar than what yours are, I wonder if you'll get it balanced to be able to rotate it over? I think you may end up having to take out the diagonals on the rotating assembly and making them bigger, which is safer in a way as it can't slide off the end, it would be captured.
I'm going to use pins on the uprights, that move the whole car up and down. I'll use grade 8 bolts to hold the rotating horizontal bars in position once the car is attached and adjusted. As for the horizontal sliding positioners I'm going to use grade 8 bolts for that too. All pins and bolts will pass through holes that I'm going to drill once I have everything lined up (before the car gets mounted). The back will be easier, since I'm going to mount the rotating horizontal bar directly to were the bumper was, with some spacers and rubber bushings. 

jikelly
20+ Year Stangneter 
Well, heres the latest. I've almost finished these things! I still have to attach the mounting points but I just mocked up the fit of the rotisseries to the car. Believe it or not but I won't need the whole rotating mass that I planned on using on the rear. I measured the height of each rotating center for each stand as the car sits right now, which is on jackstands sitting about 18 inches off the ground. To my amazement, the measurement is the same! Now remember I'm mounting the rear stand to the rear bumper holes and the front is using a drop down rotating mass which mounts to the front bumper holes in the framerails. So in theory my centers of rotation, front and rear are at the same height, without even jacking up the stands. WOW! I don't think I could have even planned that even if I wanted to. I don't know, maybe I'm just tired, but I was pretty pleased. Should have taken some pics so you guys know what I'm trying to say.  Maybe I'll get some on tomorrow. More to come...
I don't think I could have even planned that even if I wanted to. I don't know, maybe I'm just tired, but I was pretty pleased. Should have taken some pics so you guys know what I'm trying to say. Maybe I'll get some on tomorrow. More to come...
1320stang
Founding Member
My '63 Fairlane is a rolling shell with windshield and wing windows. With the wheels removed, the pivot point is is just above the horizontal bar. The front and rear horizontal bars are adjusted at the same height in relationship to the pivot point. I only have about 5" of total vertical adjustment. Doesn't seem like much, but it works. I guess you fabricate the brackets that attach them to work but my front and rear bumper mount holes are in the same plane.
paintballtommy
Member
ive allways wondered how the car attatches to the rotisserie and with what type of hardware? bumper brackets int he frame rails? other things?
1320stang
Founding Member
For the rear of a mustang, they have a T shaped bracket made with angle iron that bolts to the angle iron arms on the rotisserie. On the front, the arms just bolt to the side of the frame where the bumper mounts.
IT'S DONE, WITH PICTURES!
WELL, I'M FINALLY DONE!!!!
HERE IT IS BOYS AND GIRLS. IT TOOK A LITTLE LONGER THAN I ANTICIPATED, PLUS A FEW MORE TRIPS TO ATWOODS FOR BOLTS AND OTHER STUFF. BUT I PUT THE STANG IN THE AIR FOR THE FIRST TIME THIS AFTERNOON. MY LOCK-OUT DIDN'T WORK LIKE I WANTED IT TO, SO FOR NOW A JACKSTAND IS GOING TO DO THE DUTY OF HOLDING IT ON IT'S SIDE FOR NOW. YOU CAN SEE THE MENTIONED JACKSTAND IN THE PICTURES. IT ROLLS OVER REAL EASY, BUT IT IS A LITTLE BOTTOM HEAVY SO I GUESS I DON'T HAVE IT QUITE CENTERED, BUT I DON'T CARE IT WORKS GREAT! GOOD ENOUGH FOR GOVENMENT WORK I ALWAYS SAY. SOME OF THE PICS SHOW CLOSEUPS OF HOW I BOLTED THE CAR TO THE STANDS, FRONT AND REAR. WELL WORTH THE TIME AND EFFORT!! CHECK IT OUT.
:SNSign:
<a href="http://photobucket.com" target="_blank"><img src="http://i158.photobucket.com/albums/t104/meldhast1707/DSC01256.jpg"
border="0" alt="Photo Sharing and Video Hosting at Photobucket"></a>
<a href="http://photobucket.com" target="_blank"><img src="http://i158.photobucket.com/albums/t104/meldhast1707/DSC01256.jpg" border="0" alt="Photo Sharing and Video Hosting at Photobucket"></a>
<a href="http://photobucket.com" target="_blank"><img src="http://i158.photobucket.com/albums/t104/meldhast1707/DSC01253.jpg" border="0" alt="Photo Sharing and Video Hosting at Photobucket"></a>
<a href="http://photobucket.com" target="_blank"><img src="http://i158.photobucket.com/albums/t104/meldhast1707/DSC01237.jpg" border="0" alt="Photo Sharing and Video Hosting at Photobucket"></a>
<a href="http://photobucket.com" target="_blank"><img src="http://i158.photobucket.com/albums/t104/meldhast1707/DSC01218.jpg" border="0" alt="Photo Sharing and Video Hosting at Photobucket"></a>
CLOSE UP OF FRONT: BOLTS USING FRONT BUMPER HOLES
<a href="http://photobucket.com" target="_blank"><img src="http://i158.photobucket.com/albums/t104/meldhast1707/DSC01213.jpg" border="0" alt="Photo Sharing and Video Hosting at Photobucket"></a>
YOU CAN SEE THE PREVIOUS WORK I DID ON THE FLOOR, NEW METAL. WISH I HAD THIS THING FOR THAT WORK, IT WOULD HAVE BEEN A LOT EASIER AND CLEANER!
<a href="http://photobucket.com" target="_blank"><img src="http://i158.photobucket.com/albums/t104/meldhast1707/DSC01217.jpg" border="0" alt="Photo Sharing and Video Hosting at Photobucket"></a>
<a href="http://photobucket.com" target="_blank"><img src="http://i158.photobucket.com/albums/t104/meldhast1707/DSC01207.jpg" border="0" alt="Photo Sharing and Video Hosting at Photobucket"></a>
<a href="http://photobucket.com" target="_blank"><img src="http://i158.photobucket.com/albums/t104/meldhast1707/DSC01211.jpg" border="0" alt="Photo Sharing and Video Hosting at Photobucket"></a>
CLOSE UP OF THE REAR: BOLTS USING THE BUMPER BOLT HOLES WITH SPACERS.
<a href="http://photobucket.com" target="_blank"><img src="http://i158.photobucket.com/albums/t104/meldhast1707/DSC01212.jpg" border="0" alt="Photo Sharing and Video Hosting at Photobucket"></a>
I'M PRETTY PLEASED WITH MYSELF
<a href="http://photobucket.com" target="_blank"><img src="http://i158.photobucket.com/albums/t104/meldhast1707/DSC01210.jpg" border="0" alt="Photo Sharing and Video Hosting at Photobucket"></a>
WELL, I'M FINALLY DONE!!!!
HERE IT IS BOYS AND GIRLS. IT TOOK A LITTLE LONGER THAN I ANTICIPATED, PLUS A FEW MORE TRIPS TO ATWOODS FOR BOLTS AND OTHER STUFF. BUT I PUT THE STANG IN THE AIR FOR THE FIRST TIME THIS AFTERNOON. MY LOCK-OUT DIDN'T WORK LIKE I WANTED IT TO, SO FOR NOW A JACKSTAND IS GOING TO DO THE DUTY OF HOLDING IT ON IT'S SIDE FOR NOW. YOU CAN SEE THE MENTIONED JACKSTAND IN THE PICTURES.
IT ROLLS OVER REAL EASY, BUT IT IS A LITTLE BOTTOM HEAVY SO I GUESS I DON'T HAVE IT QUITE CENTERED, BUT I DON'T CARE IT WORKS GREAT! GOOD ENOUGH FOR GOVENMENT WORK I ALWAYS SAY. SOME OF THE PICS SHOW CLOSEUPS OF HOW I BOLTED THE CAR TO THE STANDS, FRONT AND REAR. WELL WORTH THE TIME AND EFFORT!! CHECK IT OUT.:SNSign:
<a href="http://photobucket.com" target="_blank"><img src="http://i158.photobucket.com/albums/t104/meldhast1707/DSC01256.jpg"
border="0" alt="Photo Sharing and Video Hosting at Photobucket"></a>
<a href="http://photobucket.com" target="_blank"><img src="http://i158.photobucket.com/albums/t104/meldhast1707/DSC01256.jpg" border="0" alt="Photo Sharing and Video Hosting at Photobucket"></a>
<a href="http://photobucket.com" target="_blank"><img src="http://i158.photobucket.com/albums/t104/meldhast1707/DSC01253.jpg" border="0" alt="Photo Sharing and Video Hosting at Photobucket"></a>
<a href="http://photobucket.com" target="_blank"><img src="http://i158.photobucket.com/albums/t104/meldhast1707/DSC01237.jpg" border="0" alt="Photo Sharing and Video Hosting at Photobucket"></a>
<a href="http://photobucket.com" target="_blank"><img src="http://i158.photobucket.com/albums/t104/meldhast1707/DSC01218.jpg" border="0" alt="Photo Sharing and Video Hosting at Photobucket"></a>
CLOSE UP OF FRONT: BOLTS USING FRONT BUMPER HOLES
<a href="http://photobucket.com" target="_blank"><img src="http://i158.photobucket.com/albums/t104/meldhast1707/DSC01213.jpg" border="0" alt="Photo Sharing and Video Hosting at Photobucket"></a>
YOU CAN SEE THE PREVIOUS WORK I DID ON THE FLOOR, NEW METAL. WISH I HAD THIS THING FOR THAT WORK, IT WOULD HAVE BEEN A LOT EASIER AND CLEANER!
<a href="http://photobucket.com" target="_blank"><img src="http://i158.photobucket.com/albums/t104/meldhast1707/DSC01217.jpg" border="0" alt="Photo Sharing and Video Hosting at Photobucket"></a>
<a href="http://photobucket.com" target="_blank"><img src="http://i158.photobucket.com/albums/t104/meldhast1707/DSC01207.jpg" border="0" alt="Photo Sharing and Video Hosting at Photobucket"></a>
<a href="http://photobucket.com" target="_blank"><img src="http://i158.photobucket.com/albums/t104/meldhast1707/DSC01211.jpg" border="0" alt="Photo Sharing and Video Hosting at Photobucket"></a>
CLOSE UP OF THE REAR: BOLTS USING THE BUMPER BOLT HOLES WITH SPACERS.
<a href="http://photobucket.com" target="_blank"><img src="http://i158.photobucket.com/albums/t104/meldhast1707/DSC01212.jpg" border="0" alt="Photo Sharing and Video Hosting at Photobucket"></a>
I'M PRETTY PLEASED WITH MYSELF
<a href="http://photobucket.com" target="_blank"><img src="http://i158.photobucket.com/albums/t104/meldhast1707/DSC01210.jpg" border="0" alt="Photo Sharing and Video Hosting at Photobucket"></a>
I SENT A PICTURE OF THIS TO MY BROTHER. HE WANTS TO KNOW WHAT I'M GOING TO DO WITH IT WHEN I'M DONE. ISN'T THAT JUST LIKE FAMILY, WANTING TO BORROW YOUR STUFF.
HE'S GOT A 70 FASTBACK IN NEBRASKA. IT'S BEEN SITTING IN A BARN FOR ABOUT 5 TO 10 YEARS AND IS MAKING A NICE MOUSE CONDOMINIUM RIGHT NOW
MEANWHILE HE'S IN OHIO SLACKING OFF.
HE'S GOT A 70 FASTBACK IN NEBRASKA. IT'S BEEN SITTING IN A BARN FOR ABOUT 5 TO 10 YEARS AND IS MAKING A NICE MOUSE CONDOMINIUM RIGHT NOW
MEANWHILE HE'S IN OHIO SLACKING OFF.
1320stang
Founding Member
I think the reason your lockout didn't work is because of it not being balanced. How much effort did it take to get it up there? Removing the front suspension would help a bunch. You can see what I was talking about on the diagonals on the rotating 'T'. If they were longer and the sleeve was 'captured' by them, you'd be gold. I also see that you mounted the front attachments by welding them to the 'T' instead of welding them to tube that slid over the 'T'. I'm guessing you ran out of material. They're long enough that you can fix them later. I think if you fixed the diagonals, made the attachments slide instead of welding and had locking casters, it would be just about perfect, especially for a home built piece. Good Job!!
I think the reason your lockout didn't work is because of it not being balanced. How much effort did it take to get it up there? Removing the front suspension would help a bunch. You can see what I was talking about on the diagonals on the rotating 'T'. If they were longer and the sleeve was 'captured' by them, you'd be gold. I also see that you mounted the front attachments by welding them to the 'T' instead of welding them to tube that slid over the 'T'. I'm guessing you ran out of material. They're long enough that you can fix them later. I think if you fixed the diagonals, made the attachments slide instead of welding and had locking casters, it would be just about perfect, especially for a home built piece. Good Job!!
I thought about taking off the front suspension, but I didn't. I welded the attachments to the T because I just wanted to see if this thing would work. I still have material, so I can weld them to sliders later if I feel the need to. In fact I have a lot of steel left over. It didn't take a whole lot of effort, but I did need my girlfriend to put the jackstand under there to hold it up. I can put the jackstand in myself as well, but she was standing there, so why not put her to work.
This thing doesn't roll around, that bad, so lockouts aren't going to be needed hopefully. Overall, I'm very pleased with myself. Thanks!
Similar threads


- Replies
- 8
- Views
- 356

- Replies
- 4
- Views
- 1K

- Replies
- 3
- Views
- 1K

