Cowl Vents - need some help

stangman16

Active Member
Nov 16, 2004
640
4
29
San Antonio, TX
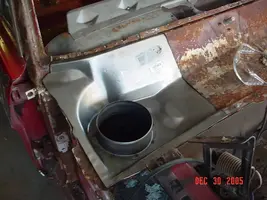
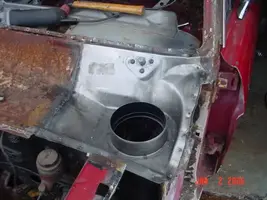
I tack welded the cowl vent into place to check for fitment with the cowl cover set on top. And the lower cowl just doesn't touch the cowl cover, except for the new patch panel that I tacked into place. I overlapped the cowl patch ontop of the lower cowl, should I switch it to go underneath the lower cowl?

How did you get the lower cowl to line up flush with the cowl cover in order to weld it together? As it is right now it seems as though the windshield would go in perfect, but I know for structural reasons I need the lower cowl to be welded to the cover. Any suggestions?

Thanks!

DSC01056.webp


DSC01067.webp
 

Attachments

  • DSC01056.webp
    DSC01056.webp
    38.6 KB · Views: 129
  • DSC01067.webp
    DSC01067.webp
    30.5 KB · Views: 149
It's little confusing. You need to explain this a little better. I've done this fix on two cars so I have some experience.

15.webp


DSC02348.webp


Driver side

DSC02345.webp
 

Attachments

  • 15.webp
    15.webp
    52.7 KB · Views: 141
  • DSC02348.webp
    DSC02348.webp
    27.8 KB · Views: 124
  • DSC02345.webp
    DSC02345.webp
    28.3 KB · Views: 145
Okay, I borrowed your picture because it represents the area of concern better. :nice:

15.webp


The green area lies flat with the bottom of the cowl cover, so it can be welded in. But the red area sits about 1/4 to 5/16" lower, and I know for sure that isn't right.

I'm going to try and tack it in place like you have yours, with the patch panel underneath the other cowl section... but my concern with that is there will be a gap at the seam (between the cowl and patch) that is about 1/8" or so, because the patch panel is that much taller... not sure how you correctly close that gap - just with a hammer?
 

Attachments

  • 15.webp
    15.webp
    45.4 KB · Views: 163
I think this is much better...

DSC01072.webp


I'm just waiting on the rust preventive paint to arrive any day here.

Is there anyway to test fit the windshield before welding in the cowl cover?
 

Attachments

  • DSC01072.webp
    DSC01072.webp
    45.2 KB · Views: 118
You're saying that the patch panel doesn't touch the cowl cover on the bottom row of spot welds at the windshield...I used a extra long jaw clamp to get most of it. Assuming the dash pad and glove box is off? You can also have someone push up from inside the car with a large screwdriver or other blunt object while you weld the plugs, but it would be better to clamp it. I fit the top row first so it's as straight and clean as possible. Clamp and weld a few holes across, then clamp and weld a few on the bottom.
 
You're saying that the patch panel doesn't touch the cowl cover on the bottom row of spot welds at the windshield...I used a extra long jaw clamp to get most of it. Assuming the dash pad and glove box is off? You can also have someone push up from inside the car with a large screwdriver or other blunt object while you weld the plugs, but it would be better to clamp it. I fit the top row first so it's as straight and clean as possible. Clamp and weld a few holes across, then clamp and weld a few on the bottom.

Yea, that's it. I wasn't sure if a clamp would fit in there. Do you have a picture of what a jaw clamp looks like? My dash is out and glove box as well... I'm getting the picture that this clamp may be extremely long if it goes through and over both the dash and glove box.

Theres about 2 spots on that row that I accidently drilled right through with the spot weld cutter... should I try welding small patches underneath the bottom cowl at those two spots, to have something to weld to?
 
Here is a link to what you are looking for as far as the larger vise grip.

http://www.sears.com/sr/javasr/prod...BV_EngineID=cchcaddljdmkkfecefecemldffidfmg.0

You should use pliers or vise grips to line up the upper lip of the lower cowl (confused?) from the new panel to the old panel and do as described before having someone push up to tack weld. The larger vise grips should be enough without incorporating help from some one else though.

You should butt weld and not over lap this joint. This seam could trap moisture since sealing from underneath would be nearly impossible. It apears you are overlapping; be careful/warned.

Makes perfect sense - thanks! I'll have to go pick up some of those vice grips
 
The deeper one will get more of the lip without help. Was tough to find! We have one set even deeper than that. Gets used a lot surprisingly. Thanks for the image, I seem to be having a hard time with it...
 

Attachments

  • 5128.webp
    5128.webp
    7.7 KB · Views: 144
You could have drilled holes to plug weld on the lower lip and the side before you tacked it in. Clamp and weld-grind smooth them clamp and plug weld the cover. Geostang, you're talking about where he has the patch panel attached to the center section right? Yea, you need to seam weld that solid. Go slow, don't warp the center pan. THen a good coat of POR 15, seam sealer and top coat. Will last forever, and will have a 99.998 percent chance of not leaking... :)

Oh, right, it should be butt welded, but if it's too late for that, make sure you weld it solid the whole length. THat's what I meant by seam welded.

My concern is not the overlap that would leak at this joint but at the underside seam where he will not be abl to weld. Could moist of some sort get in there and begin slow rot? Even if its just humidity?
 
If it's seam welded on top, brushable seam sealer applied to the welded joint (grind the weld flat, but not flush), and brushable seam sealer underneath, should be fine. Even if moisture were "trapped" in the seam, it would take another 20 years for it to rust through. Mine are overlapped, but I used an air flanger and put a flange on the patch panel, drilled holes, clamped, plug welded to hold it, then seam welded it. Not sure if I have the pictures here. Looking...nope, can't find it. But they were posted on here last year. Probably gone by now. I'll look at home.