
You are using an out of date browser. It may not display this or other websites correctly.
You should upgrade or use an alternative browser.
You should upgrade or use an alternative browser.
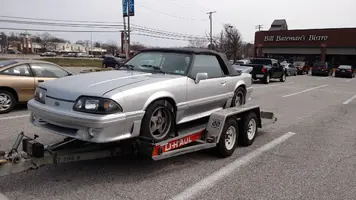
Frame And Strut Tower Repair
- Thread starter Sulli88GT
- Start date
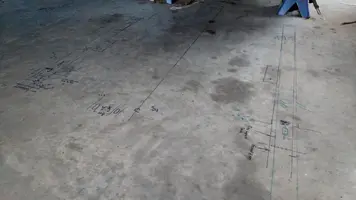
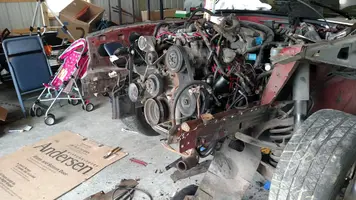
Don't mind the scribbles
Attachments

- Mar 2, 2015
- 6,945
- 5,816
- 213
Very interesting way of transferring the measurements. I've located subframe bolt holes that way to lower the car in the right area to align bolts. Never thought about using it to map out the chassis. Givin' me ideas....
Did you use a plumb Bob ? Looks like you're well on your way to cut, chop, and rebuild the front towers and frame.
Did you use a plumb Bob ? Looks like you're well on your way to cut, chop, and rebuild the front towers and frame.
Craftsman tripod laser level it's small and has three screws to adjust. I lined the beam up with the center holes here and there. Im OCD lol it's been a week going over the car. Had to start at rear and try to center from there and then forward. I have not done this before or welding of this scale, but like I said the OCD will not let me down. Everything on the front end is out of wack, so I think to make sure front end is square with the rear. My drawing are alittle off but at least it's a reference point.Very interesting way of transferring the measurements. I've located subframe bolt holes that way to lower the car in the right area to align bolts. Never thought about using it to map out the chassis. Givin' me ideas....
Did you use a plumb Bob ? Looks like you're well on your way to cut, chop, and rebuild the front towers and frame.
Attachments


wow this reminds me of my nightmare, bought my 90GT 4 years ago now.. and had the rot in the strut tower/frame rail... drove the car home, found how bad it was and it's been sitting on jack stands ever since. (I thought it was just some surface rust on the tower in the engine compartment, boy was I wrong :-( ).. I've pretty much gutted it... I have the tower/rails repaired now... just have to put it all back together now... since i had motor out, I had that rebuilt... took the rear out and had that done... ect ect... I'm also half way done installing the torque box re-reinforcements... just have to weld the upper ones in (I figured why not add them...) I've been stocking parts for past 4 years.. my basement is full of boxes... pretty much all new everything going back in... springs, shock/structs, rack, control arms... ect.. ect....plus I'm changing interior color from red to black... so new carpet, seats, ect...) I will post some pics up of my strut tower repair when I get home... but on the LMR rail kit... a guy makes that.. and LMR gets it from him... I found him in a mustang forum... can't remember now which one... (this is going back 4 years) but I contacted him directly... since I only needed some of the frame rail metal and mostly that outer top part that the k-member bolt nuts sit on top off, and the lower metal plate the crush tubes sit on top of..... I didn't want to have to make that... so I was able to buy those parts from him... I also got the crush tubes he makes, but I ended up using some pipe i had laying around and cut them from that... since the pipe was much thicker... oh, and the stock k-member bolts are not cheap... I think ford liists them for 25+$ each... but I found a set on e-bay for under 30.00... that were in great shape...
Same here, I have a fresh set of stock heads, injectors, pretty much everything that attaches to block is new, new carpet, seats, I could on. Car for the most part is gutted, I said why not, good time to replace heater core and AC evaporator. And fix some very small issue with wiring, (taping, car had a alarm and had crimps on wires) and rebuild steering column. New top some time down the road. Had to buy a mig so that held me off car for a bit but that's the time I have been taking notes, measurements and looking through the internet on all and any info for this project. And other advise also, how they did the work and what they suggest.
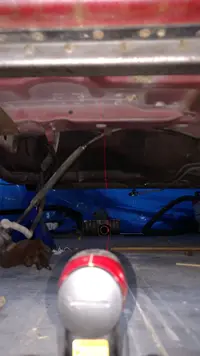
More pic
Attachments
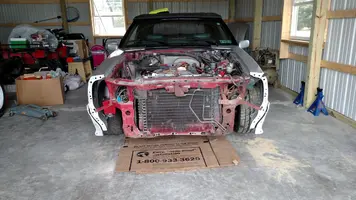


Of course I couldn't find the inner liner. Some said I could use the 90-93 rad support but it was to late had this piece, and alot of hammering lol. Bolted it together because I knew later I would weld it up or if it didn't fit up right weld in some new steel.
Attachments

Yeah, as far as I know you can't get new replacement inner support panels. I luckily got a salvage radiator support.
Kind of looks like all the crap I've got to do with my car.
Kind of looks like all the crap I've got to do with my car.
mikestang63
SN Certified Technician
Yeah, as far as I know you can't get new replacement inner support panels. I luckily got a salvage radiator support.
Kind of looks like all the crap I've got to do with my car.
I was lucky and found a fox body in the local u pull and cut out what I needed.
She is finely done, not 100% but very close. From rusted out mess to this, nothing is trash!
Attachments

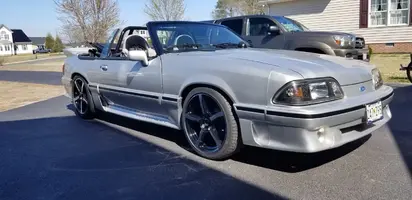


She is finely done, not 100% but very close. From rusted out mess to this, nothing is trash!
Attachments


Seams never ending. You'll get it done, then enjoy the fruits of your labor.I am in the midst of a similar effort to repair the windshield flange on my 82. PIta, but I am making progress. I started at the drivers side upper corner, and went all the way across, down and back across the cowl. Todays two patches are in the photo.
Similar threads
- Replies
- 6
- Views
- 135
- Replies
- 25
- Views
- 1K
- Replies
- 16
- Views
- 4K
- Replies
- 20
- Views
- 954