
How's that comin' Steve?Stang89LXCPE said:I will get you a length for sure. That also reminds me to go out and measure the bolts for the upper to lower to add to the thread. I have a 1" spacer and had to get longer bolts. Thanks for making me remind myself!
Steve
You are using an out of date browser. It may not display this or other websites correctly.
You should upgrade or use an alternative browser.
You should upgrade or use an alternative browser.
Freaky's Official Explorer and GT-40 intake thread. 56k, dont' bother
- Thread starter Stang89LXCPE
- Start date
jaymac
New Member
if I use the Exp 65mm tb,w/ the intake, do I need to use and EGR spacer or does it run right through the tb and/or intake?
You should buy a 65mm EGR spacer to match the 65mm TB and then the intake EGR passages deliver exhaust gas to the intake throught the EGR spacer/EGR valve.
jaymac
New Member
Cool, got the "spacer" part. And all the bolt hole line up, if I use the 96 GT40P tb nd intake w/ a 87-93 EGR spacer?
but how about EGR relating to the heads?
Is it only the air tbues that go to the heads, or are there "coolant" lines too?
Wat's the deal?
but how about EGR relating to the heads?
Is it only the air tbues that go to the heads, or are there "coolant" lines too?
Wat's the deal?

jaymac said:Cool, got the "spacer" part. And all the bolt hole line up, if I use the 96 GT40P tb nd intake w/ a 87-93 EGR spacer?
you can use the stock spacer with the stock TB, but why do that if you have the Explorer 65mm TB - buy the right EGR spacer - most supply houses like Summit or JEGS sell them.
jaymac said:but how about EGR relating to the heads?
Is it only the air tbues that go to the heads, or are there "coolant" lines too?
Wat's the deal?
The EGR gasses go through the intake lower and upper on a 96 Explorer intake. The air tubes that go to the back of the heads are not EGR stuff, it's the air injection/thermactor system.
v8only said:hmmm, just bolted on my lower intake without drilling for the act sensor, can i relocate that act sensor to the airbox as I've heard?
Yes
v8only said:got a link for that spacer I need that they are talking about?
Summit or Jegs carries them.
jaymac
New Member
I already have those hoses from the air pump plugged up as I don't run cats.tmoss said:The EGR gasses go through the intake lower and upper on a 96 Explorer intake. The air tubes that go to the back of the heads are not EGR stuff, it's the air injection/thermactor system.
Can I just bolt the tubes to existing holes in the heads w/o having to drill or tap anything?
jaymac said:I already have those hoses from the air pump plugged up as I don't run cats.
Can I just bolt the tubes to existing holes in the heads w/o having to drill or tap anything?
Yes, you can bolt the tubes up for looks - the hole won't be there to push air into the head, that's all - I'd just leave the tube off without the thermactor system working, it's just a blind bolt hole.
jwzg
Member
Relocated ACT sensor.
I have GT40P heads which are not drilled for smog. If you look at the bottom of the picture, I ran the thermactor hoses directly to the cats by removing the diverter valve. I simply joined the stock hoses together with a heater hose splice from Advance. It looks stock, allows easier spark plug access, and I didn't need to bolt up the thermactor plumbing.
jaymac
New Member
Sorry for the delay guys I will add the information to the main post.
Length of bolts for Upper to Lower(w/o any spacer)
5/16-18 x 6" bolts. You'll need 4 of these
5/16-18 x 1" bolts You'll need two of them
With a one inch spacer you'll need
qty 4, 5/16-18 x 7" long
qty 2, 5/16-18 x 2" long
If you are going to order a Spacer (1 inch or 3/8"). Order one for a Cobra as it will have more bolts that you need. The GT-40 upper only uses two of the long bolts.
The studs for the TB and EGR are the same as the stock H.O. Pieces
5/16-18 x 4 1/2" long. You'll need four of these.
The Gt-40 Tubular upper weighs in at 11 lbs with no accessories bolted to it.
The Explorer upper casting weighs exactly 10 lbs more for a total of 21 lbs, without accessories.
jaymac
New Member
awesome Steve, thanks for that info!
I had the Explorer 65 mm converted today and I bolted it on to my still-stock setup. Next my friend is giving me his stock EGR spacer and I'm going to try my hand at port-matching that to the GT40P upper and that should match the 65mm too. The heads will be done by July 15th and I hope to have them on that weekend, so we'll see!
I had the Explorer 65 mm converted today and I bolted it on to my still-stock setup. Next my friend is giving me his stock EGR spacer and I'm going to try my hand at port-matching that to the GT40P upper and that should match the 65mm too. The heads will be done by July 15th and I hope to have them on that weekend, so we'll see!
so how did it turn out? I hope you didn't try to "port" the egr spacer....A cylinder hone works so much better
jaymac
New Member
Well, we actually used an upside-down table mounted router amd about 4 different attachments. It took about 10 min., alot of WD-40, and it was a smooth as glass and PERFECTLY matched!!
The whole H/I install took about 16 hours, w/ alot of troubleshooting elec. and ultimately vac. problems, but runs great now. So far I shaved about 1/2 a second of my 1/4 times, with some more left in the bag w/ some tunng and weight, and of course, much cooler weather on my previous best.
So I'm happy (for now)!
What did you guys do about the vacuum lines? AFM's write-up is pretty vague. I see how they connected the PCV by tee-ing it off. This is all they say on the subject:
You will need to do a few adaptations to fit all the lines. The most important being the EGR and Fuel regulator vacuum lines.
They didn't further explain how they achieved that. Also, that would be different on my application since I have a fox-body, correct? Also, where would I mount the salt & pepper shakers?
Vacuum is vacuum, connect the lines anyplace they will fit. Cap the unused vacuum ports.93FIVEOH said:What did you guys do about the vacuum lines? AFM's write-up is pretty vague. I see how they connected the PCV by tee-ing it off. This is all they say on the subject:
You will need to do a few adaptations to fit all the lines. The most important being the EGR and Fuel regulator vacuum lines.
They didn't further explain how they achieved that. Also, that would be different on my application since I have a fox-body, correct? Also, where would I mount the salt & pepper shakers?
Vacuum line connections:
One large vacuum line from the upper front goes to the carbon canister
One large vacuum line from the rear goes to the vacuum tree.
One small line in the front feeds the Smog pump solenoid control valves on the rear of the passenger side wheel well..
One small line in the rear goes to the fuel pressure regulator.
One small line in the rear goes to the EGR suction regulator.
One large line in the rear goes to the PVC valve.
See the following website for some help from Tmoss (diagram designer) & Stang&2Birds (website host) for help on 88-95 wiring http://www.veryuseful.com/mustang/tech/engine/
Diagram courtesy of Tmoss & Stang&2birds
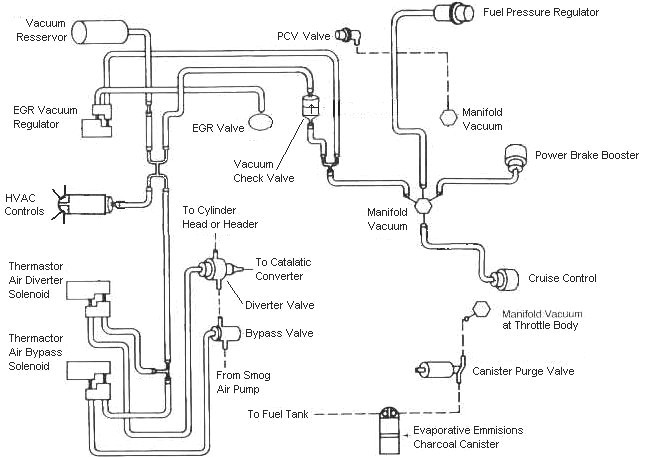
The salt & pepper shakers will float between the upper manifold and the EGR spacer with no problems. If you haven broken the plastic clip that mounts them, here's the plan. One end of the top clip fits under the cover plate on top of the upper manifold and the other hooks on the bottom lip of the upper manifold. I believe that Tmoss suggests grinding or filing a small relief for the bottom clip on the upper manifold.
I didn't realize it was that simple. Thank you for the advice and the quick reply.jrichker said:Vacuum is vacuum, connect the lines anyplace they will fit. Cap the unused vacuum ports.
Similar threads
- Replies
- 3
- Views
- 277
- Replies
- 12
- Views
- 855
- Replies
- 4
- Views
- 892
- Replies
- 9
- Views
- 1K