
I'm getting power at the inertia switch and its not tripped. Getting power to relay by wiper motor, and the eec power relay as well as the fuel pump relay under the drivers seat but the one under the dash drivers side isnt turning on...i think that the a/c relay which is removed from the car but pretty sure it use to come on. this is an intermittant problem i think i have a short somewhere but where to start?
You are using an out of date browser. It may not display this or other websites correctly.
You should upgrade or use an alternative browser.
You should upgrade or use an alternative browser.
fuel pump cicuit help 86 gt 5.0 please?
- Thread starter 86gtriceeater
- Start date
sounds great to me but which wire do i hot wire? which on gets 12v with the key on? youre saying key on striaght from the battery and just make it run?
everything was fine yesterday...turned it off wouldnt start...couldnt hear fuel pump prime...put battery in today started right up (pump turned on like normal) now again was running fine turned it off No prime what the heck?
Fuel Pump Troubleshooting for 86 Mustangs
Clue – listen for the fuel pump to prime when you first turn the ignition switch on.
It should run for 2-5 seconds and shut off. This on and off again cycle helps to prevent
flooding the engine when cranking. To trick the fuel pump into running, find the ECC
test connector and jump the connector in the upper RH corner to ground.


If the fuse links are OK, you will have power to the pump. Check fuel pressure –
remove the cap from the Schrader valve behind the alternator and depress the
core. Fuel should squirt out, catch it in a rag. A tire pressure gauge can also be
used if you have one - look for 37-40 PSI. Beware of fire hazard when you do this.
No fuel pressure, possible failed items in order of their probability:
A.) Tripped inertia switch – press reset button on the inertia switch. The hatch
cars hide it under the plastic trim covering the driver's side taillight. Use the
voltmeter or test light to make sure you have power to both sides of the switch
B.) Fuel pump power relay – located under the driver’s seat in most stangs .
C.) Clogged fuel filter
D.) Failed fuel pump
E.) Blown fuse link in wiring harness.
F.) Fuel pressure regulator failed. Remove vacuum line from regulator and inspect
for fuel escaping while pump is running.
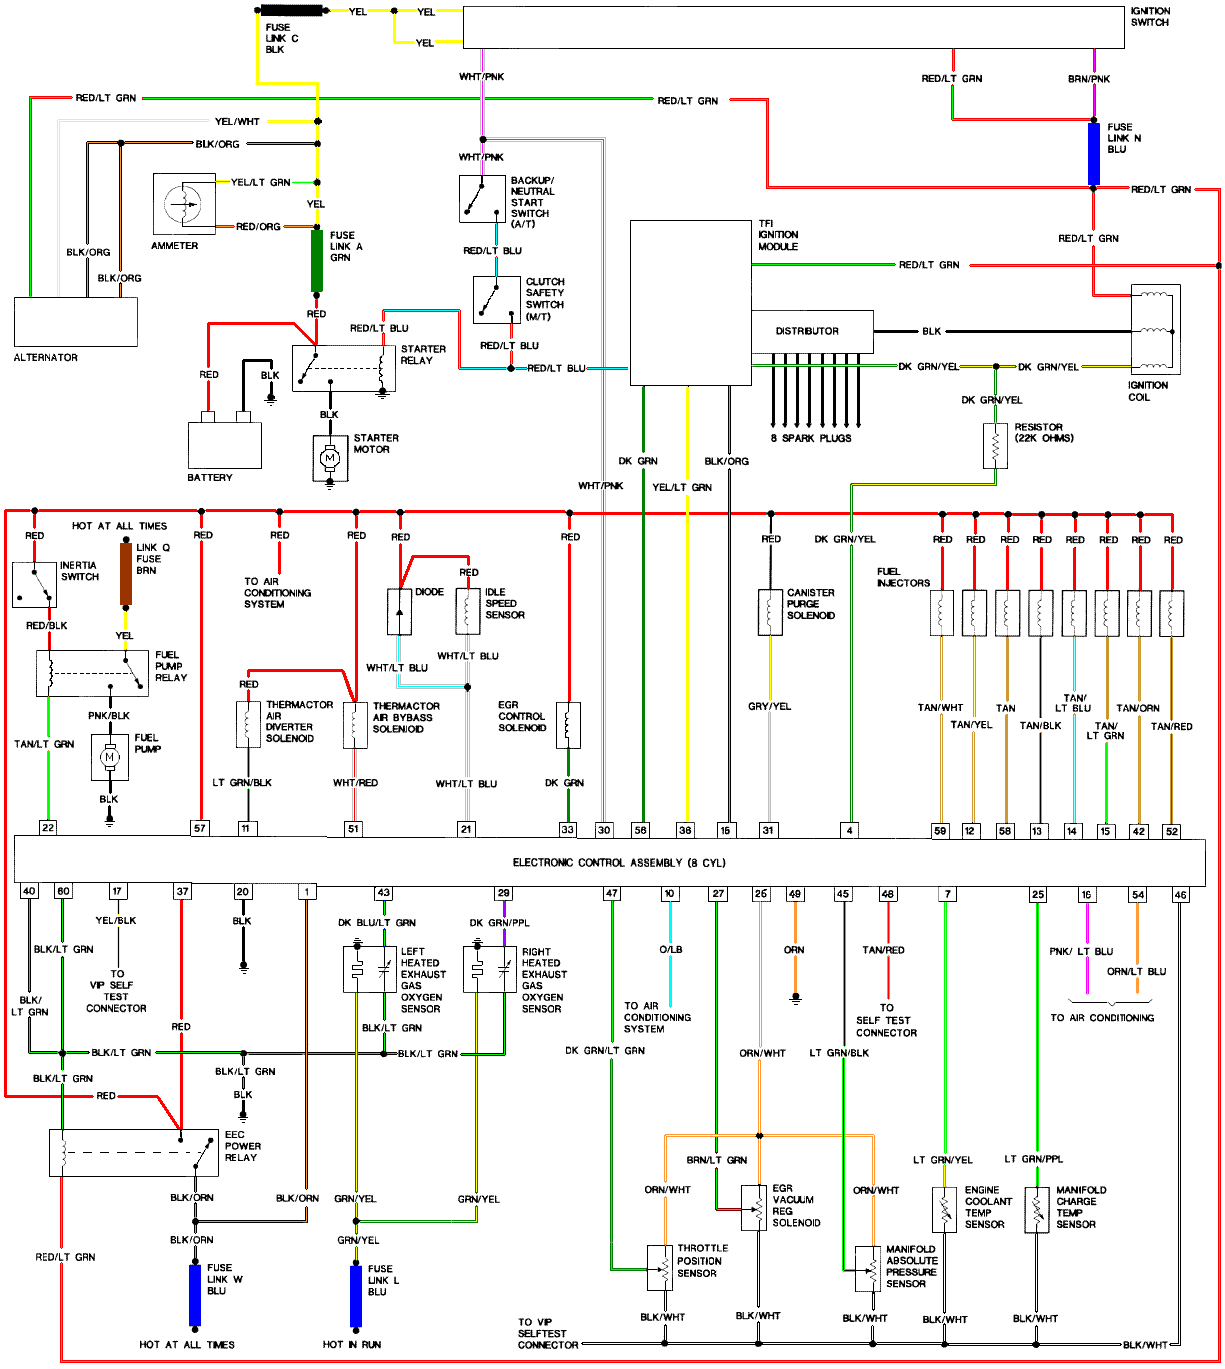
The electrical circuit for the fuel pump has two paths, a control path and a power
path.
The control path consists of the inertia switch, the computer, and the fuel pump
relay coil. It turns the fuel pump relay on or off under computer control. The
switched power (red wire) from the ECC relay goes to the inertia switch
(red/black wire) then from the inertia switch to the relay coil and then from the
relay coil to the computer (tan/ Lt green wire). The computer provides the ground
path to complete the circuit. This ground causes the relay coil to energize and
close the contacts for the power path. Keep in mind that you can have voltage
to all the right places, but the computer must provide a ground. If there is no
ground, the relay will not close the power contacts.
The power path picks up from a fuse link near the starter relay. Fuse links are like
fuses, except they are pieces of wire and are made right into the wiring harness.
The feed wire from the fuse link (yellow wire) goes to the fuel pump
relay contacts. When the contacts close because the relay energizes, the power
flows through the contacts to the fuel pump (light pink/black wire). Notice that
pin 19 on the computer is the monitor to make sure the pump has power.
The fuel pump has a black wire that supplies the ground to complete the circuit.
Remember that the computer does not source any power to actuators, relays
or injectors, but provides the ground necessary to complete the circuit. That
means one side of the circuit will always be hot, and the other side will go to
ground or below 1 volt as the computer switches on that circuit.
Diagrams courtesy of Tmoss & Stang&2birds
Now that you have the theory of how it works, it’s time to go digging.
Look for 12 volts at the yellow wire (power source for fuel pump relay).
No voltage or low voltage, bad fuse link, bad wiring, bad ignition switch or ignition
switch wiring or connections. There is a mystery connector somewhere under the
driver’s side kick panel, between the fuel pump relay and the fuse link.
Turn on the key and jumper the fuel pump test connector to ground as previously
described. Look for 12 volts at the Light Pink/Black wire (relay controlled power
for the fuel pump). No voltage there means that the relay has failed, or there is a
broken wire in the relay control circuit.
Check the Red/black wire, it should have 12 volts. No 12 volts there, either the
inertia switch is open or has no power to it. Check both sides of the inertia
switch: there should be power on the Red wire and Red/Black wire. Power on the
Red wire and not on the Red/Black wire means the inertia switch is open.
Make sure that the power is off the circuit before making any resistance checks.
If the circuit is powered up, your resistance measurements will be inaccurate.

You will have to drop the tank to inspect the pump power and ground connector
and the pump wiring chassis ground.
Pump wiring: Anytime the ignition switch is in the Run position and the test
point is jumpered to ground, there should be at least 12 volts present on the
black/pink wire. You should see less than 1 Ohm between the black wire(s)
and ground. The chassis ground is up near the spare tire shell. To get some
idea of what a good reading is, short the two meter leads together and
observe the reading. It should only be slightly higher when you measure
the black wire to ground resistance.
The Tan/Lt Green wire provides a ground path for the relay power. With the test
connector jumpered to ground, there should be less than .75 volts. Use a test
lamp with one side connected to battery power and the other side to the
Tan/Lt Green wire. The test light should glow brightly. No glow and you have a
broken wire or bad connection between the test connector and the relay. To test
the wiring from the computer, remove the passenger side kick panel and
disconnect the computer connector. It has a 10 MM bolt that holds it in place.
With the test lamp connected to power, jumper pin 22 to ground and the test
lamp should glow. No glow and the wiring between the computer and the fuel
pump relay is bad.
Computer: If you got this far and everything else checked out good, the computer is suspect.
Remove the test jumper from the ECC test connector located under the hood.
Probe computer pin 22 with a safety pin and ground it to chassis. Make sure the computer
and everything else is connected. Turn the ignition switch to the Run position and observe
the fuel pressure. The pump should run at full pressure.
If it doesn't, the wiring between pin 22 on the computer and the fuel pump relay is bad.
If it does run at full pressure, the computer may have failed.
Keep in mind that the computer only runs the fuel pump for about 2-3 seconds when you turn
the key to the Run position. This can sometimes fool you into thinking the computer has died.
Connect one lead of the test light to power and the other lead to computer pin 22 with a safety pin.
With the ignition switch Off, jumper the computer into self test mode like you are going to dump
the codes. Turn the ignition switch to the Run position. The light will flicker when the computer
does the self test routine. A flickering light is a good computer. No flickering light is a bad computer.
Remove the test jumper from the ECC test connector located under the hood.
Fuel pump runs continuously: The fuel pump relay contacts are stuck together or the Tan/Lt Green wire
has shorted to ground. Remove the fuel pump relay from its socket. Then disconnect the computer and use
an ohmmeter to check out the resistance between the Tan/Lt Green wire and ground. You should see
more than 10 K Ohms (10,000 ohms) or an infinite open circuit. Be sure that the test connector isn’t
jumpered to ground.
If the wiring checks out good, then the computer is the likely culprit.
Prior to replacing the computer, check the computer power ground. The computer has its own
dedicated power ground that comes off the ground pigtail on the battery ground wire. Due to
it's proximity to the battery, it may become corroded by acid fumes from the battery. It is a
black cylinder about 2 1/2" long by 1" diameter with a black/lt green wire. You'll find it up
next to the starter solenoid where the wire goes into the wiring harness
If all of the checks have worked OK to this point, then the computer is bad. The
computers are very reliable and not prone to failure unless there has been
significant electrical trauma to the car. Things like lightning strikes and putting
the battery in backwards or connecting jumper cables backwards are about the
only thing that kills the computer.
See the following website for some help from Tmoss (diagram designer) &
Stang&2Birds (website host)
http://www.veryuseful.com/mustang/tech/engine/images/IgnitionSwitchWiring.gif
http://www.veryuseful.com/mustang/tech/engine/images/fuel-alt-links-ign-ac.gif
http://www.veryuseful.com/mustang/tech/engine/images/88-91eecPinout.gif
Clue – listen for the fuel pump to prime when you first turn the ignition switch on.
It should run for 2-5 seconds and shut off. This on and off again cycle helps to prevent
flooding the engine when cranking. To trick the fuel pump into running, find the ECC
test connector and jump the connector in the upper RH corner to ground.
If the fuse links are OK, you will have power to the pump. Check fuel pressure –
remove the cap from the Schrader valve behind the alternator and depress the
core. Fuel should squirt out, catch it in a rag. A tire pressure gauge can also be
used if you have one - look for 37-40 PSI. Beware of fire hazard when you do this.
No fuel pressure, possible failed items in order of their probability:
A.) Tripped inertia switch – press reset button on the inertia switch. The hatch
cars hide it under the plastic trim covering the driver's side taillight. Use the
voltmeter or test light to make sure you have power to both sides of the switch
B.) Fuel pump power relay – located under the driver’s seat in most stangs .
C.) Clogged fuel filter
D.) Failed fuel pump
E.) Blown fuse link in wiring harness.
F.) Fuel pressure regulator failed. Remove vacuum line from regulator and inspect
for fuel escaping while pump is running.
The electrical circuit for the fuel pump has two paths, a control path and a power
path.
The control path consists of the inertia switch, the computer, and the fuel pump
relay coil. It turns the fuel pump relay on or off under computer control. The
switched power (red wire) from the ECC relay goes to the inertia switch
(red/black wire) then from the inertia switch to the relay coil and then from the
relay coil to the computer (tan/ Lt green wire). The computer provides the ground
path to complete the circuit. This ground causes the relay coil to energize and
close the contacts for the power path. Keep in mind that you can have voltage
to all the right places, but the computer must provide a ground. If there is no
ground, the relay will not close the power contacts.
The power path picks up from a fuse link near the starter relay. Fuse links are like
fuses, except they are pieces of wire and are made right into the wiring harness.
The feed wire from the fuse link (yellow wire) goes to the fuel pump
relay contacts. When the contacts close because the relay energizes, the power
flows through the contacts to the fuel pump (light pink/black wire). Notice that
pin 19 on the computer is the monitor to make sure the pump has power.
The fuel pump has a black wire that supplies the ground to complete the circuit.
Remember that the computer does not source any power to actuators, relays
or injectors, but provides the ground necessary to complete the circuit. That
means one side of the circuit will always be hot, and the other side will go to
ground or below 1 volt as the computer switches on that circuit.
Diagrams courtesy of Tmoss & Stang&2birds
Now that you have the theory of how it works, it’s time to go digging.
Look for 12 volts at the yellow wire (power source for fuel pump relay).
No voltage or low voltage, bad fuse link, bad wiring, bad ignition switch or ignition
switch wiring or connections. There is a mystery connector somewhere under the
driver’s side kick panel, between the fuel pump relay and the fuse link.
Turn on the key and jumper the fuel pump test connector to ground as previously
described. Look for 12 volts at the Light Pink/Black wire (relay controlled power
for the fuel pump). No voltage there means that the relay has failed, or there is a
broken wire in the relay control circuit.
Check the Red/black wire, it should have 12 volts. No 12 volts there, either the
inertia switch is open or has no power to it. Check both sides of the inertia
switch: there should be power on the Red wire and Red/Black wire. Power on the
Red wire and not on the Red/Black wire means the inertia switch is open.
Make sure that the power is off the circuit before making any resistance checks.
If the circuit is powered up, your resistance measurements will be inaccurate.
You will have to drop the tank to inspect the pump power and ground connector
and the pump wiring chassis ground.
Pump wiring: Anytime the ignition switch is in the Run position and the test
point is jumpered to ground, there should be at least 12 volts present on the
black/pink wire. You should see less than 1 Ohm between the black wire(s)
and ground. The chassis ground is up near the spare tire shell. To get some
idea of what a good reading is, short the two meter leads together and
observe the reading. It should only be slightly higher when you measure
the black wire to ground resistance.
The Tan/Lt Green wire provides a ground path for the relay power. With the test
connector jumpered to ground, there should be less than .75 volts. Use a test
lamp with one side connected to battery power and the other side to the
Tan/Lt Green wire. The test light should glow brightly. No glow and you have a
broken wire or bad connection between the test connector and the relay. To test
the wiring from the computer, remove the passenger side kick panel and
disconnect the computer connector. It has a 10 MM bolt that holds it in place.
With the test lamp connected to power, jumper pin 22 to ground and the test
lamp should glow. No glow and the wiring between the computer and the fuel
pump relay is bad.
Computer: If you got this far and everything else checked out good, the computer is suspect.
Remove the test jumper from the ECC test connector located under the hood.
Probe computer pin 22 with a safety pin and ground it to chassis. Make sure the computer
and everything else is connected. Turn the ignition switch to the Run position and observe
the fuel pressure. The pump should run at full pressure.
If it doesn't, the wiring between pin 22 on the computer and the fuel pump relay is bad.
If it does run at full pressure, the computer may have failed.
Keep in mind that the computer only runs the fuel pump for about 2-3 seconds when you turn
the key to the Run position. This can sometimes fool you into thinking the computer has died.
Connect one lead of the test light to power and the other lead to computer pin 22 with a safety pin.
With the ignition switch Off, jumper the computer into self test mode like you are going to dump
the codes. Turn the ignition switch to the Run position. The light will flicker when the computer
does the self test routine. A flickering light is a good computer. No flickering light is a bad computer.
Remove the test jumper from the ECC test connector located under the hood.
Fuel pump runs continuously: The fuel pump relay contacts are stuck together or the Tan/Lt Green wire
has shorted to ground. Remove the fuel pump relay from its socket. Then disconnect the computer and use
an ohmmeter to check out the resistance between the Tan/Lt Green wire and ground. You should see
more than 10 K Ohms (10,000 ohms) or an infinite open circuit. Be sure that the test connector isn’t
jumpered to ground.
If the wiring checks out good, then the computer is the likely culprit.
Prior to replacing the computer, check the computer power ground. The computer has its own
dedicated power ground that comes off the ground pigtail on the battery ground wire. Due to
it's proximity to the battery, it may become corroded by acid fumes from the battery. It is a
black cylinder about 2 1/2" long by 1" diameter with a black/lt green wire. You'll find it up
next to the starter solenoid where the wire goes into the wiring harness
If all of the checks have worked OK to this point, then the computer is bad. The
computers are very reliable and not prone to failure unless there has been
significant electrical trauma to the car. Things like lightning strikes and putting
the battery in backwards or connecting jumper cables backwards are about the
only thing that kills the computer.
See the following website for some help from Tmoss (diagram designer) &
Stang&2Birds (website host)
http://www.veryuseful.com/mustang/tech/engine/images/IgnitionSwitchWiring.gif
http://www.veryuseful.com/mustang/tech/engine/images/fuel-alt-links-ign-ac.gif
http://www.veryuseful.com/mustang/tech/engine/images/88-91eecPinout.gif
the pump wont turn on testing it at the diagnostic connector...inertia switch has 12v not sure where to go from here
Do you have 12 volts on the yellow wire at the fuel pump relay?
NO
Fuse link for yellow wire in the wiring harness near the stater solenoid is blown open or not connected to power.
Fuse link for yellow wire in the wiring harness near the stater solenoid is blown open or not connected to power.
Yes
Turn the ignition switch to the Run position.
Insert the fuel pump test jumper in the diagnostic connector under the hood.
Look for 12 volts on the pink/black wire on the fuel pump relay.
No 12 volts, either the relay is bad or your ground at the test connector is bad.
Turn the ignition switch to the Run position.
Insert the fuel pump test jumper in the diagnostic connector under the hood.
Look for 12 volts on the pink/black wire on the fuel pump relay.
No 12 volts, either the relay is bad or your ground at the test connector is bad.
i have power everywhere now it runs good but wont solve my problem long term. How do i go about finding an intermittant short?
i have power everywhere now it runs good but wont solve my problem long term. How do i go about finding an intermittant short?
I would clean the relay socket contacts and replace the relay since I can't be there to actually see what things look like.
Spray the relay socket down with electronic parts cleaner or non-inflammable brake parts cleaner (same stuff in a bigger can and cheaper too). Then try to use a jeweler's screwdriver to scrape the inside of the metal pins where they make contact with the relay pins. Examine the relay socket wiring to make sure there isn't any wiring that is broken under the insulation and only making temporary contact .
great i did that stuff...still runs funny pump turns on and i went to adjust my tps and i'm getting 5v reference but also getting 5v to the other wire...ground is good. Why am i getting 5v at both the green and orange wire on the the throttle position sensor? now i really need help
does the green or orange wire provide reference voltage? then the other one i could just snip and wire to the proper pin on the computer right? I guess i dont know how that wiring works...any help out there?
Setting the TPS: you'll need a good Digital Voltmeter (DVM) to do the job. Set the TPS voltage at .5- 1.1 range. Because of the variables involved with the tolerances of both computer and DVM, I would shoot for somewhere between .6 and 1.0 volts. Unless you have a Fluke or other high grade DVM, the second digit past the decimal point on cheap DVM’s is probably fantasy.
Since the computer zeros out the TPS voltage every time it powers up, playing with the settings isn't an effective aid to performance or drivability. The main purpose of checking the TPS is to make sure it isn't way out of range and causing problems.
Wire colors & functions:
Orange/white = 5 volt VREF from the computer
Dark Green/lt green = TPS output to computer
Black/white = Signal ground from computer
The Orange/White wire is the VREF 5 volts from the computer. You use the Dark Green/Lt green wire (TPS signal) and the Black/White wire (TPS ground) to set the TPS. Use a pair of safety pins to probe the TPS connector from the rear of the connector. You may find it a little difficult to make a good connection, but keep trying. Put the safety pins in the Dark Green/Lt green wire and Black/White wire. Make sure the ignition switch is in the Run position but the engine isn't running.
When you installed the sensor make sure you place it on the peg right and then tighten it down properly. Loosen the back screw a tiny bit so the sensor can pivot and loosen the front screw enough so you can move it just a little in very small increments. I wouldn’t try to adjust it using marks.
A.) Always adjust the TPS and Idle with the engine at operating temp. Dive it around for a bit if you can and get it nice and warm.
B.) When you probe the leads of the TPS, do not use an engine ground, put the ground probe into the lead of the TPS. You should be connecting both meter probes to the TPS and not one to the TPS and the other to ground.
C.) Always reset the computer whenever you adjust the TPS or clean/change any sensors. I just pull the battery lead for 10 minutes.
D.) The key is to check the TPS voltage whenever the idle screw is changed.
TPS testing: most of the time a failed TPS will set code 23 or 63, but not always. Use either an analog meter or a DVM with an analog bar graph and connect the leads as instructed above. Turn the ignition switch to the Run position, but do not start the engine. Note the voltage with the throttle closed. Slowly open the throttle and watch the voltage increase smoothly, slowly close the throttle and watch the voltage decrease smoothly. If the voltage jumps around and isn’t smooth, the TPS has some worn places in the resistor element. When the throttle is closed, make sure that the voltage is the same as what it was when you started. If it varies more than 10%, the TPS is suspect of being worn in the idle range of its travel.
TPS Troubleshooting:
The TPS sensor is a variable resistor like the volume control on most cheap radios. We have all heard them make scratchy noises as you turn them up or down. The carbon element can wear and cause a drop out spot in the output voltage. This confuses the computer because it expects to see a steady TPS voltage increase as the Throttle opens up.
Wire colors & functions:
Orange/white = 5 volt VREF from the computer
Dark Green/lt green = TPS output to computer
Black/white = Signal ground from computer
TPS troubleshooting steps:
1.) Use the Orange/white & Black white wires to verify the TPS has the correct 5 volts source from the computer.
Use the Dark Green/lt green & Black/white wires to set the TPS base voltage. Setting the TPS: you'll need a good Digital Voltmeter (DVM) to do the job. Set the TPS voltage at .5- 1.1 range. Because of the variables involved with the tolerances of both computer and DVM, I would shoot for somewhere between .6 and 1.0 volts. Unless you have a Fluke or other high grade DVM, the second digit past the decimal point on cheap DVM’s is probably fantasy. Since the computer zeros out the TPS voltage every time it powers up, playing with the settings isn't an effective aid to performance or drivability. The main purpose of checking the TPS is to make sure it isn't way out of range and causing problems.
2.) Use an analog voltmeter to check the voltage on the Dark Green/lt green & Black/white wires to make sure that it increases smoothly and doesn’t drop out or increase suddenly.
Some basic checks you can make to be sure that the sensor is getting power & ground:
Note that all resistance tests must be done with power off. Measuring resistance with a circuit powered on will give false readings and possibly damage the meter.
Check the resistance between the black/white wire on the MAP/BARO sensor and then the black/white wire on the EGR and the same wire on the TPS. It should be less than 1 ohm. Next check the resistance between the black/white wire and the negative battery cable. It should be less than 1.5 ohm.
The following power on check requires you to turn the ignition switch to the Run position.
Use a DVM to check for 5 volts on the orange/white wire. If it is missing, look for +5 volts at the orange/white wire on the TPS or EGR sensors. Use the black/white wire for the ground for the DVM.
im getting 5v and both the green and orange wire when warm, what up with that?
Did you bother to read about the ground resistance check in the tech note?
I dont know what setting on the voltmeter to use for the measurement of resistance for the map and egr sensors. Its a cheap one from walmart
Every model voltmeter is different, so I can't help you there.
Automotive circuits are mostly simple stuff: a power source, a connection path, a control device, a load, and a ground.
The battery/alternator is the positive power source.
The wire and fuses are the connection path.
Control devices are switches, relays and sensors.
A load is a light, motor, solenoid or heater element.
In automotive circuits, grounds are the return path so the electrical power can flow from the load to the negative side of the power source.
Electricity flows like water:
Voltage is like pressure,
Current in amps is like volume,
Resistance is like the kink you put in a garden hose to decrease the pressure or volume.
Power is pressure multiplied by volume or voltage multiplied by current (amps)
Digest that, and you just got the first 3 days of Electricity 101.
Use some jumper wires (connection path and ground) to hook up a switch (control device), a battery (power source), a light bulb (load). Now make the light turn on and off with the switch.
That's the electrical lab for the first week of Electricity 101. People pay hundreds of dollars and sit in hard chairs in a stuffy classroom to learn what I just told you for free. So smile, you just got an expensive lesson for free
Step 1.) Find the instruction book that came with your Multimeter. Read it and familiarize yourself with how it works and how use it. If you lost the book or didn’t get one with it, do a Google search on the web to find the manufacturer’s web site & download a copy of the manual.
Step 2. ) Make sure that you know what test lead plugs into which jacks on the Multimeter. There are usually several different jacks on most Multimeters, and they have different functions. Make sure that your battery(s) in the Multimeter are good: if you have any doubts, replace the battery(s).
Step 3.) Once you are sure that the Multimeter is functional and you have the leads plugged into the jacks for Ohms ( the upside down “U” symbol), do some simple measurements to make sure that you know how to use it correctly. Set the switch to the lowest range and touch the leads together: you should not see “nothing” but you should see 1.0-0.3 ohms. Measure a 60 watt light bulb: cold it will measure about 17.5 Ohms. It you measure it while it is hot, the reading will be greater.
Step 4.) Make several test measurements using the ohms function and the DC volts function. Remember all resistance measurements must be done with the power off the circuit. This avoids false readings and possible damage to the ohmmeter.. Repeat steps 3 & 4 until you are sure that you can do it without making any mistakes.
Try Automotive Online Instruction for a beginning Automotive Electrical course. The course is very good and best of all, it is FREE!!!
hmmmm
okay resistance on the black/whitewire to neg post for map sensor is 3.2
below do you mean separately check black/white wire to neg battery? or black/wire wire to black/white wire. I measured the black/white of the map to the black on the tps and the meter starts at like 4 then slowly declines to zero. Whats next man thank you sooooo much
Check the resistance between the black/white wire on the MAP/BARO sensor and then the black/white wire on the EGR and the same wire on the TPS
Your resistance readings sound like they are bad or you are having some problems using the meter.
Short the probe tips together. You should see .3-1.5 Ohms. If you don't, then re-read the instructions for the meter to make sure you have the low ohms range selected.
Short the probe tips together. You should see .3-1.5 Ohms. If you don't, then re-read the instructions for the meter to make sure you have the low ohms range selected.
Check the computer main power ground while you are looking for things that may be the source of the problem.
The picture shows the common ground point for the battery & extra 3G alternator ground wire.
A screwdriver points to the bolt that is the common ground point.
The battery common ground is a 10 gauge pigtail with the computer ground attached to it.
Picture courtesy timewarped1972

Correct negative battery ground cable.

The computer has its own dedicated power ground that comes off the ground pigtail on the battery ground wire.
Due to it's proximity to the battery, it may become corroded by acid fumes from the battery.
In 86-90 model cars, it is a black cylinder about 2 1/2" long by 1" diameter with a black/lt green wire.
In 91-95 model cars it is a black cylinder about 2 1/2" long by 1" diameter with a black/white wire.
You'll find it up next to the starter solenoid where the wire goes into the wiring harness.

The picture shows the common ground point for the battery & extra 3G alternator ground wire.
A screwdriver points to the bolt that is the common ground point.
The battery common ground is a 10 gauge pigtail with the computer ground attached to it.
Picture courtesy timewarped1972
Correct negative battery ground cable.
The computer has its own dedicated power ground that comes off the ground pigtail on the battery ground wire.
Due to it's proximity to the battery, it may become corroded by acid fumes from the battery.
In 86-90 model cars, it is a black cylinder about 2 1/2" long by 1" diameter with a black/lt green wire.
In 91-95 model cars it is a black cylinder about 2 1/2" long by 1" diameter with a black/white wire.
You'll find it up next to the starter solenoid where the wire goes into the wiring harness.
Looks like shorting the probes together seems to give reasonable results. I would say the results of your first test with 3.2 ohms is correct. That resistance is too high, and means you have some bad connections or bad wiring.86gtriceeater said:okay resistance on the black/whitewire to neg post for map sensor is 3.2
If you didn't misconnect something, that's too high. Since the TPS is connected to the rest of the wiring via the 10 pin salt & pepper connectors, you might want to clean the connections inside the white connector. Spray it down with electronic parts cleaner or non-inflammable brake parts cleaner (same stuff in a bigger can and cheaper too).86gtriceeater said:I measured the black/white of the map to the black on the tps and the meter starts at like 4 then slowly declines to zero.
Similar threads
- Replies
- 8
- Views
- 404
- Replies
- 4
- Views
- 157
- Replies
- 10
- Views
- 527
- Replies
- 10
- Views
- 304