
Technical Write up thread. (How To)
I got the spoiler from http://www.atlantaauto.com/ford/mustang/rearspoilers/3d691038p05.html on the advice of DarkFireGT Under $230 prepainted and shipped to my door!!!!!
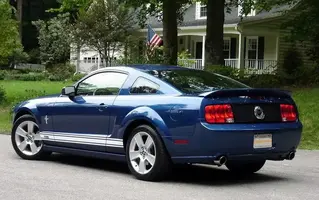
The wing is near awesome as far as paint match and paint quality. Install time start to finish was about 1 hour and 10 minutes. I had my dad help as we fitted the wing to the car after peeling the adhesive backing. The rest was solo.
Here is my detailed install.
There are 4 bolts holding the factory spoiler on(2 on each side).


Remove the nuts using a 10mm socket.


Once all 4 nuts are removed, remove the spoiler. There is adhesive on each side that has to be "broken". To do so, I used a "credit card". As I slowly pushed up(from the back)the spoiler I took the card and carefully started slicing at the adhesive which cuts fairly easy. It gets a bit tricky the farther under the spoiler you get. I alternated sides working once I reached the first bolt stud, then went back and did from there to the rear of the adhesive. After that...off she came. Be careful as to not damage the trunk lid since the studs are still in the bottom of the spoiler.

Time into project-20 minutes
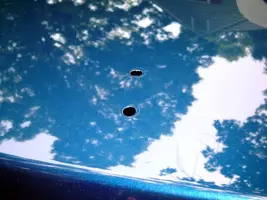
Now it is time to remove the remaining adhesive on the trunk lid(quite a bit).


I carefully used the card for this as well since the adhesive was still relatively thick and didn't have to worry about paint damage. there will still be a thin layer left behind.

Here is the amount removed in the above step(just from 1 side...not both). Also what adhesive still remains.


To remove the remaining adhesive, I used rubbing alcohol on a paper towel and wet the area. After letting that sit for a few seconds I started rubbing it off using my thumb(tedious work, but works for me). You may have to rewet the area a few times to keep the adhesive pliable(I did). I'm sure there are chemicals specific to adhesive removal, but this seemed the inexspensive and at the time easy route.


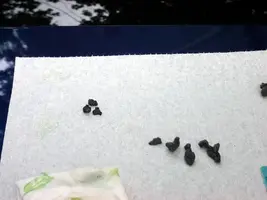
The 3 clumps on the upper left is what was removed from this step(once again, just 1 side).

This is where I got using the rubbing alcohol/thumb technique. The rest was removed using a hand glaze. That cleaned the area real well.

Time into project-50 minutes.
For surface prep for the adhesive strips on the bottom of the new spoiler, I used rubbing alcohol and went over the section that needed to be cleaned 10x(used a new cloth every time). It may seem like alot, but it's only a matter of seconds each time. I let the surface dry in between cleanings as well which only took a few seconds.
Time into project-55 minutes.
Now comes the time to test fit the new spoiler. That was amazingly easy! Eyeball it from the top, hold it in place, open the trunk and see that the holes line up. I got pretty darn close the very first time
Here are the parts included and supplies needed to complete the job.


Bottom side of spoiler to show adhesive tape placement. It is the red backing adhesive. It got painted as well, but you can see the rectangle if you look closely(look closer and you can see where I scratched some paint off near the lower left side, revealing the red backing).

Here is 1 of the mounting holes(there is 1 for each side as this spoiler does not use all 4 of the factory holes-it does cover them).

During the test fitting, I used painters tape to mark dead center on both the spoiler and the car(used a raised dot in the center of the thrid brake light for a reference point). This was to make it alot easier during final fitment(this is where dad came into play )so no guess work as to location.

After placing the spoiler in the correct location, I went around the spoiler pressing firmly for about 5 seconds in many places all the way around to get a good bond.
Now it is time to use the 2 screws, washers and pads supplied to firmly attatch the spoiler.
Here is a view as to what it looks like so far. Only the hole closest to the back of the trunklid gets reused.

I removed the backing from the foam pads and placed 1 on each hole per side.

Next, I tightened the screw(applied a bit of silicone caulking in the hole prior to putting in the screw-to keep out water)just until I noticed the pad becoming indented. I stopped to check how tight the screw was. It was still loose. So as a gauge I pressed my fingernail to the washer and if it pressed in(it did), I would give a few turns and check again. I did that until I could no longer move the washer.


Since there is now an open hole on each side of the trunk lid, I used clear silicone caulking to fill the hole. You can see the adhesive strip is over the hole. That made it nice due to the fact I wouldn't need to fill such a deep hole.

Time into project-70 minutes(not including polishing and waxing the spoiler). That took another 15-20 minutes.
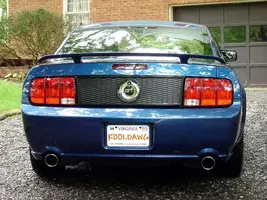
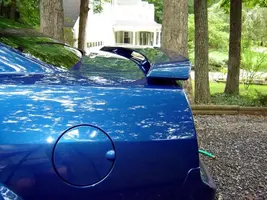
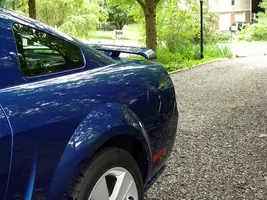
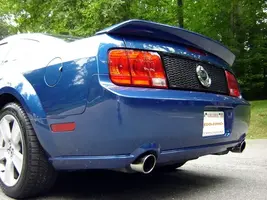
Here are the pics
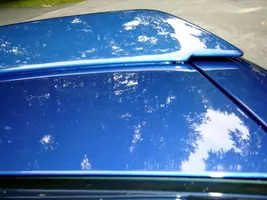
Before


During

After


I got the spoiler from http://www.atlantaauto.com/ford/mustang/rearspoilers/3d691038p05.html on the advice of DarkFireGT
Under $230 prepainted and shipped to my door!!!!! The wing is near awesome as far as paint match and paint quality. Install time start to finish was about 1 hour and 10 minutes. I had my dad help as we fitted the wing to the car after peeling the adhesive backing. The rest was solo.
Here is my detailed install.
There are 4 bolts holding the factory spoiler on(2 on each side).
Remove the nuts using a 10mm socket.
Once all 4 nuts are removed, remove the spoiler. There is adhesive on each side that has to be "broken". To do so, I used a "credit card". As I slowly pushed up(from the back)the spoiler I took the card and carefully started slicing at the adhesive which cuts fairly easy. It gets a bit tricky the farther under the spoiler you get. I alternated sides working once I reached the first bolt stud, then went back and did from there to the rear of the adhesive. After that...off she came. Be careful as to not damage the trunk lid since the studs are still in the bottom of the spoiler.
Time into project-20 minutes
Now it is time to remove the remaining adhesive on the trunk lid(quite a bit).
I carefully used the card for this as well since the adhesive was still relatively thick and didn't have to worry about paint damage. there will still be a thin layer left behind.
Here is the amount removed in the above step(just from 1 side...not both). Also what adhesive still remains.
To remove the remaining adhesive, I used rubbing alcohol on a paper towel and wet the area. After letting that sit for a few seconds I started rubbing it off using my thumb(tedious work, but works for me). You may have to rewet the area a few times to keep the adhesive pliable(I did). I'm sure there are chemicals specific to adhesive removal, but this seemed the inexspensive and at the time easy route.
The 3 clumps on the upper left is what was removed from this step(once again, just 1 side).
This is where I got using the rubbing alcohol/thumb technique. The rest was removed using a hand glaze. That cleaned the area real well.
Time into project-50 minutes.
For surface prep for the adhesive strips on the bottom of the new spoiler, I used rubbing alcohol and went over the section that needed to be cleaned 10x(used a new cloth every time). It may seem like alot, but it's only a matter of seconds each time. I let the surface dry in between cleanings as well which only took a few seconds.
Time into project-55 minutes.
Now comes the time to test fit the new spoiler. That was amazingly easy! Eyeball it from the top, hold it in place, open the trunk and see that the holes line up. I got pretty darn close the very first time
Here are the parts included and supplies needed to complete the job.
Bottom side of spoiler to show adhesive tape placement. It is the red backing adhesive. It got painted as well, but you can see the rectangle if you look closely(look closer and you can see where I scratched some paint off near the lower left side, revealing the red backing).
Here is 1 of the mounting holes(there is 1 for each side as this spoiler does not use all 4 of the factory holes-it does cover them).
During the test fitting, I used painters tape to mark dead center on both the spoiler and the car(used a raised dot in the center of the thrid brake light for a reference point). This was to make it alot easier during final fitment(this is where dad came into play
)so no guess work as to location.After placing the spoiler in the correct location, I went around the spoiler pressing firmly for about 5 seconds in many places all the way around to get a good bond.
Now it is time to use the 2 screws, washers and pads supplied to firmly attatch the spoiler.
Here is a view as to what it looks like so far. Only the hole closest to the back of the trunklid gets reused.
I removed the backing from the foam pads and placed 1 on each hole per side.
Next, I tightened the screw(applied a bit of silicone caulking in the hole prior to putting in the screw-to keep out water)just until I noticed the pad becoming indented. I stopped to check how tight the screw was. It was still loose. So as a gauge I pressed my fingernail to the washer and if it pressed in(it did), I would give a few turns and check again. I did that until I could no longer move the washer.
Since there is now an open hole on each side of the trunk lid, I used clear silicone caulking to fill the hole. You can see the adhesive strip is over the hole. That made it nice due to the fact I wouldn't need to fill such a deep hole.
Time into project-70 minutes
(not including polishing and waxing the spoiler). That took another 15-20 minutes.Here are the pics
Before
During
After
Attachments
-
 DSC03799.webp45.4 KB · Views: 346
 -
 DSC03797.webp36.9 KB · Views: 367
 -
 DSC03802.webp44.2 KB · Views: 325
 -
 DSC03800.webp37.6 KB · Views: 334
 -
 DSC03805.webp110 KB · Views: 311
 -
 DSC03808.webp121 KB · Views: 351
 -
 DSC03807.webp57.8 KB · Views: 291
 -
 DSC03809.webp31.4 KB · Views: 351
 -
 DSC03810.webp52 KB · Views: 318
 -
 DSC03811.webp41 KB · Views: 309
 -
 DSC03812.webp41.2 KB · Views: 316
 -
 DSC03813.webp65.5 KB · Views: 341
 -
 DSC03814.webp36.9 KB · Views: 312
 -
 DSC03818.webp48.3 KB · Views: 327
 -
 DSC03822.webp110 KB · Views: 316
 -
 DSC03823.webp31 KB · Views: 360
 -
 DSC03824.webp96.8 KB · Views: 350
 -
 DSC03825A.webp56.5 KB · Views: 321
 -
 DSC03827.webp80.2 KB · Views: 349
 -
 DSC03828.webp67.1 KB · Views: 320
 -
 DSC03829.webp85.8 KB · Views: 351
 -
 DSC03831.webp13.4 KB · Views: 331
 -
 DSC03832.webp65.3 KB · Views: 315
 -
 DSC03833.webp77.3 KB · Views: 341
 -
 DSC03787.webp101.2 KB · Views: 317
 -
 DSC03791.webp100.4 KB · Views: 317
 -
 DSC03795.webp114.7 KB · Views: 324
 -
 DSC03820.webp123.1 KB · Views: 352
 -
 DSC03834.webp72.2 KB · Views: 289
 -
 DSC03839.webp75.9 KB · Views: 312
 -
 DSC03840.webp52.1 KB · Views: 321
 -
 DSC03843.webp71 KB · Views: 311
 -
 DSC03844.webp74.2 KB · Views: 317
 -
 DSC03845.webp90.9 KB · Views: 327
 -
 DSC03846.webp61.8 KB · Views: 310
 -
 DSC03851.webp78.5 KB · Views: 316
 -
 DSC03852.webp86.4 KB · Views: 336
 -
 DSC03856.webp23.9 KB · Views: 313
 -
 DSC03857.webp17.4 KB · Views: 306
 -
 DSC03858.webp17.7 KB · Views: 315
 -
 DSC03859.webp48.7 KB · Views: 372
 -
 DSC03866.webp52.2 KB · Views: 334