Exhaust Header Gasket

WonkeyDonkey

New Member
Dec 29, 2014
24
1
1
HB/OC/SoCal
OK, looking back through all the old header gasket topics I see lots of talk about using RTV in addition or as a substitute for the manufactured header gasket.
Question is which side do you put the RTV on? Are you putting it against the head and the gasket or the header flange and the gasket? Both?


With Stage 8 bolts do you put the retainers on after heat cycling them? Probably explained in the instructions, but I haven't even bought the bolts yet, just thinking about them as a way of fixing this leak.


FYI, stock heads, JBA shorties, the last owner replaced the gasket with a NAPA part and install was at the original dealership. Unfortunately that gasket only lasted 1500 miles, so I might be looking at getting the header flange machined.
 
  • Sponsors (?)


we put it on the header then put the header on. put 2 end bolts in to hold it in place then pull from the center out

you should be ok with black... we run copper now. the turbo makes to much heat and pressure so we switched from black to red then red to copper
 
Copper RTV was made to be the high temp exhaust gasket maker. Do not even think about another color got this spot. I will be looking at soft, aluminum gaskets next time. The header is most likely to have imperfections or not be flat, so that is the side I might seal.
 
Never having to chase a loose header bolt would be nice. If you can afford it, go for it! I have thought about drilling and safety wiring the bolt heads next time, but this looks nicer!
 
Copper RTV was made to be the high temp exhaust gasket maker. Do not even think about another color got this spot. I will be looking at soft, aluminum gaskets next time. The header is most likely to have imperfections or not be flat, so that is the side I might seal.
we used black on the nitrous motor and never had an issue. the turbo motor just makes to much drive pressure and to much heat.
 
Never having to chase a loose header bolt would be nice. If you can afford it, go for it! I have thought about drilling and safety wiring the bolt heads next time, but this looks nicer!
In the days of my youth I was an aircraft mechanic, so I still do some things that way. The bolt heads were drilled with a #52 drill bit (about .040) using a drill press and lots of WD40 to cool the bit. The head is drilled with the holes in a cross pattern at 90 degree angles to each other.

The bolts are 3/8 -16 thread stainless steel Allen head, 7/8" or 3/4" long depending on the thickness of the header flange that is on your headers.

I bought a 5/16" Bondhus Balldriver Allen wrench, it works like a universal joint. You can tighten up the Allen head bolts at 15-20 degrees off center angle and still get everything tight. Cut the "L" part off the wrench with a cutoff wheel and stuck the straight part in a Allen socket. This works great, because the Allen heads are smaller than even the 12 point bolt heads, and with my fancy tool I can tighten them up with a torque wrench.

Torque the bolts down and pull off about 12" of .032 stainless steel safety wire. Thread the wire through 2 holes, or just one if the other one is blocked by the header pipe. Pull the wire through until the ends are even. Twist up about 2" with your handy-dandy safety wire twister pliers, making sure that the wire pulls the bolt tighter as it routes across the header pipe. Make sure the twist ends at the wire hole in the next bolt, and that it pulls the bolt in the tightening direction. Thread it through and twist up about 3/4"of wire on the other side of the hole and cut it off evenly. Fold it over about midway so that the sharp end doesn't stick you.

The safety wire takes about 10-15 minutes a header pipe to do right and make it look good. The driver's side is easy, but you have to remove the mass air & smog pump air plumbing on the passenger side to have room to work.

safety-wiring-bolts-gif.55214
 
  • Like
Reactions: 1 users
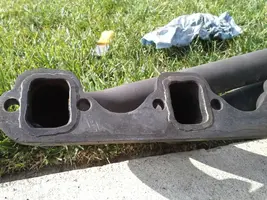
Hey guys, should I even put these back on?
20150109_131658.jpg 20150109_131722.jpg


They are 22+ year old JBA shorty headers (I mean, they need to go back on this is a DD not a project). Should I shop for new ones?
Do all headers have the seam at the flange/pipe? Should that get machined flat?
I am just going through the prep and cleaning them like crazy.

Unless they leak, spray them with some VHT high temp ceramic paint and slap them back on.
 
  • Like
Reactions: 1 users
Smooth the raised ridges lightly with a fine, flat file then use the copper RTV on that side as stated. Unless one or more pipe flange is really receded from rust and exhsust, you should be good to go if the pipes are solid but ugly.