How To Cut A Hardtop Door For A T-top Or Convertible

billison

I like tinted tail
15 Year Member
Feb 27, 2006
2,579
1,089
184
stl
ok, short version, I started on my doors 88 gt t top, drivers side has some damage that may be Beyond my skill. I doubt I’ll find a 87-88 hardtop style t top door, the next best is a 87-88 vert door with the right mirror. After that my options are changing both doors to the 88+ vert style, or converting either a 86 vert door or a 87+ dark top door. My question is this, what is the option that requires the least work if I can’t find a 87-88 ttop vert door?
Thanks
 
Last edited:
  • Sponsors (?)


Yeah, I can get a hard top door and cut the frame off. Only worry is transferring over the bracing. Waiting for my toes to defrost before I go see how it comes off. I found one Local that’s already the right color.
 
Ok, so it looks like I have 2 added braces in my door. One that goes along the top of the door frame that is basically just a stamping of the frame that’s spot welded on, then a smaller one below it that’s riveted on.

Think I’ll get away with pop rivets for the reinstall or do I need to weld? I got the welder but kinda suck at it lol.

Blue is the length of the brave and red is just to point it out.
 

Attachments

  • 66885CD1-8FD8-4E1F-91ED-E800D75376AC.jpeg
    66885CD1-8FD8-4E1F-91ED-E800D75376AC.jpeg
    605.2 KB · Views: 682
I have used coupe/hatchback doors a couple of times for convertible/t-top cars. Its really easy, ESPECIALLY if you have old t top doors to pull the bracing and glass out of. All fox convertible and t-top cars started as coupes. The door frames (along with the roof of the car) were simply cut off to make them into the t-top or convertible car.
 
I don’t know if your doors differ from mine much Bill, but if the donor door doesn’t have the upper brace, you’ll want to weld that in. It’s just several spot welds, nothing that will look too ugly:D.

I have two braces on my doors, one toward the front that goes from top to bottom, and one towards the rear. They just rivet in.
 
As of now I plan to swap everything over. I found 2 black doors Local I’m gonna check out. If one is rust free I’ll be set. I’ll take lots of pics and put together a how to.
 
  • Like
Reactions: 1 users
Busy night. But found a black rust free hard top door. Using my old door I was able to easily see where to cut.
 

Attachments

  • 2EAEE276-9493-4E71-89DD-6F806CDECEA8.jpeg
    2EAEE276-9493-4E71-89DD-6F806CDECEA8.jpeg
    568.5 KB · Views: 539
  • AFDFE1DE-96DF-4C46-9F2E-6EF9BC22F647.jpeg
    AFDFE1DE-96DF-4C46-9F2E-6EF9BC22F647.jpeg
    442.5 KB · Views: 483
  • 54A4FF75-8799-4B23-9ED0-E48F5A028801.jpeg
    54A4FF75-8799-4B23-9ED0-E48F5A028801.jpeg
    532.9 KB · Views: 505
  • Like
Reactions: 4 users
Went ahead and removed the big brace. That’s 26 welds and one big weld. The spot weld cutter liked to jump on me so it’s gonna get a primer coat. But it came out and lays nicely on the new door.
 

Attachments

  • 2D4EC319-2E51-4028-BA2A-A279C43E6EC8.jpeg
    2D4EC319-2E51-4028-BA2A-A279C43E6EC8.jpeg
    687.2 KB · Views: 534
  • B1F60F9C-706F-49E8-BA47-9837F38B3CAE.jpeg
    B1F60F9C-706F-49E8-BA47-9837F38B3CAE.jpeg
    654.3 KB · Views: 464
  • 6195C567-8251-4C62-A382-659CD70CB5CE.jpeg
    6195C567-8251-4C62-A382-659CD70CB5CE.jpeg
    671.7 KB · Views: 463
  • Like
Reactions: 1 users
I’m done for tonight. Once I figure how to properly place it on the new door it’ll get welded up. It’s easy to access the back of each weld so I can use my copper spoon and cheat the welds in.

After that it’s just moving the glass and maybe the regulator. I still have not gotten a definitive answer on that. My only lead is that lmr lists one for each type of door.
 
  • Like
Reactions: 1 user
Not the best pics, but the support is almost a perfect overlay of the upper frame. Drilled the holes for window stops and started welding in the brace. I’m not the best welder but that’s what grinders are for. But I got a couple more welds, some grinding , and there is part that I think keeps the door from rattling that I gotta get off the other door and drill the rivets for the small brace. This has been a pain but this is the most fun I’ve had on the car in awhile.
 

Attachments

  • F67A47BC-117F-48F4-943C-E94D6551FE11.jpeg
    F67A47BC-117F-48F4-943C-E94D6551FE11.jpeg
    708.7 KB · Views: 455
  • DEA0D484-F16D-4D0C-A7DE-4241C51EECB7.jpeg
    DEA0D484-F16D-4D0C-A7DE-4241C51EECB7.jpeg
    642.5 KB · Views: 492
  • 869C8AF3-E12C-4C1B-8091-5C90289CB5F2.jpeg
    869C8AF3-E12C-4C1B-8091-5C90289CB5F2.jpeg
    402 KB · Views: 428
  • 7058A134-1D65-4D56-B279-4A9BA5057024.jpeg
    7058A134-1D65-4D56-B279-4A9BA5057024.jpeg
    589.2 KB · Views: 544
  • Like
Reactions: 3 users
Without removing the other one, as far as I can tell, the regulators are the same.

The new door is now a t top door.

Ran into 1.5 snags. The part pictured above that I think helps prevent door rattle, both bolts were stripped, had to weld a junk screw driver to them and take a impact to the nut so I’ll have to sorce new nuts. That’s the .5. I also found there is a second L shapped brave inside the door for this part. As far as I can tell, they put spot welds all around where the nut holes where. Not sure I can remove it and maintain any strength. If I can get it out cleanly, I’ll just cut some 1/4 metal and drill it and put it in the door with a tac weld.
 

Attachments

  • 83A65991-9189-40A2-949D-705CC573578B.jpeg
    83A65991-9189-40A2-949D-705CC573578B.jpeg
    673.5 KB · Views: 502
  • Like
Reactions: 1 user
Lady Luck was kind enough to bless me with doing the job twice. I’d like to add some notes about drilling the upper brace out.

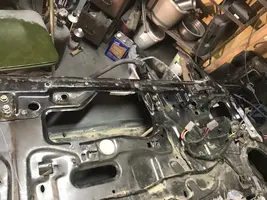
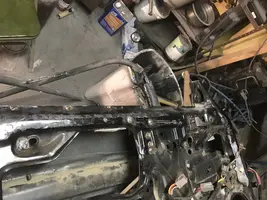
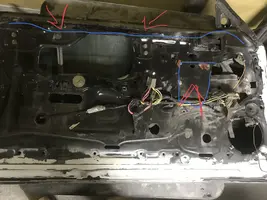
There are 27ish spot welds, the count was not the same. Not all in the same spots either. The trick to finding them is to use the light and look for a circle. Use a spring loaded center punch and a spot weld drill bit, both from harbor freight. If you are lucky, you’ll get them all and they will pop loose with just a little convincing. If you bend the brace, and it’s easy to do, put it back on the old door using the holes to line it up, use the bolts from the window stop to hold it tight, and using a few pairs of Channel locks, clamp it back together and it’ll easly go back. If it’s really bad you could run bolts through the drill holes or even use self tapping screws.

For welding it on the new door. You want to minimize how much raw metal is left. What I did what used the various methods to get it firmly in place. Chose a hole, used the channel locks to make sure it was flush, then used a drimel with a bit to knock back the paint to have a good clean area to weld to. I would go from front to back to make sure it stayed in place and used as many clamps as I could. When I was done, the whole brace got scuffed with a scotch bright and primered and will get top coated later.

The brace is the biggest part of the job besides paint.
 
  • Like
Reactions: 1 users