Installed some new goodies today...

kooldawg6

mine works really well and can take a fair amount
Aug 31, 2006
1,679
2
38
Central VA
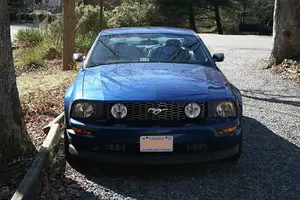
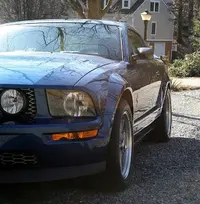
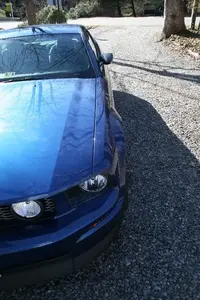
Installed the CDC Classic Chin Spoiler, Agent 47 mirrors, black billet heating control knobs and black billet "GT" cup holder bezel.
Only have some camera phone pics of the spoiler and mirrors for now.
0123081706A.webp

0124081722aA.webp

More and nicer pics will follow once I get the springs in and an alignment:nice: I love the look the spoiler and mirrors gave:D
 

Attachments

  • 0124081722aA.webp
    0124081722aA.webp
    57.6 KB · Views: 130
  • 0123081706A.webp
    0123081706A.webp
    110.7 KB · Views: 104
You've beaten me to the punch. I wanted both the chin spoiler and the mirrors! Are you going to paint the mirrors? I think if I ever go ahead and get them, I will. It all looks good to me. Thanks for basically convincing me to spend more money. :nice:
 
Awesome. I'm working on getting the chin spoiler and mirrors custom painted right now. With my car being bright red, I don't want just black mirrors, but all red is too much, so I'm getting a two tone job and a similar job on the chin spoiler. Black in the middle but red on the outsides. A La GT/CS.
 
Got the mirrors and interior goodies from SHR(Silver Horse Racing):nice:
Will post up better pics once the springs are installed. That could be a week because of my schedule:( Stuff like this I can't see paying to have installed. Besides, I love wrenching on my car as much as I can:D
 
Looks real good. I really like the way your car is going. I've just got the Legend splitter which I hope to fit soon and the painted Cervini lower side ducts although the paint around the edges was disappointing and needs some work before I get to fitting those.
 
I agree with you Heavy as far as painting it, but on lighter colored cars. On yours, it gives a finished look as it wraps around the lower grill, matches the bumper and completes the stripes. On my Vista, I like the way it blends in with the black lower grill and dark blue paint:nice:
 
Being a little hesitant about breaking the glass upon removal and install, it went fairly easy:nice: Actual work involved, taking my time, I had about 1.25 hours involved. Yes, you transfer over the motor and wiring harness so they still work as normal:D I have a writeup over in Tech.
 
Newer/better pics..

IMG_0581A.webp

IMG_0583A.webp

IMG_0584A.webp

IMG_0585A.webp

IMG_0586A.webp

IMG_0587A.webp

IMG_0588A.webp

IMG_0589A.webp

IMG_0590A.webp

IMG_0593A.webp

IMG_0595A.webp

IMG_0598A.webp
 

Attachments

  • IMG_0581A.webp
    IMG_0581A.webp
    149.7 KB · Views: 157
  • IMG_0583A.webp
    IMG_0583A.webp
    92.3 KB · Views: 111
  • IMG_0584A.webp
    IMG_0584A.webp
    72.3 KB · Views: 148
  • IMG_0587A.webp
    IMG_0587A.webp
    71.3 KB · Views: 135
  • IMG_0586A.webp
    IMG_0586A.webp
    70.4 KB · Views: 130
  • IMG_0585A.webp
    IMG_0585A.webp
    94.3 KB · Views: 143
  • IMG_0589A.webp
    IMG_0589A.webp
    44 KB · Views: 113
  • IMG_0588A.webp
    IMG_0588A.webp
    45.6 KB · Views: 133
  • IMG_0590A.webp
    IMG_0590A.webp
    40.4 KB · Views: 133
  • IMG_0593A.webp
    IMG_0593A.webp
    37.5 KB · Views: 149
  • IMG_0595A.webp
    IMG_0595A.webp
    43.6 KB · Views: 153
  • IMG_0598A.webp
    IMG_0598A.webp
    30.6 KB · Views: 153