My Mustang Adventures 2011

65coupe408w

Member
Mar 26, 2010
192
0
16
So I decided that it is probably time to document my Mustang adventures so far this year. I will try not to make this too long winded and provide lots of pictures.

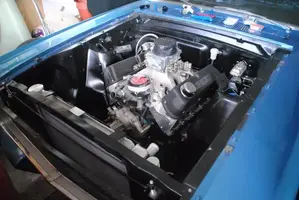
So I started with this which I have owend for the past 6 years (my 408w powered coupe):

DSCN4841.webp


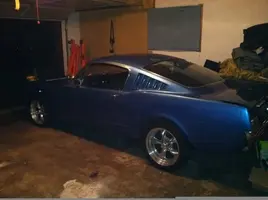
Then last december I decided to buy this in California:

424231689_o-1.webp


And drive it home (San Fransisco to St. Petersburg FL):

At the Golden Gate Bridge:

DSC_0060.webp


Then on through the Pacific Coast Highway:

DSC_0128.webp


DSC_0226.webp


A stop at Big Sur:

DSC_0250.webp


Me and my girlfriend at the Grand Canyon (it was snowing up there!):

DSC_0395.webp


DSC_0425.webp


Gotta Love Texas!:

DSC_0525.webp


DSC_0582.webp


Last Fuel Stop before home!:

DSC_0617.webp


Sun going down as we approach home in St. Petesburg 3,000 miles anf 5 days later:

DSC_0633.webp
 
Part 2

OK so now onto the project at hand. My goal was to swap complete powertrains from the coupe to the fastback and do some upgrades along the way. So here goes!

So we tore the fastback down to this:

DSC_1133.webp


DSC_1130.webp


Which made my garage look like this:
DSC_1134.webp


Then we got to work on the Coupe (Many thanks to my brother for all his help!):

Out with the 408:
DSC_1189.webp


Brother detailing out the engine bay:
DSC_1242.webp


Finished Product:
DSC_1257.webp


Front suspension swapped:
DSC_1247.webp


340hp 5.0 & Close ratio 4spd on its way to its new home:
DSC_1272.webp


In she goes:
DSC_1286.webp


Finished product (I sold the car in 2 weeks):
DSC_1334.webp

DSC_1330.webp

DSC_1343.webp

DSC_1367.webp

DSC_1359.webp
 
Part 3

So now I am getting to work on the Fastback.

So I installed my 5 1/2 leaf rear springs and trac-bars:
DSC_1143.webp


Then I got my fuel tank & system mounted up:
DSC_1151.webp


Now onto getting the 9inch back in (35 spline axles, detroit locker, stranger Nodular Case, Billet Daytona Pinion Support ect...):
DSC_1155.webp

DSC_1159.webp

DSC_1163.webp


Then I installed my 1in heavy duty lowering springs in with OpenTracker rollerized spring perches:
DSC_1314.webp


Last weekend I gutted the interior and this is where I am up to thus far...I will have more updates over the weekend:
DSC_0209.webp

DSC_0211.webp

DSC_0214.webp

DSC_0215.webp
 
I havent posted on this thread in a while but I have been making a lot of progress. Here are some crappy cell phone pics.

Detailed Engine Bay, cleaned up 408w, installed motor, had headers recoated and installed, installed transmission, dynmat'd interior, added auxilliary fuse panel to run all my after market accesories, added billet Optima Battery trunk mount kit, ran return style fuel system, installed dual resivour braking system with line lock, installed large crossflow aluminum radiator, installed hydraulic clutch.

Things left:

Magnaflow 3in exhaust system
Re-upolster factory seats (traded the high backs for a set of stockers)
Install Borgeson Saginaw Pump
QA1 adjustable front shocks

Thats about it...other than minor stuff... Ill update more later

I will post more tonight when I can break out the good camera! Let me know what you think!

fastback.webp


fbwindsor3.webp


fbwindsor2.webp


fbwindsor1.webp


fbinterior1.webp


fbexterior1.webp
 

Attachments

  • fastback.webp
    fastback.webp
    37.3 KB · Views: 184
  • fbwindsor3.webp
    fbwindsor3.webp
    42.7 KB · Views: 169
  • fbwindsor2.webp
    fbwindsor2.webp
    34.1 KB · Views: 170
  • fbwindsor1.webp
    fbwindsor1.webp
    62.7 KB · Views: 156
  • fbinterior1.webp
    fbinterior1.webp
    64.7 KB · Views: 140
  • fbexterior1.webp
    fbexterior1.webp
    35.3 KB · Views: 158
Quick update...

Got these in the mail last week... now I have a nice weekend project.

Adjustable QA1 shocks for up front. These are some really nice pieces!
QA1.webp


Saginaw conversion PS pump from Borgeson.
pump.webp


Only complaint about the pump is although it is sold for a 289/351 and bolts right up. If you want to use it with stock PS you have to re-valve the internals and also purchase a fitting to connect the high pressure line up to the pump. I have a seperate thread on this and will be showing how to do it.

More to come soon:

Just need MSD 6BTM and Magnaflow Catback...almost there.
 
Thanks for all the kind words! I am about to get into the car big time this week. The weather has started to cool down here and I really want to drive the car!

More updates to come!
 
65coupe408w,
I'm curious about something. Given that you seem to be:
A> sparing no expense on this beautiful car
B> not anal about originality
C> already have an upgraded power steering pump
why would you keep the kinda crappy, no feel, finicky and problematic OEM ram style power steering setup with the Borgeson integral box (and others) available and easy to install? Even if you are planning to keep using a clutch Z-Bar, Borgeson now offers a modified Z-Bar for you car. Certainly, it's your car/your choice, but I'm just curious as to the logic.
Just Wondering,
Gene

The borgeson pump I purchased can work with their box also, so I will likely upgrade down the road. To tell the truth I want to get the car running so I can use it this fall (prime cruising time here in FL) I fear that If I tackle the box I will never get her running!

Luckily I am running a hydraulic clutch so I dont need to worry about the Z-bar. But I am concerned that running this 408w, which is more than a squeeze may give me issues with their box that could slow this project down. I have already done so much custom work to make everything fit I am also certain the box will give me some headaches aswell.

Appreciate the questions though! I will post some more pictures later...

Thanks :)
 
So I spent most the evening moving the car into the middle of my garage and then working on the passenger side suspension. When installing the brakes I had run into a stuck bleeder that I just couldnt get out. Last night I decided it was coming out whether it liked it or not! It took me a good 45 minutes but it finally gave up and I was able to put a new one in. I am hoping that I can bleed the brakes tonight and mount up my AC/PS brakcet permanently. Everything is coming together nicely but its all the little things that take time!

A better quality shot of the engine bay before I started last night:

DSC_0076.webp


The QA1 adjustable, ready to go in.

DSC_0079.webp


Installed on my OpenTracker rollerized perches:

DSC_0081.webp


Engine bay with both QA1's:

DSC_0080.webp


We will see how much progress I make tonight. Its nice to see things coming together now. More updates to follow!
 
Please post your thoughts on the QA1 shocks when you get the car on the road. Your project looks great and it is neat to follow the progress.

I have those same shocks all around, but it will be a while before I get enough money for an engine.


Armando
 
Please post your thoughts on the QA1 shocks when you get the car on the road. Your project looks great and it is neat to follow the progress.

I have those same shocks all around, but it will be a while before I get enough money for an engine.


Armando

Ill be sure to report back! If I like them I will be swapping my rears out for them too. From the initial looks of things they seem great. Now some road tests will have to show how good they really are!
 
67 mustang

I'm from Madeira Beach. I'd love to hook up and see your ride. I've got a 67 with a 302 that I'm putting a blower on, but I also have a 351 and would like to see how much clearance there is for that. :shrug: