Paint Prep

HGFireHazard

Member
Apr 10, 2005
460
0
17
Michigan
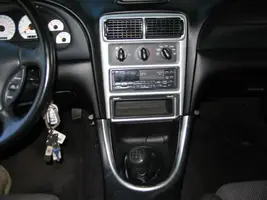
So I gutted my entire interior this eveing because I want to do some silver on some of the interior pieces of the car. So far I've got the door arm rests and the center radio/control face to be done. However, once I pulled out the center piece it looks rather messy to try and pull the actual vents out of the center piece. For those who have painted this part how did you remove it? Or did you just carefully tape and block off that part. I'm also looking to paint the shifter base, but that as well has the same problem. The boot is attatched with the same kind of crap as the vents, so again some advice there if you guys have any. Hope to get some pics up in a couple days since I have the next 2 off of work. Thanks for the help guys.
 
Check my name for a couple posts on painting interior pieces. I dyed my tan stuff to black. As for the AC vents,,especially the center trim,,remove it and tape the vents off real well. As for the door switch panels get w/RC about that. Im not to sure how you go about smoothing it out since there is a plastic type layer on these pieces. I just used rubbing alcohol and a red scotch brite pad to clean it up. Use adhesion promoter to make sure the paint sticks.
 
Alright, here is an update on how today went. All I decided to paint today was the two arm rests on the doors and the center radio bezzle. The easiest by far to paint was the bezzle, even though I thought it would be much harder to mask off the A/C vents. It came out fantastic. However, the arm pieces were a little more difficult. I started by using adhesion promoter, but that turned out to lead to a disaster on my second coat. That rubberized top that is put on top of the base plastic because to bubble and come off. At the time I thought no big deal, we'll just sand it all off and keep going. The sanding turned into a 2 hour process, with the help of a friend. We used 100 grit until it was all gone, and then stepped up to 220 to smoothe it out a bit for painting. If there is an easier way to remove that coating someone feel free to chime in. After that it took 2 coats of promoter, followed by 4 coats of color, and 3 coats of clear. After the entire process the arm rests still have some small lines and a few drip marks down in the handle area (which may give me reason enough to do them all over again), but like I said the bezzle looks fantastic. I took the time to clean and shine up all of the interior pieces that I decided to gut while I did this (console, door panels, etc.). I'll have some pictures in the morning to show you guys how they look. Time for bed now though, enough playing for today.
 
HGFireHazard said:
Alright, here is an update on how today went. All I decided to paint today was the two arm rests on the doors and the center radio bezzle. The easiest by far to paint was the bezzle, even though I thought it would be much harder to mask off the A/C vents. It came out fantastic. However, the arm pieces were a little more difficult. I started by using adhesion promoter, but that turned out to lead to a disaster on my second coat. That rubberized top that is put on top of the base plastic because to bubble and come off. At the time I thought no big deal, we'll just sand it all off and keep going. The sanding turned into a 2 hour process, with the help of a friend. We used 100 grit until it was all gone, and then stepped up to 220 to smoothe it out a bit for painting. If there is an easier way to remove that coating someone feel free to chime in. After that it took 2 coats of promoter, followed by 4 coats of color, and 3 coats of clear. After the entire process the arm rests still have some small lines and a few drip marks down in the handle area (which may give me reason enough to do them all over again), but like I said the bezzle looks fantastic. I took the time to clean and shine up all of the interior pieces that I decided to gut while I did this (console, door panels, etc.). I'll have some pictures in the morning to show you guys how they look. Time for bed now though, enough playing for today.
sweet man...what color did you paint them.....and PICSSSSSSSSSS!!!!!!!!
 
Alright, here are the pics of the final product

IMG_0279.webp

IMG_0280.webp

IMG_0281.webp

IMG_0282.webp

IMG_0283.webp


I realize that the shifter lining doesn't match up with the radio bezzle, but I did it on purpose for a little different look. The handles like I said didn't turn out awesome, but I'll redo those on another day.
 

Attachments

  • IMG_0279.webp
    IMG_0279.webp
    51.8 KB · Views: 83
  • IMG_0280.webp
    IMG_0280.webp
    46.2 KB · Views: 85
  • IMG_0281.webp
    IMG_0281.webp
    46.3 KB · Views: 84
  • IMG_0282.webp
    IMG_0282.webp
    53.7 KB · Views: 88
  • IMG_0283.webp
    IMG_0283.webp
    37.9 KB · Views: 77