Polished Master Cylinder Done (Pics)..How to Put In?

94GTLaserRC

Squint as you approach, lest you be blinded by my
15 Year Member
Well, not because it took so long, but being busy with storms, etc, I hadnt had a chance to finish polishing this sucker until today.

Here's the original pic:

1682904MasterCylinder5.jpg


Here are pics of the finished product:

1682905MasterCylinder6.jpg

1682906MasterCylinder7.jpg

1682907MasterCylinder8.jpg


Debating whether or not to put the Steeda Decal (it's not a "sticker", it's a thick platic coded glossy emblem)


What specifically do I need/need to do to change the stock MC out?

Thanks
RC
 
tsoccer3299 said:
also wondering how exactly you did it? If i had some time I'd love to do some of that

Dremel is a must...Die grinder with compressor EXTREMELY helpful.
1. Die Grinder with Scotch-type pad for rough cast removal...Dremel with small sanding wheels for tight spots.

2. Small Scotch-type wheels on Dremel.

3. 400 Grit sand paper.

4. Buffing wheels with Tripoli.

5. Felt pads with white rouge.

6. Denova...then some Dry buff.


Kevin...Come by and help me do some REAL mods, and Ill help you polish :nice:

Getting ready for my C/C plates install and this MC...COuld use some help.

RC
 
Im kinda far away now but when in back in town im always down for lending a helping hand anytime. Can you show me what the pads you use look like for the tripoli/white rouge? And where did you get it? I thought you could get it at Home Depot but I couldnt find it last time i checked.
 
BlueOvalStangGT said:
Im kinda far away now but when in back in town im always down for lending a helping hand anytime. Can you show me what the pads you use look like for the tripoli/white rouge? And where did you get it? I thought you could get it at Home Depot but I couldnt find it last time i checked.

Home Depot DOES have the stuff.

GO to www.eastwood.com

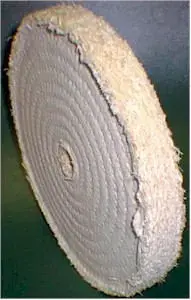
You use a spiral sewn (TIGHT) wheel with pressure for buffing with Tripoli (first compound after sanding)
sisal2.webp
GET one that you tighten with a nut and bolt.... If you get the one that is pre fastened with a shank, the shank always seems to loosen when you apply pressure.

Tripoli is a brownish red....White rouge is, well, white :stupid:

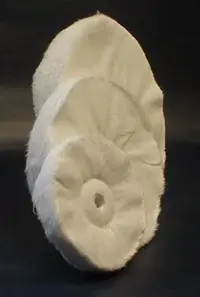
Use a Loose flap wheel with the rouge
loose.webp

I use a small clean one for dry buffing when Im all done.

Just drop by and Ill hook you up!
RC
 

Attachments

  • sisal2.webp
    sisal2.webp
    7.8 KB · Views: 100
  • loose.webp
    loose.webp
    7.4 KB · Views: 139
When installing or replacing a master cylinder, it is critical that all air is removed from the master cylinder.

1) Place your master cylinder in a vise by the ears (not body). Make sure it is level.
2) Attach a piece of clear plastic hose to the short end of one of the plastic
nozzles. Do the same to the other hose and nozzle.
3) Clip the plastic bridge to the wall and push the ends of the hose through the holes so they are SUBMERGED in the reservoir on either side of the wall.
4) Press the tapered end of the nozzle FIRMLY into the cylinder port hole with a twisting motion. Repeat this procedure on the other port hole.
5) Fill the reservoir with CLEAN brake fluid recommended by the manufacturer.
6) Using full strokes, push the piston in, then release. Do this until ALL the air bubbles have disappeared from the clear plastic hose.
(CAUTION-MASTER CYLINDER WILL NOT BLEED PROPERLY UNLESS HOSES ARE SUBMERGED IN BRAKE FLUID UNTIL THE BLEEDING PROCESS IS COMPLETED.)

Now mount master cylinder and avoid brake fluid leaking out of front and rear ports during installation.


Always bench bleed master cylinder first, then the system. There are four methods: gravity, pressure, vacuum, and pedal bleeding. The most common is pedal. This process is as follows:

1) Pedal bleeding is a 2 person job - one person pumps the pedal, and the other operates the valves. Open each bleeder valve individually, then depress the pedal one full stroke. The person watching the valves looks for air bubbles and closes the bleeder valve before the pedal is slowly returned to the released position. (NOTE: To assure that no air is siphoned into the system, a plastic hose should be connected to the valve. The other end of the hose should be submerged in container of brake fluid. Also, the valve must be closed at the end of each stroke before releasing the pedal.)
2) Continue in this manner until all calipers are bled.
3) After each caliper is bled, refill the master cylinder and frequently check the reservoir.
4) Bleed the longest line first, following this order: right-rear-outer, right-rear-inner, left-rear-outer, left-rear-inner, right-front and left-front.
 
TUNEDIN: Thanks for taking time to post this...Im still a little confused on a couple things (see bolds in your quote)


tunedin302 said:
When installing or replacing a master cylinder, it is critical that all air is removed from the master cylinder.

1) Place your master cylinder in a vise by the ears (not body). Make sure it is level.
2) Attach a piece of clear plastic hose to the short end of one of the plastic
nozzles. Do the same to the other hose and nozzle.
3) Clip the plastic bridge to the wall (IM NOT REALLY SURE WHAT WALL YOU ARE TALKING ABOUT. In the pic you posted it looks as though the upper reservoir is a large open container, when in fact it's a closed container with a small opening on top) and push the ends of the hose through the holes so they are SUBMERGED in the reservoir on either side of the wall.
4) Press the tapered end of the nozzle FIRMLY into the cylinder port hole with a twisting motion. Repeat this procedure on the other port hole.
5) Fill the reservoir with CLEAN brake fluid recommended by the manufacturer.
6) Using full strokes, push the piston in, then release. Do this until ALL the air bubbles have disappeared from the clear plastic hose.
(CAUTION-MASTER CYLINDER WILL NOT BLEED PROPERLY UNLESS HOSES ARE SUBMERGED IN BRAKE FLUID UNTIL THE BLEEDING PROCESS IS COMPLETED.)

ONE NOTE: I do have the little hoses that came with the MC to make this step easier...Im sure once I get to it and see it, it will make sense. Vib may be dropping by that day anyway (But Iwant to do all the work.

Thanks again.
RC
 
94GTLaserRC said:
Thanks again buddy!!

Just so everyone reading this knows...

Mansonozz is the one that put up with me on AOL IM explaining how to go about getting this and shining 'er up. (also gave me the suggestion)

Thanks again :hail2::worship:
RC

If you're gonna bling it, go all the way! :banana:

:shrug:

:D
 
The picture is just generic. Most Chebby MC's are totally open up top. Just make sure the hose it spraying the fluid back into the reservoir, and everything will be fine. That's all the "clipping to the wall" is for. Just pump it until you get some good fluid movement, slap it in, and bleed the system. It's not a big deal.
Brandon