

just got done with install of typhoon couple days ago. fired up and no good. took upper off today to see if coolant was in valley. ports aren't straight so no luck. egr to tb gasket was soaked which I didn't remember when switching to 70 mm a while back. and small hold on bottom vacuum "tee" thing. is egr gasket normally soaked and what other signs of coolant leak to oil can I look for without removing lower.
You are using an out of date browser. It may not display this or other websites correctly.
You should upgrade or use an alternative browser.
You should upgrade or use an alternative browser.
Typhoon Pain
- Thread starter Lovejoy
- Start date

mikestang63
SN Certified Technician

And I get heck for typing unclearly when it it too late
At night! Please try again if I answer the wrong question.
The gaskets on both sides of the EGR plate should be subjected to pressurized coolant flow. If it is hooked up like the factory, coolant runs through from hose barbs on the front and rear of the EGR plate - that plate is in between the throttle body and the end of the intake. If the gaskets are installed 90 degrees off (or on the wrong side????) coolant will not flow right through there and may leak. And although I have installed them dry, installing paper gaskets without some sealer is just asking for a leak under pressure.
As far as testing, Stant (and others) make a coolant pressure testing kit. Before you tear things apart farther, plug those two little EGR plate hoses, put on the adaptor from the kit on where the radiator cap goes, plug the overflow tube, pump up the pressure, watch for leaks and pressure drops.
Why are you thinking you have a leak? Are you smoking or loosing coolant? Is there a chartreuse puddle under the car?
At night! Please try again if I answer the wrong question.
The gaskets on both sides of the EGR plate should be subjected to pressurized coolant flow. If it is hooked up like the factory, coolant runs through from hose barbs on the front and rear of the EGR plate - that plate is in between the throttle body and the end of the intake. If the gaskets are installed 90 degrees off (or on the wrong side????) coolant will not flow right through there and may leak. And although I have installed them dry, installing paper gaskets without some sealer is just asking for a leak under pressure.
As far as testing, Stant (and others) make a coolant pressure testing kit. Before you tear things apart farther, plug those two little EGR plate hoses, put on the adaptor from the kit on where the radiator cap goes, plug the overflow tube, pump up the pressure, watch for leaks and pressure drops.
Why are you thinking you have a leak? Are you smoking or loosing coolant? Is there a chartreuse puddle under the car?
car smokes a little when rpm go up. and feels similar to a head gasket but not nearly as much smoke. I will try with some rtv and put back together. no puddle under car. and gaskets didn't slip. did use end seals instead of rtv. thinking maybe not torque enough. but runs very rough but idles strong :s.
What color of smoke? Do you smell fuel or something sweet with the smoke?
Do the pressure test. First. Advance Auto lends the kits, and I just bought a nice one for little on Amazon.
If it leaks, check your plugs to see if they are fouled or if one is, or if one is wet. Hopefully, it will be just a vac. leak that is causing the rpm issue.
Do the pressure test. First. Advance Auto lends the kits, and I just bought a nice one for little on Amazon.
If it leaks, check your plugs to see if they are fouled or if one is, or if one is wet. Hopefully, it will be just a vac. leak that is causing the rpm issue.
So ended up not starting back up. Tore apart and turns out I'm an idiot. Lower to head gaskets were both upside down. Head side facing intake. Not sure if that was the main problem causing car to run like crap but couldn't have helped. Any opinion would help and no coolant in oil. New gasket set in will try round 2 this weekend. May the car gods be with me 
Just got done with typhoon install finally after 2nd try lol. Now only problem is coolant leak and smoke on passenger side seems like rear of engine. Wondering where this may come from. Heater core hoses seem fine no leak that I can see. Unless on bottom section of those hoses. Any lines in rear of block for coolant? Thanks for help

There is a coolant passage on both the driver side and passenger side of the lower intake manifold, just past the last intake runner. The lower intake gasket probably slipped while the intake was being installed..
Just in case you haven't seen this before....
Here's some tips...
Tools: a good torque wrench is a must have item. A razor blade scraper that holds a single edge razor blade from Home Depot or Ace hardware is another handy thing. Get a Chilton or Haynes shop manual - you'll need it for the bolt torques and patterns. The intake manifold has an especially odd pattern. You'll need access to a timing light to set the timing after you re-stab the distributor. Look in the A/C repair section for the fuel line tools. They look like little plastic top hats. You will need the 1/2" & 5/8" ones. The hat shaped section goes on facing the large part of the coupling. Then you press hard on the brim until it forces the sleeve into the coupling and releases the spring. You may need someone to pull on the line while you press on the coupling. Put some motor oil on them when you put the line back together.
The A/C Compressor comes off with lines still connected. Mark all the electrical, smog and vacuum lines with tags to help you remember where to re-connect them. If you have a digital camera, take several pictures.
Whatever you do, don't skimp on cleaning the gasket surfaces. New gaskets need to seat against bare metal and not the residue left from the old gaskets in order to seal leak free. This is the most time consuming and tiresome part of the job. Look for little things that need to be replaced like the short hose from the thermostat hosing to the water pump, damaged vacuum lines and hose clamps that are rusted or broken.
Plan on cutting the thermostat to water pump hose, or removing the thermostat housing. Also plan on removing the distributor to get clearance to remove the intake manifold. Remove #1 spark plug, stick your finger in the spark plug hole and crank. When your finger gets air moving past it, stop cranking. Turn the engine until the timing marks line up with the pointer. Now you can pull the distributor out.
My favorite trick that saves time and effort is the stay in place gasket. Be sure that you scrape (don't use a wire brush) all the old gasket material off, then clean all the surfaces with acetone or MEK.
When the surfaces are clean, use weather strip adhesive on the head to manifold surface, and on the side of the gasket that mates to the head. Follow the instructions on the tube or can and when it gets tacky, press the gasket down on the head.
Clean the area where the rubber rails mount to the block in front and in the rear with more acetone or MEK and do the same trick with the weather strip adhesive that you did to the heads.
Coat the rubber seals and the gasket area around the water passages with lots of Blue Silicone gasket sealer and put it together. Wala! no leaks, and no gaskets that shifted out of place.
Get a tube of anti-seize and coat all the bolt threads and under the bolt heads. That will help insure even torque when you tighten the manifold bolts. Plan on re-torquing them a after a weeks worth of driving
Diagram courtesy of Tmoss & Stang&2birds - Intake manifold bolt tightening sequence for a 5.0 Fox stang:
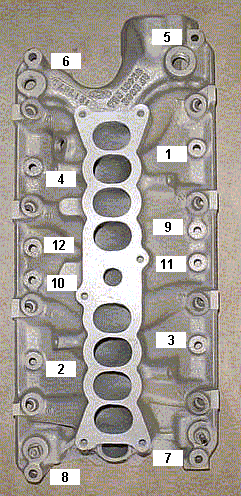
Intake manifold to head bolts
--Step 1 96 in/lbs
--Step 2 16ft/lbs
--Step 3 23-25 ft/lbs
See the following website for some help from Tmoss (diagram designer) & Stang&2Birds (website host) for help on 88-95 wiring http://www.veryuseful.com/mustang/tech/engine/
Fuel injector seal kits with 2 O rings and a pintle cap (Borg-Warner P/N 274081) are available at Pep Boys auto parts. Cost is about $3 per kit. The pintle caps fit either injectors with a pin sticking out the injector end or 4 with more tiny holes in the injector end. The following are listed at the Borg-Warner site ( http://www.borg-warner.com ) as being resellers of Borg-Warner parts:
http://www.partsplus.com/ or http://www.autovalue.com/ or http://www.pepboys.com/ or http://www.federatedautoparts.com/
Most of the links above have store locators for find a store in your area.
Use motor oil on the O rings when you re-assemble them & everything will slide into place. The gasoline will wash away any excess oil that gets in the wrong places and it will burn up in the combustion chamber.
Consumable items:
Upper manifold gasket
Fel Pro 1250 or equal lower manifold gasket set.
Short formed hose between thermostat hosing and intake manifold
6 ft 7/64" or 1/8" vacuum hose
2 ft 1/2" heater hose
1 1/2 ft 5/8" heater hose
Blue Silicone sealer
ARP antiseize or equal for the bolts
4 each 3/4" hose clamps (spare item in case the old ones are bad)
4 each 1/2" hose clamps (spare item)
What can happen if you don’t use the stay in place gasket…
Ask Nicoleb3x3 about the intake gasket that slipped out of place and caused idle and vacuum leak problems that could not be seen or found by external examination. Spay everything with anything you have, and you won't find the leak...

Just in case you haven't seen this before....
Here's some tips...
Tools: a good torque wrench is a must have item. A razor blade scraper that holds a single edge razor blade from Home Depot or Ace hardware is another handy thing. Get a Chilton or Haynes shop manual - you'll need it for the bolt torques and patterns. The intake manifold has an especially odd pattern. You'll need access to a timing light to set the timing after you re-stab the distributor. Look in the A/C repair section for the fuel line tools. They look like little plastic top hats. You will need the 1/2" & 5/8" ones. The hat shaped section goes on facing the large part of the coupling. Then you press hard on the brim until it forces the sleeve into the coupling and releases the spring. You may need someone to pull on the line while you press on the coupling. Put some motor oil on them when you put the line back together.
The A/C Compressor comes off with lines still connected. Mark all the electrical, smog and vacuum lines with tags to help you remember where to re-connect them. If you have a digital camera, take several pictures.
Whatever you do, don't skimp on cleaning the gasket surfaces. New gaskets need to seat against bare metal and not the residue left from the old gaskets in order to seal leak free. This is the most time consuming and tiresome part of the job. Look for little things that need to be replaced like the short hose from the thermostat hosing to the water pump, damaged vacuum lines and hose clamps that are rusted or broken.
Plan on cutting the thermostat to water pump hose, or removing the thermostat housing. Also plan on removing the distributor to get clearance to remove the intake manifold. Remove #1 spark plug, stick your finger in the spark plug hole and crank. When your finger gets air moving past it, stop cranking. Turn the engine until the timing marks line up with the pointer. Now you can pull the distributor out.
My favorite trick that saves time and effort is the stay in place gasket. Be sure that you scrape (don't use a wire brush) all the old gasket material off, then clean all the surfaces with acetone or MEK.
When the surfaces are clean, use weather strip adhesive on the head to manifold surface, and on the side of the gasket that mates to the head. Follow the instructions on the tube or can and when it gets tacky, press the gasket down on the head.
Clean the area where the rubber rails mount to the block in front and in the rear with more acetone or MEK and do the same trick with the weather strip adhesive that you did to the heads.
Coat the rubber seals and the gasket area around the water passages with lots of Blue Silicone gasket sealer and put it together. Wala! no leaks, and no gaskets that shifted out of place.
Get a tube of anti-seize and coat all the bolt threads and under the bolt heads. That will help insure even torque when you tighten the manifold bolts. Plan on re-torquing them a after a weeks worth of driving
Diagram courtesy of Tmoss & Stang&2birds - Intake manifold bolt tightening sequence for a 5.0 Fox stang:
Intake manifold to head bolts
--Step 1 96 in/lbs
--Step 2 16ft/lbs
--Step 3 23-25 ft/lbs
See the following website for some help from Tmoss (diagram designer) & Stang&2Birds (website host) for help on 88-95 wiring http://www.veryuseful.com/mustang/tech/engine/
Fuel injector seal kits with 2 O rings and a pintle cap (Borg-Warner P/N 274081) are available at Pep Boys auto parts. Cost is about $3 per kit. The pintle caps fit either injectors with a pin sticking out the injector end or 4 with more tiny holes in the injector end. The following are listed at the Borg-Warner site ( http://www.borg-warner.com ) as being resellers of Borg-Warner parts:
http://www.partsplus.com/ or http://www.autovalue.com/ or http://www.pepboys.com/ or http://www.federatedautoparts.com/
Most of the links above have store locators for find a store in your area.
Use motor oil on the O rings when you re-assemble them & everything will slide into place. The gasoline will wash away any excess oil that gets in the wrong places and it will burn up in the combustion chamber.
Consumable items:
Upper manifold gasket
Fel Pro 1250 or equal lower manifold gasket set.
Short formed hose between thermostat hosing and intake manifold
6 ft 7/64" or 1/8" vacuum hose
2 ft 1/2" heater hose
1 1/2 ft 5/8" heater hose
Blue Silicone sealer
ARP antiseize or equal for the bolts
4 each 3/4" hose clamps (spare item in case the old ones are bad)
4 each 1/2" hose clamps (spare item)
What can happen if you don’t use the stay in place gasket…
Ask Nicoleb3x3 about the intake gasket that slipped out of place and caused idle and vacuum leak problems that could not be seen or found by external examination. Spay everything with anything you have, and you won't find the leak...
Last edited:

skyline247
Advanced Member
If the leak is by the firewall on the passenger side, it could be the heater core. There is a little hole on the firewall that coolant will leak out of if the heater core has failed. I was able to see coolant sitting just inside the hole when it happened to me. FYI, heater cores have been known to leak coolant all over the passenger side carpet if not repaired soon enough. I bypassed mine before it got to that point but have yet to replace it.
If it's not the heater core, maybe someone else can provide suggestions on what else to look for. I think you can also pressure test the system to check for leaks.
Sent from my Nexus 6 using Tapatalk
If it's not the heater core, maybe someone else can provide suggestions on what else to look for. I think you can also pressure test the system to check for leaks.
Sent from my Nexus 6 using Tapatalk
skyline247
Advanced Member
That may be the same one I'm talking about. I don't have a picture for reference right now.
Sent from my Nexus 6 using Tapatalk
Sent from my Nexus 6 using Tapatalk
skyline247
Advanced Member
Oh...I must have overlooked that in your original post. Sorry about that. If it's leaking on to the engine, then it can't be the heater core. It has to be a gasket or a hose, unless something is cracked.
Sent from my Nexus 6 using Tapatalk
Sent from my Nexus 6 using Tapatalk
If you have not bought them, make sure you get Fel pros with a steel core. jrichker (or someone) has a write up on on here about how to really do this right.

Similar threads

- Replies
- 8
- Views
- 416
- Replies
- 34
- Views
- 5K

- Replies
- 3
- Views
- 2K
Progress Thread
Family member 1989 GT- Backstory and updates
- Replies
- 15
- Views
- 1K