
im trying to tidey up the underhood of my 5.0 and i wanna get rid of most of the underhood wiring and move it into the fenders, is there any kit out there that does this or you have to just wing it and figure it out on your own. also anyone have any tips on how to do it?
You are using an out of date browser. It may not display this or other websites correctly.
You should upgrade or use an alternative browser.
You should upgrade or use an alternative browser.
underhood wires anyone?
- Thread starter 91stangy
- Start date
luckythirteen13
New Member
dont know of any kits. do a search because just a few weeks ago some one posted about wiring hiding and in that topic some one posted a few links to a web site that had step by step help on wiring hiding
JIffy94
New Member
I think AlmostStock has the web page with the step by step to hiding wires. His looks really really good. I did it back in January and all i can say is, take your time and do it right the first time, if you have to cut any wire solder them back together. Thats the last thing you want is to have to chase down wiring gremlins.
DTT92LX
New Member
I just did a search on "wire hiding" and came up with 34 posts. Links are in them and plenty of info. Awesome way to clean up the bay!
G'luck
G'luck
As said above...take your time. That's really important. It took me a few days to do mine. Just think things through
Unwrap the tape and loom from all harnesses, unplug them, regroup them so the wire bunches are smaller and untangled, then put the rear portion of the harness through the strut towers and the front portion of the harnesses through the headlight/bumper area.
http://www.soniccherry.com/wires.html
I put the main wiring harness under the pinchweld. Others put it behind their dash. Basically unplug everything, take out the dash, and run it behind there if you want to go that route.
The solenoid is directly underneath the driver's side framerail and all the wiring was run either underneath thru the headlight area or right under the strut tower from the bottom and then back up to the solenoid. It's easy, just time-consuming since you have to basically rewire everything.
The good news is, it's near impossible to mess anything up, so at least you don't have to worry about that.
Once you have them regrouped and in smaller bunches (in stock form, the wire groups are made up of numerous wiring harnesses all tangled up together, which adds thickness) you can retape them and then add some loom. I wrapped them 100% in electrical tape, then added loom at the point where they left the engine bay.
The headlight harness was put in front of the framerail, out of sight. I cut and soldered it all back together, it was easier/quicker than taking the fenderwell out again to gain access to unplug it all.

Edit: Took maybe 3-3.5 hours to do the passenger side and about 4-4.5 to do the driver's side. The solenoid slowed me down, the wiring can get tight and I had to come up with a few ways to redo it so I had enough slack. I didn't want to have to add on extra wiring and splice, etc. Keep in mind, this was with stripping all the old loom and tape off, retaping/looming, and degreasing all the wiring that was had 12 years of filth and grime over half of them. If you did it quickly and not at neat, I can see it being done in a couple hours each side, depending if you want to leaev any signs of wiring at all in the bay or not, really.
http://www.soniccherry.com/wires.html
I put the main wiring harness under the pinchweld. Others put it behind their dash. Basically unplug everything, take out the dash, and run it behind there if you want to go that route.
The solenoid is directly underneath the driver's side framerail and all the wiring was run either underneath thru the headlight area or right under the strut tower from the bottom and then back up to the solenoid. It's easy, just time-consuming since you have to basically rewire everything.
The good news is, it's near impossible to mess anything up, so at least you don't have to worry about that.
Once you have them regrouped and in smaller bunches (in stock form, the wire groups are made up of numerous wiring harnesses all tangled up together, which adds thickness) you can retape them and then add some loom. I wrapped them 100% in electrical tape, then added loom at the point where they left the engine bay.
The headlight harness was put in front of the framerail, out of sight. I cut and soldered it all back together, it was easier/quicker than taking the fenderwell out again to gain access to unplug it all.
Edit: Took maybe 3-3.5 hours to do the passenger side and about 4-4.5 to do the driver's side. The solenoid slowed me down, the wiring can get tight and I had to come up with a few ways to redo it so I had enough slack. I didn't want to have to add on extra wiring and splice, etc. Keep in mind, this was with stripping all the old loom and tape off, retaping/looming, and degreasing all the wiring that was had 12 years of filth and grime over half of them. If you did it quickly and not at neat, I can see it being done in a couple hours each side, depending if you want to leaev any signs of wiring at all in the bay or not, really.
Attachments
wazazzle
New Member
mansonozz said:Unwrap the tape and loom from all harnesses, unplug them, regroup them so the wire bunches are smaller and untangled, then put the rear portion of the harness through the strut towers and the front portion of the harnesses through the headlight/bumper area.
http://www.soniccherry.com/wires.html
I put the main wiring harness under the pinchweld. Others put it behind their dash. Basically unplug everything, take out the dash, and run it behind there if you want to go that route.
The solenoid is directly underneath the driver's side framerail and all the wiring was run either underneath thru the headlight area or right under the strut tower from the bottom and then back up to the solenoid. It's easy, just time-consuming since you have to basically rewire everything.
The good news is, it's near impossible to mess anything up, so at least you don't have to worry about that.
Once you have them regrouped and in smaller bunches (in stock form, the wire groups are made up of numerous wiring harnesses all tangled up together, which adds thickness) you can retape them and then add some loom. I wrapped them 100% in electrical tape, then added loom at the point where they left the engine bay.
The headlight harness was put in front of the framerail, out of sight. I cut and soldered it all back together, it was easier/quicker than taking the fenderwell out again to gain access to unplug it all.

Edit: Took maybe 3-3.5 hours to do the passenger side and about 4-4.5 to do the driver's side. The solenoid slowed me down, the wiring can get tight and I had to come up with a few ways to redo it so I had enough slack. I didn't want to have to add on extra wiring and splice, etc. Keep in mind, this was with stripping all the old loom and tape off, retaping/looming, and degreasing all the wiring that was had 12 years of filth and grime over half of them. If you did it quickly and not at neat, I can see it being done in a couple hours each side, depending if you want to leaev any signs of wiring at all in the bay or not, really.
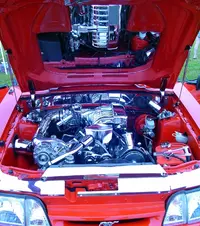
 holy shnikes thats clean!! i just swapped my harness and that was a pita. i'm not trying to clean it up, it just took me 2 months just to get it backup and running. nice engine bay though,,, man!!!
Attachments

JIffy94
New Member
Forgot how to spell mansonozz's name, but there it is he also has one of the sickest bays i have seen on here. I hope mine will turn out like that when i repaint it. Anything close to that and i will be more than happy.
Thanks guys. Jiffy, if I can help in any way, feel free to ask. I did the engine bay smoothing/painting over winter without having any prior paint/weld/body work experience. It's not hard, you just have to know what to do and care for detail ")
Autobodypro_1
New Member

Similar threads
- Replies
- 7
- Views
- 175
- Replies
- 3
- Views
- 915
- Replies
- 4
- Views
- 123