
You are using an out of date browser. It may not display this or other websites correctly.
You should upgrade or use an alternative browser.
You should upgrade or use an alternative browser.
1980 Coupe - Turbo AWD v8 Swap
- Thread starter jeremythedestroyer
- Start date
")


What? You had a kid?
Crap, does your wife know?
Like 10 fingers and 10 toes?
What model did you get?
Crap, does your wife know?
Like 10 fingers and 10 toes?
What model did you get?
Well you certainly cannot turn back now..If you've been wondering where I've been, I took some time to tackle some projects around the house. Lots of yard work, a giant dining table, and lots of dealing with grass. Oh and had a kid!
We're finding our new routine and the big projects are knocked out so I started to get back to work. Spent some time this weekend to drop the motor out for some finish work (trans tunnel, oil pan baffle, etc) and start running fuel lines.
I devised a solution to cleanly mount my fuel and brake lines by doing this:

Behold my cutting board brackets! I didn't like the idea of a hundred p clamps for the three lines to I knocked these out in an hour. The bolt goes down through the floor, the top is then tacked down and the clamps get a nylock nut to sandwich it all down.


I got the hard lines roughed into place a little finessing and they should look amazing.
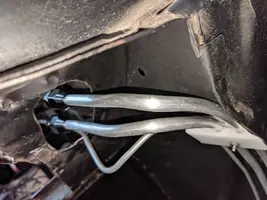
I needed a place for the lines to enter the engine bay so i did some cutting. Some of this work was for a certain someone so they better be happy. I've got some thinking to do on how to fill this area and clean it up.

And I hate to say it, but the pic is begging to be commented on..
One of those fuel lines is phcked.
- Apr 4, 2018
- 131
- 168
- 53
Well you certainly cannot turn back now..
And I hate to say it, but the pic is begging to be commented on..
One of those fuel lines is phcked.
It might be an optical illusion going on, I did use a bender for the sharp bends. What did you see?
If it's an optical illusion, it's pretty convincing. You have a badly linked tube at the bend that goes into the engine compartment
- Apr 4, 2018
- 131
- 168
- 53
I will double check but I'm pretty sure it's goodIf it's an optical illusion, it's pretty convincing. You have a badly linked tube at the bend that goes into the engine compartment
EDIT:
Ok, I just took a look. Yes and no. Yes it is ovaled a bit but I wouldn't say it's kinked. There are no abrupt bends, it simply ovaled by a mm. Lines are a lil wavy but I think these are clearer shots.
What do you consider unacceptable vs unacceptable in bending tube such as this?
Attachments

Last edited:
Boostedpimp
20+ Year Stangneter 

- Apr 4, 2018
- 131
- 168
- 53
I've been movin along getting the fuel system button up. I've had the tank close to done but not in and there was holes to be made for the top hat to clear. Getting to this point felt like a good win and some progress towards running.

Now look, I thought it would bolt right in. I didn't realize that the 00's gas filler neck was a few inches taller than the older one. I'm trying to make it easy for myself...
So I chopped it and used some hose to bridge the gap

And while I was at it I added a fuel vent with rollover protection. I tapped into the line for the filler burp and put the vent in the filler box above the filler neck. Not pictured is reinstalling the filler box drain. I need some hose clamps on a couple of these lines but for the most part, I shouldn't have to drop the tank again.
Speaking of making clearance for the top hat...

Tried to keep this access hole to a minimum. I started by cutting the circle in the middle of the tire well and added some room for the fuel lines. Liberal application of hammer, pliers and using a dolly as a hammer and I have a nice lip on here. Top hat clears the opening with ease. Just need a cover and all's good.
Now look, I thought it would bolt right in. I didn't realize that the 00's gas filler neck was a few inches taller than the older one. I'm trying to make it easy for myself...
So I chopped it and used some hose to bridge the gap
And while I was at it I added a fuel vent with rollover protection. I tapped into the line for the filler burp and put the vent in the filler box above the filler neck. Not pictured is reinstalling the filler box drain. I need some hose clamps on a couple of these lines but for the most part, I shouldn't have to drop the tank again.
Speaking of making clearance for the top hat...
Tried to keep this access hole to a minimum. I started by cutting the circle in the middle of the tire well and added some room for the fuel lines. Liberal application of hammer, pliers and using a dolly as a hammer and I have a nice lip on here. Top hat clears the opening with ease. Just need a cover and all's good.
Why are you not using the stock tank?I've been movin along getting the fuel system button up. I've had the tank close to done but not in and there was holes to be made for the top hat to clear. Getting to this point felt like a good win and some progress towards running.
Now look, I thought it would bolt right in. I didn't realize that the 00's gas filler neck was a few inches taller than the older one. I'm trying to make it easy for myself...
So I chopped it and used some hose to bridge the gap
And while I was at it I added a fuel vent with rollover protection. I tapped into the line for the filler burp and put the vent in the filler box above the filler neck. Not pictured is reinstalling the filler box drain. I need some hose clamps on a couple of these lines but for the most part, I shouldn't have to drop the tank again.
Speaking of making clearance for the top hat...
Tried to keep this access hole to a minimum. I started by cutting the circle in the middle of the tire well and added some room for the fuel lines. Liberal application of hammer, pliers and using a dolly as a hammer and I have a nice lip on here. Top hat clears the opening with ease. Just need a cover and all's good.
- Apr 4, 2018
- 131
- 168
- 53
Why are you not using the stock tank?
I wanted a bigger tank and ford revised the tank and mounting a year or so after my car, it was work either way to get more capacity. I wanted an in-tank pump too and this tank was cheap, clean and available when I needed one. I probably would have had an easier time with a tank from an early 90's but again, couldn't find one locally when I was starting.
I must admit I got a kick out of seeing the guy who fabricated nigh on 80% of his car asking another guy who is fabricating nigh on 80% of his car why he is fabricating something.

It's a curiosity thing..its how you know that maybe somebody found a better way to do something that might not require that nigh of 80% of something else need fabricating in the future.I must admit I got a kick out of seeing the guy who fabricated nigh on 80% of his car asking another guy who is fabricating nigh on 80% of his car why he is fabricating something.
SEEK. ....and ye shall find.
- Apr 4, 2018
- 131
- 168
- 53
It's a curiosity thing..its how you know that maybe somebody found a better way to do something that might not require that nigh of 80% of something else need fabricating in the future.
SEEK. ....and ye shall find.
My takeaway is if you want a 79-82 mustang get an 82 mustang lol
- Apr 4, 2018
- 131
- 168
- 53
Here's what I've got done recently. I started cleaning up the openings made when I cut the strut towers out. I welded some 5/8" box in that I keep telling myself makes up for the big hole I made. I've got to finish the tops of the openings still.


Oil pan is off as I need to baffle it (although its baffling me really) and get a dipstick in. Now here is the fun question, how far past the bottom of the block (where the oil pan mates) does the dip stick go? Alternatively, how much distance should I have between the bottom of the rods/crank to the top of the resting oil line? The explorer pan was about 4" although if I go by that measurement, turned off I'll read full with 3qts.
Anyone able to measure a motor on a stand and let me know how far from the oil pan surface to the full dot I should be? pics would be nice too!
- Apr 4, 2018
- 131
- 168
- 53
A quick update.
Made a simple baffle/splash shield for the oil pan:

(The trend of my photos is taking them right before I finish cleaning the parts up XD ). I vaguely copied the canton baffling for this, I think it'll work just fine.
I got the pan back on, dipstick tube made, and welded my steering shaft support to the k member and got the engine back in the car:
.webp")
Dipstick tube is made from 3/8 steel fuel line with a brass compression ring soldered on where it meets the block and a bracket bolting on at the header. Dip stick is one of amazon's cheapest. About 15 bucks altogether and it looks great.
Last night I finished the fuel rail brackets. These were quick to knock out, I had a bunch of aluminum left from making my intake. A couple holes (one in my finger, Ouch!), some cutting and sanding and I was done.

and cleaned up and installed on a spruced up lower intake

Not pictured (or pictured well) is trans tunnel was patched sealed and painted. Remote oil filter adapter was installed (only minor surgery required to make that happen)
Got some parts ordered, and working on putting things on and leaving them on. Ordered a radiator and oil cooler as well as intake gaskets to get that sealed up. Also plug wires ordered to see if I need to tweak my downpipe.
Now for those still reading, I need to order spark plugs but I'm not sure what to go with. Thought? Opinions? Dreams?
Made a simple baffle/splash shield for the oil pan:
(The trend of my photos is taking them right before I finish cleaning the parts up XD ). I vaguely copied the canton baffling for this, I think it'll work just fine.
I got the pan back on, dipstick tube made, and welded my steering shaft support to the k member and got the engine back in the car:
Dipstick tube is made from 3/8 steel fuel line with a brass compression ring soldered on where it meets the block and a bracket bolting on at the header. Dip stick is one of amazon's cheapest. About 15 bucks altogether and it looks great.
Last night I finished the fuel rail brackets. These were quick to knock out, I had a bunch of aluminum left from making my intake. A couple holes (one in my finger, Ouch!), some cutting and sanding and I was done.
and cleaned up and installed on a spruced up lower intake
Not pictured (or pictured well) is trans tunnel was patched sealed and painted. Remote oil filter adapter was installed (only minor surgery required to make that happen)
Got some parts ordered, and working on putting things on and leaving them on. Ordered a radiator and oil cooler as well as intake gaskets to get that sealed up. Also plug wires ordered to see if I need to tweak my downpipe.
Now for those still reading, I need to order spark plugs but I'm not sure what to go with. Thought? Opinions? Dreams?
Cheap copper autolite.... gt40 heads will use a 104.. use these up to 15psi..
Use a 103 for above 15psi
Use a 103 for above 15psi

- Apr 4, 2018
- 131
- 168
- 53
This is exactly what I wanted to see. I started googling and forsaw information overload coming and noped out.Cheap copper autolite.... gt40 heads will use a 104.. use these up to 15psi..
Use a 103 for above 15psi
Decipha
Active Member
I recommend the autolites as well. If the car see's more abuse than street then the 103s would be more ideal.
Similar threads
- Replies
- 0
- Views
- 723
- Replies
- 11
- Views
- 1K
- Replies
- 2
- Views
- 745
- Replies
- 14
- Views
- 1K