Build Thread '83 T-top Coupe - Cliff Notes Edition

So today won't be a very exciting post, I'm pretty tweaked by it though.

At lunch I took this
IMG_3524.webp

and trimmed off the excess and now have this
IMG_3547.webp
IMG_3549.webp

I still need to straighten out the lower area a little, nothing a porta power can't take care of. Then maybe wednesday or thursday I'll drop it off with the sandblasters, they couldn't possibly warp this like my dang hood!:fuss:

I'm saving the frame rail pieces for later, Digging through the engine bay and looking where I couldn't look before kind of has me thinking i might need these for some repair.
IMG_3550.webp
 
I did a little bit today. Again, lack of tools kept me from Nirvana.

I got pretty much everything off I want to before pulling the engine except the exhaust.
IMG_3558.webp

So i thought i'd go ahead and drop,the exhaust system completely. This is where the lack of proper tools comes in to play. I need a portable Sawsall. I'll dig one up from a friend tomorrow at work.
IMG_3557.webp

I was going to drop the bigass catalytic converter to have it out of the way. Nope, sawsall needed here as well. The thermactor tube has grown roots and needs to be cut off.

So, in theory, if I have the proper tools, the engine is coming out saturday.

I'm going back to the yard tomorrow after work to finish the smalls on the supercoupe engine. I really want to bring the blower home with me.

Sunday I have to change the water pump on my truck. This shouldn't take real long, maybe I'll have time to go dance around inside my empty engine bay!:banana:

That's it! All caught up to page 136!
 
Last edited:
I got some stuff done today.

I took the reciprocating saw to the exhaust and got everything off. Off to the metal bin with it.
IMG_3570.webp

Here's my cute little exhaust manifolds, they may become wall art.
IMG_3569.webp

I'm not real sure what this little vacuum valve is for, it was on the driver's side exhaust manifold.
IMG_3571.webp

Here the engine sits now. I was going to disconnect the engine from the transmission, but then I thought maybe I should just yank them out together. Anyone see any issues with doing that? It being an automatic, I didn't know if there might be a problem with that or not.
IMG_3573.webp

I was going to remove the driveshaft but I'm kind of tired today, so that's all the farther I got. I guess you could say I'm exhausted.
IMG_0708.webp
 
I was feeling tired again, didn't want to mess with the car......but I have this tool..........:banana:
IMG_3575.webp

So, tired or not! I was going to cut some sht up!

I removed the upper part of the radiator support.
IMG_3576.webp

I looked at that for a minute and thought I should really go ahead and pull the eb wiring harness, so I did that.
IMG_3577.webp

And crap, how hard is it really to pull a driveshaft, so I jacked up the rear and put it on jackstands and removed the pinion flange bolts and voila! It's starting to empty out down below, huh?
IMG_3582.webp
IMG_3583.webp

Of course since I had the driveshaft out i should go ahead and drop the transmission pan too, I mean, what the hell? I'm laying down already, right? The trans fluid looked like new fluid, isn't that crazy?

So I decided to pack it in, after all, I'm tired. So i'm putting my tools away and pick up the sawsall to remove the battery and like a kid with a new toy I found myself hacking away the lower part of the support. This also loosened up the bumper shocks and I pulled them out too.You can see how tore up that right side was, all of the welds from the inner bracket had been torn loose from the outer.
IMG_3581.webp

Should be pretty easy to pull the engine out through there, huh?

I only have a couple little things left to pull before the drivetrain finds itself in the back of my truck. There's possibilities of rain for the next four days here. I'm wanting to get back to the yard.

That's it for tonight, no, I mean it.
 
Well, I tried getting back after things a little bit. We finally got some drier weather.

I was going to go to the yard to work on removing more stuff from the sc engine bay but I had to work late.

So I stopped by the storage unit on the way home instead.

I put the yoke back into the tailhousing to block that leak. I disconnected the last couple things, speedo cable, couple wire connectors, put the trans pan back on, etc.....

Take a look at that trans support, I think it might need to be replaced.:chin
IMG_3590.webp

I loosened up the motor mounts and trans mounts. We're ready to go. Though it'll be thursday before it actually gets pulled. I'm waiting for one of my buddies to help then. I'll have to push Scuby out of the storage unit to pull the drivetrain, I'll need someone to help push it back in.:zombie:

I really took a good look at the passenger frame rail, I've got a feeling that I'll be needing to replace it:nonono:
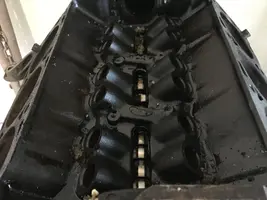
. I'm not saying for sure, but I have a sneaking suspicion. Look at the picture for a minute, see the rust at the shock tower? I'm thinking that's merely foreplay to what really needs to be fixed. That's ok though, I really like doing this stuff.
IMG_3592.webp

Tomorrow, at lunch, I'm finally going to drop the new(ish) radiator support off with the sand blasters. I think I'll have them blast the bumper shocks as well. Thinking about the bumpers as well, those rat bastards couldn't possibly warp that metal.......
 
Ok, got the engine out of the way, let's take a look at that right frame rail.....I don't think my screwdriver is supposed to fit here!
IMG_3596.webp

Here's one without the screwdriver so you can see it's not an on purpose hole.
image.webp

This one is looking through that hole under the shock tower, it's not devastatingly bad, but I might as well replace the whole right frame rail. I will put that hole back in the frame rail below the shock tower.
IMG_3600.webp

Here's that trans crossmember rot I mentioned earlier.
IMG_3605.webp

I dropped the gas tank too. Nice sized dent there on the right rear of the tank. The PO had to feel that one!
IMG_3608.webp

Here's a look at the poor little engine and trans waiting it's new home.
image.webp
 
I picked up Scuby at lunch and brought him to the shop.
IMG_3611.webp

Some of my buddies helped with all of the loading and unloading.
IMG_3612.webp

Parked next to his new buddy. It's amazing how small a fox is next to a newer charger.
IMG_3614.webp

Tomorrow his glass will get pulled and Thursday he gets tossed on to the frame machine.

I believe the hit that nailed the gas tank is responsible for the slight buckling in the right quarter. The rear floor pan on the right side is buckled just slightly as well.
 
Last edited:
So, today was glass day.

I didn't really appreciate exactly how difficult 34 year old butyl could be till today, omg......:nonono:

It wasn't so dried up to simply fall apart. It was almost as hard as a rock, yet still pliable enough to not freaking let go! Damnit!

All that said, I got the freaking glass out and holy crap, i'm tired!
IMG_3617.webp

The windshield is wasted, which is ok. Oddly, new fox windshields are very affordable. A new windshield will be extra nice anyhow.

I got the quarter and rear glass out safely and even had time to clean up the quarter glass. They look almost as good as new. PLUS! The rear glass looks wonderful. The defroster lines are in great shape.
IMG_3620.webp

Tomorrow is frame day! Yay!
 
So today.....it was a bad and good day.

Good? I got the supercharger off of the supercoupe.
IMG_3622.webp

IMG_3623.webp


Working on the car is therapeutic for me, I forget everything else.

The yard owner has a mechanics shop he leases out to a couple mechanics, they said they would finish pulling the engine for me for $175! I'm definitely all over that! So, maybe I can really have the sc engine in my garage soon.

Bad? I talked to my brother at lunch. The oncologist told him he needs to get things settled, he doesn't have real long.

Next week he will have to get a feeding tube because his esophagus will be pretty well closed due to the cancer.

He starts chemo and radiation therapy the week after, if it fails, he'll be dead in about two months.

He decided to forget about building the red car, he wants to spend the time with his boys. He was fishing with his older son today. I can't blame him, I would do the same.

I'm sad......
 
Finally had time to put Scuby up on the frame machine today. I was pretty thrilled we had the measurements in our computer for fox mustangs.
1E008348-24F1-41E9-9501-91C58C5647B5.webp

He was out a little bit on the right rear, pushed up and out a little. A couple tugs backwards and downwards and the tweak on the right quarter sail panel area popped back in.

From side to side the rear subframes are different by 7mm now, they were close to twenty at the beginning. This is plenty good enough now for me. Hell, just watching that big outy suck back in was good enough.
9EB0391C-F088-4028-A9D9-85F6622FC570.webp

The front subframes are marvelously straight and even between sides.
CCF3BA05-E364-4A61-A7A0-4C97654FD22E.webp

I’ll drop him down off the frame machine tomorrow and he’ll head back to the storage unit.
 
Nothing big today, just loaded up the old engine onto my pick up without any breaks, gouges or scratches on my body. I'm pretty proud of myself.

It seems like I can go buy new pillows and end up with a four inch gash on my forehead.
IMG_3639.webp
IMG_3640.webp

I'll be dropping it off at the yard tomorrow night.
 
So, obviously I got back to the yard and picked up my sweet little sc engine.

I'll show a couple more pictures of the car now that it's not in the weeds.
IMG_3661.webp
IMG_3664.webp

Here's the seats again. I have reupholstery friends now, so I think I might get these. That rear seat might be a little problematic, I would love that arm rest though, maybe a little modification and..........
IMG_3657.webp
IMG_3658.webp

Another angle of the engine.
IMG_3667.webp

I'll take it to the car wash tomorrow and then mount it up to the engine stand.

I have to go help my wife get her mother out of the hospital and take her to her house tomorrow morning, so I'll clean it late tomorrow and then mount it to the stand Sunday.
 
Well, since you asked Scott.

I started out by taking off some things to make it easier to clean and so I could mount it to my stand. I took of the flex plate and backing plate, headers and pulleys and brackets. Five minutes work there.
IMG_3673.webp

Then hosed it down with two cans of Gunk and went to the car wash. Most of the crap cleaned off fairly easy.
IMG_3675.webp


Since I got it clean (sort of), i thought my work deserved refreshments.:D
IMG_3678.webp

I mounted it up to the stand and drained the oil. I don't see any contamination from coolant, that was good. The oil was seriously slugged out though. For you older guys it looked like the coffee that Lisa would pour on Green Acres. It came plopping out of the drain plug. That's how it's sitting right now, tilted slightly to the right side draining into my oil pan.
IMG_3682.webp

IMG_3687.webp

That had me wondering what the engine looked like inside, so I took off the valve covers. Looks really nice!
IMG_3690.webp
IMG_3692.webp

That's as far as I'm going for right now. I must watch football now and drink beer. That's the rules, i'm just doing my part.
 
Ok, I took my drunk butt out into the garage to work on the engine a little bit.

As a caveat here, how FREAKING GREAT is it that I can go to my garage and work on this engine!

I pulled the injector harness, the fuel lines/injectors and the intake manifold.
IMG_3696.webp
IMG_3700.webp
IMG_3701.webp

So, what did I find? I'll let you look. Look at the coolant passages at the front and rear of the left head. The front is completely blocked off from using a stop leak. Let this picture be a warning to y'all that might think is a great temporary fix for a coolant leak. OMG, the front was completely blocked!
IMG_3704.webp
IMG_3709.webp

Beyond the completely blocked coolant passage:nonono: it looks pretty nice in the valley.
 

Attachments

  • IMG_3703.webp
    IMG_3703.webp
    387.9 KB · Views: 178
So I got the heads off today. The coolant passages are a little plugged up too.
FFD05507-264A-4C36-935E-0453ABD4E5BE.webp
C9ADE353-9F19-4F45-95CE-3E7630D5201E.webp

The cylinder walls are not impressive. I might need more than a honing. That's ok, it's going to get a full service shortly anyhow. The head gaskets looked just fine though. There is a glimmer of crosshatching in a couple cylinders. It looks like an engine that has set for a number of years. No real big deal other than the Stop Leak.
71F30E21-7310-450C-8B61-53BABF3FFA76.webp
6444509C-75E9-44A3-8D31-6C4C98A7CD76.webp

I also removed the water pump. The passage going into the right side of the block was completely blocked with the Stop Leak crap.
E0FAD9F8-4996-45C8-80CF-F59D912D0E6E.webp
98EB2D77-D4C1-4476-BDF9-E534D73127F8.webp

That poor engine must have been running bad hot in places.

Oh well, here’s how it sits for now. I’ll be pulling off the rest of the front end including the cam within the next day or two.
8374ECD1-020C-47F4-BF53-CD4E34D5332C.webp
FF6D2A3F-4A7D-4881-B1FD-63D016627A10.webp
 

Attachments

  • 0C31B0BA-7938-4345-8249-3172A5017DEE.webp
    0C31B0BA-7938-4345-8249-3172A5017DEE.webp
    305.7 KB · Views: 168
Ok......I have an engine in my garage, right? So I should be doing something......:nonono:

Well sunday night I go to the garage to shut lights off before getting some sleep. As soon as I open the door I hear water splashing. Sure, you may thinking the soothing sound of splashing water may take you away to some beautiful scenery in the rockies as it flows gently over the rocks in a stream. What it did for me is to take me to the closet in the garage that has the water heater.:nonono:

So last night i'm installing a new water heater and moving my engine out of the way. Water heaters are heavy, btw. I took off work at 2:00 and went to Lowe's and began the journeyman phase of plumbing. By 8:30 I was igniting the pilot light of the new water heater and by 9:15 I was enjoying a nice long hot shower to sooth my aching back after lifting a 200+lb water heater by myself.

So nothing mustang wise Monday night.

That ancient history, this is Tuesday now for goodness sake. What did I do today? I removed the harmonic dampener/balancer.
IMG_3729.webp


Then off with the external oil pump.
IMG_3736.webp

Pump looks really nice.
IMG_3734.webp

Timing cover was next.
IMG_3744.webp

IMG_3742.webp

Then the oil pan.
IMG_3748.webp

Kind of interesting to see the SC mark on the inside of the block.
IMG_3747.webp

Everything looks pretty good, oddly enough with the stop leak stuff a distant memory. Some sludge in the bottom of the oil pan, but nothing sparkly.

Next thing will be to remove the timing chain and gears, then the camshaft.

After that it will be time for the rotating assembly.
 
Last edited: