After 20+ years sitting outside, restoration has started with fuel

  • Sponsors (?)


If you can't find the factory rubber line from the filter to the hard lines, I see no reason why you couldn't just use fuel injection hose off the reel at NAPA. Clamp both ends with FI hose clamps. The duckbill clips are a Ford concoction that aren't really necessary. I used Mustang hardlines and filter bracket on my '54 build and connected everything with FI hose and clamps.

P1010001_5.JPG


P1010004_2.JPG
 
2X post #8. We spray in something too ('carb cleaner', PB Blaster, whatever) @ 1st, watch till clean, spray again'n the compressed ait, till we see it's clean.
Now I see the pic (external) I'd say "new hrd lines". I say "Never go 'kits' where U can make up ur own" as I like my own, need save the $.
 
The saga continues… I blew the hard lines from the schrader valve and nothing but decent looking fuel. Stuck a q-tip in the end of the return line at the rear and it came out red, so some surfaces rust. I think they’ll be okay, but what do all of you think?

I removed the radiator and ordered the all aluminum one from American Muscle.

Today I planned to remove the thermostat housing so I could flush the old coolant out of the block (I purchased a new thermostat and gasket last week). Then remove each spark plug and spray fogging oil into each cylinder to soak for the next week before I fire her up next weekend. Then new fluids - oil, tranny and rear end. Install new radiator and fill, then install gas tank if time permits. I got none of that done.

Removed accessories (alternator, tensioner and brackets)to get the thermostat housing off. Once I got that off and the hose from the heater core, I saw that the return inlet from the heater core to the water pump was full of rusty crap. Awesome! Thankful I did this, as the input pipe has a good sized hole at the base where that rusty crap was sitting, on the bottom where I couldn’t have seen it. Would have sprayed coolant everywhere.

Who wants to bet that my heater core is shot as well?

How much further do I need to dig into this? I’m thinking I can connect a garden hose to to inlet pipe for the heater core and see what comes out. What about the block? Should I remove the freeze plugs and really rinse it out. Or just shoot water into the thermostat opening with vinegar, plug the outlets, and let it sit to loosen everything up followed by a thorough rinse? Open to all suggestions…
 

Attachments

  • 0EC9607E-7C85-4150-A054-BA9B574F6D4C.jpeg
    0EC9607E-7C85-4150-A054-BA9B574F6D4C.jpeg
    679.3 KB · Views: 59
  • A9C2181E-EFFA-4B61-B01D-8982E997C491.jpeg
    A9C2181E-EFFA-4B61-B01D-8982E997C491.jpeg
    330.9 KB · Views: 45
Last edited:
this is all backwards for me. We start w/getting it running (what is needed from an attempt) & go from there w/stop/go, onto safety. Some daily commutes/around towns & onto problem solving as presented. Finally - upgrades~

I suppose if thinkin "Restore" one might go in this direction...
 
this is all backwards for me. We start w/getting it running (what is needed from an attempt) & go from there w/stop/go, onto safety. Some daily commutes/around towns & onto problem solving as presented. Finally - upgrades~

I suppose if thinkin "Restore" one might go in this direction...
Replacing rusted fuel and cooling systems before I start it…
 
  • Like
Reactions: 1 user
Flush the block. Since you are going to replace the radiator I would do this so it doesn’t get plugged if there is crap in the block. Not sure how well it will work with the water pump removed so you may have to temp that back on. Pull the T-Stat, insert hose into hole and let her eat. If you get a bunch of crap out doing just that then you may need to get more serious.

If you need to swap the heater core I have the article from MM&FF from years ago that shows how to do it. I can email it to you or if the mods want me to post it I can if is has not been.
 
For sure the heater core is trash, bypass it for now until you can replace it. The job sucks, it's a PITA, but just go slow and plan for at least a half a day to get it replaced. Good call to inspect all that before trying to start it, it will pay off in the long run.
 
Thanks everyone. I have a perfect replacement dash but wasn’t sure I wanted to tackle that job. I removed it from another car so I know it’s a pita. Guess I will now! I’ll flush the block with the current water pump back on and see what comes out. Any advantage to pouring vinegar in and letting it sit for some time?
 
Vinegar would lift some scale if it can soak for a day or two, depends on how bad it is and if you want to seal it up first. For a block I'd just flush with a hose until it runs clear there generally not to bad unless it was parked with straight water in it, radiator if its calcium build up, the vinegar would work well so long as the core is still in good shape and doesn't have signs of leakage all ready, if there's a lot of blue oxidation it's probably got a pin hole or two.
 
Yep. Gotta love ethanol! Hoping the hard fuel lines fared better. Is there any way to replace the rubber line from the fuel filter to hard line? I have all the other soft lines, but can't find that one. Is it only available with the fuel tank to engine hard line kit for $230 at LMR?
I bought nylon fuel line, and this tool from Dorman and made my own lines.
DA3994DD-E31B-4999-BE22-B94DE963E3FD.jpeg

C3029525-105C-48D5-A288-8E10B319E551.jpeg
 
  • Like
Reactions: 2 users
Thanks, Rdub6, I like that idea. I’ll run it as I have it with the stock hard lines, but if they ever need to be replaced, I like your solution. Clean install and about $300 less expensive.

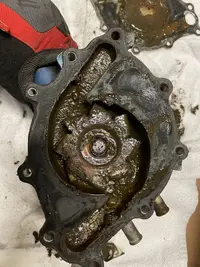
Good day on the car today. Flushed the engine block, no issues. Water ran clear after a few minutes. Pulled every spark plug and sprayed each cylinder with foaming oil to get them ready to move again. Plugs looked pretty good, but new ones will go in. Wires look great. Cleaned up the timing cover so I can put the new water pump on.

Moved to the rear end. Had to remove the sway bar to get to the drain plug. It had surface rust all over so I brushed that off and painted it. Thought maybe I was wasting my time when clean gear oil drained from the top hole in the pumpkin, but it was thick and nasty looking at first when I removed the bottom drain plug. It looked good after that bottom sludge cleared out. Some shavings on the magnetic plug, but nothing to worry about. Good idea to change all fluids, though the motor oil looks great on the dipstick and is at level.

New gear oil is in the rear-end, thanks to the hand pump I bought for the tranny fluid swap. Tomorrow I’m changing the tranny and motor oils and installing the water pump. New radiator and fuel tank go on next, then we fire it up. Fingers crossed!

Once she’s running I’ll remove and replace the dash and heater core. New heater core will be here next week. That job should take a couple of days! Lol!

Fun stuff, though I wish my body was in better shape for this. Stupid aging!
 

Attachments

  • 57C821CF-551B-4442-9199-9C002CFC27B2.jpeg
    57C821CF-551B-4442-9199-9C002CFC27B2.jpeg
    732.4 KB · Views: 49
  • 359FAF67-ED3B-418C-BDCC-BBAA420C703D.jpeg
    359FAF67-ED3B-418C-BDCC-BBAA420C703D.jpeg
    620 KB · Views: 46
  • 4D4686B5-CD06-43E6-8F7A-E3CD5E32994B.jpeg
    4D4686B5-CD06-43E6-8F7A-E3CD5E32994B.jpeg
    624.4 KB · Views: 45
  • D38B9993-5B82-4451-87DE-CAAD7E89D72C.jpeg
    D38B9993-5B82-4451-87DE-CAAD7E89D72C.jpeg
    626.7 KB · Views: 43
  • Like
Reactions: 2 users