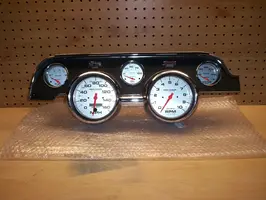
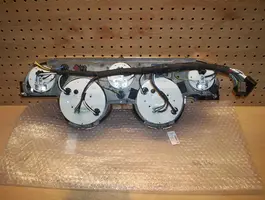
Autometer Cluster -- 1967-68

Jonmustang

New Member
Feb 10, 2010
1
0
0
Howdy folks,

I've already done an Autometer cluster conversion a few years ago by just sliding complete gauges (5" and 2-5/8") with intact bezels through the front of the original gauge panel, which I modified to fit. It looked OK for a while, but now I'm gonna mount them from behind a new panel, the right way.

The two DIY articles I've found so far have you screw the gauges in from behind after removing the bezel, but there's also an aftermarket plastic panel out there that's supposed to hold the gauges in from behind.

I want to do this the most professional way possible -- So, basically, once I remove the bezels and trim panel to get the gauges sitting nice, what's the best way to hold the gauges in place?

Thanks! Feel free to post links to articles -- I've searched this forum quite a bit before asking too. :)
 
Hello,

i do this work a few years ago. I took a plastic gauge support behind the autometer gauges.
The new gauge bezel i trimmed with a soldering iron and remove the big aluminium rings around the autometer ultra lite gauges.
I made a few pic´s.

gauge cluster

Markus
 
I just completed this same project a few weeks ago. I was going to go with the new plastic support but once I received it and realized how thin it was I decided to carve up my original. I followed a tutorial by " EDBERT " and also found some good pics from the REENMACHINE thread.
Took me about 10 hours and around $750-800 to complete.
Another thing to consider when using the plastic support is that you will need to provide grounds for your turn signal and hi beam lamps as they were originally grounded to the metal support.

Good luck
 

Attachments

  • Autometer guage upgrade 001.webp
    Autometer guage upgrade 001.webp
    109.9 KB · Views: 1,176
  • Autometer guage upgrade 002.webp
    Autometer guage upgrade 002.webp
    118.1 KB · Views: 997
Great job to both of you, came out really nice.

67GTRAG - how are your guages secured? Hard to tell from the picture. This is a modification I am definately going to do at some point. Not really a fan of the plasting backing plate, seems so flimsy. I have an extra complete guage cluster so I don't mind cutting it up. More pics and descriptions appreciated.
 
Gauges Mod
I'm not sure if you have ever seen the write up by "EDBERT" but I provided a link. I followed his tutorial. Very detailed and excellent pictures. I spent a little more time on trimming up my original metal support so I did'nt lose any of the mounting surfaces. If I did it again I think I could have done better, but in the end nobody will see the backside anyway.

Good luck and have fun. Wear your safety glasses.

Jeff
 
Yup, have seen EDBERT's page on this a while back, thanks for reposting. The ONLY thing I didn't really like about it was the way the guages were mounted to the bezel with the screw. Doesn't look like it would hold up too well. ReenMachine did a really nice conversion where he used the original metal housing cut up much like EDBERT did but welded brackets on for the guages to mount solidly to. This is probably the way I will go, but I don't have a welder yet. Not sure how the plastic aftermarket mount solves the mounting of the guages, if anyone has pics please post them.
 
Buiding a Better BezelWhen I first saw how the guages were attached to the bezel I did'nt think it would hold up but after doing it I really don't see a problem. The autolite guage housings are all plastic and are very light. They're not going anywhere.
If I was using a mechanical speedo with a cable I might be more concerned.
I also saw how Reenmachine worked his. He has got mad skills. Way beyond anything I could pull off.
Check out the link for how to use the plastic cluster housing.