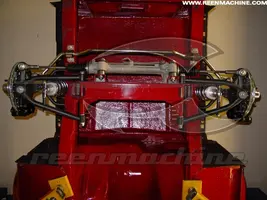
best place for mustang II?

geostang351 said:
can I use my existing mig welder, change the .030 wire to be "wire only" and purchase a bottle or do I need a whole new system, as it is not "gas ready" within the trigger/handle.
Your welder needs to be set up to use gas. It's a totally different system than a regular wire feed.
 
reenmachine said:
I don't understand what you mean. What are you referring to as a standoff? By symmetrical do you mean that the upper and lower arms are the same, dimensionally? Please clarify so we're on the same page with our discussion.

The A-arm is wider than the crossmember.
Some A-arms split the difference (symetrical). Mine I think have a one inch spacer, or stand off, on each side of the crossmember.
m2tla-lowerA.webp


Some A-arms are flush on the crossmember one side and have a larger spacer on the other side.(asymetrical)
IFS_under.webp


The symetrical design is stronger, assuming all else is equal.

Also, I think the street rod engineering x-member mounts the rack in double sheer, not sure though.
 

Attachments

  • m2tla-lowerA.webp
    m2tla-lowerA.webp
    7.6 KB · Views: 162
  • IFS_under.webp
    IFS_under.webp
    80.3 KB · Views: 145
geostang351 said:
I'm always willing to learn especially with welding. Pics would be great as they are worth a 1000 words

Here are the steps for you

1) Muster up the guts to put a torch to your vintage classic :nono:


2) LEVEL OFF THE CAR.... THEN clean off your metal, use a soap stone and take and retake your measurements. Use good clamps and RE-MEASURE. RE-CHECK that the car is level. Tack and REMEASURE. RE-MEASURE and tack again.... Put the other pieces and RE-MEASURE, then tack and RE-MEASURE ...........and then, when you are ready to weld, get a buddy (or two) to RE-MEASURE. The measurements should be taken from the jig holes and cross checked with other standardize holes and measures (i.e. front of the frame etc...). Don't only follow the basic instruction. Overkill is the name of the game.


3) Once you have taken all the steps to measure and re-measure and spent a few too many hours to weld your stuff, stand back and look at what you have done :bang:


4) Then comes the fun part. THE MOTOR MOUNTS :fuss: . Because of the rack shaft, the driver motor mount needs to be angle about 10-15 degrees. Since I am going with long tube headers and will be shortening the shaft, I went to 15 degrees to allow enough space for the "monster" size Universal Knuckle. I also raised the top re-inforcing cross bar to allow enough clearance for any mods I may have to do to the steering.

I used a old 351w block and AOD tranny core to do the mock up and took more measurements than it should be allowed by law.


I will spare you the pics (unless someone wants to see them). I took measurements at the front and the back of the intake to ZERO side to side, which I cross referenced with the cross member, oil pan and the tranny. I centered the engine between the frame rail, and guess what RE-MEASURED. I then lowered the tranny until I got 4 degrees downward slope and RE-MEASURED everything. I made sure that I had at least 1/4 inch clearance between the rack and the oil pan (love semi-solid motor mounts), then RE-MEASURED once last time before I tacked the motor mount. After a few good tacks, RE-MEASURED, got 2 buddies to RE-MEASURED and when to get a :cheers: . After a little rest and 1 brewski, I RE-MEASURED and proceeded with the welding. Checked everything and tacked the re-inforcing cross bars and VOILA!!!!!


5) THEN came the fun part :banana: I will let the picture speak for itself.


I did go with a 2" dropped spindle and upgraded to a 13" SSBC Force 10 (4 piston) brake set up on a 17" Torq Thrust II with a 7/32 wheel spacer. All tucks in just fine.

Hope this helps. It was not easy but you should see the stance :banana:

In all as an amateur, it took me about 16 hours to get a rolling chassis, that includes a couple of phone calls to Willie.
 
By the way the white junk you see all over in the engine bay and on the set-up is ChemPrim. The beauty of southern Louisiana is not the food nor the southern women, it is the 100% humidity, which translates in instant FLASH RUST. ChemPrim is a rust protector/inhibitor, which gives me that added time to finish all the work, without having to worry about spending more time cleaning and prepping metal.

Next is to re-skin the engine bay. Those little patches just don't do it for me.........
 
Hey Ren :OT: ,

I like what you did with removing the trailing arm and sway bar boxes. I hope you will not get offended if I mimic you??? By the way did you have to make any mods or change the sway bar to make it attach to the frame instead of those angle iron??
 
samwe said:
The A-arm is wider than the crossmember.
Some A-arms split the difference (symetrical). Mine I think have a one inch spacer, or stand off, on each side of the crossmember.

Some A-arms are flush on the crossmember one side and have a larger spacer on the other side.(asymetrical)
OK, I see what you're saying. The way the Heidt's system is welded and gusseted it's plenty strong though.
 
Dr_Pain said:
Hey Ren :OT: ,

I like what you did with removing the trailing arm and sway bar boxes. I hope you will not get offended if I mimic you??? By the way did you have to make any mods or change the sway bar to make it attach to the frame instead of those angle iron??
Go for it. I'm sure I wasn't the first to do it. I just figured that there's no reason to keep structure around that no longer has any purpose. With the Heidt's kit the sway bar is designed to mount to the frame rails, not the original mounting points, so you can cut the original bracketry away. I believe the Rod & Custom kit uses the original sway bar mounting locations.
 
Dr_Pain said:
4) Then comes the fun part. THE MOTOR MOUNTS :fuss: . Because of the rack shaft, the driver motor mount needs to be angle about 10-15 degrees. Since I am going with long tube headers and will be shortening the shaft, I went to 15 degrees to allow enough space for the "monster" size Universal Knuckle.
Mine is a '70, and thus wider, so my rack is extended on the passenger side, so the whol unit is shift to teh drivers side. My mounts both perpendicular.
I used 2x2 with the tops cut to make an upsode down V. The stock motor mounts bolt through a tube welded at the top of the V.

Isn't it nice having all that room under the hood?

nofndrs1.jpg