
I recently installed Detroit Rocker camshafts, Kooks long tubes with cats, C&L Racer intake, and a custom tune from Been speed on my '06 GT. It started and idled fine, and even handled some at-idle revving, but when I took it for a drive, about one second into my first WOT pull, a camshaft slipped on the timing chain and a piston started contacting a valve. It's an engine with less than 50000 miles on it and I was VERY careful during the install. Any suggestions about what caused the cam gear to randomly slip?
You are using an out of date browser. It may not display this or other websites correctly.
You should upgrade or use an alternative browser.
You should upgrade or use an alternative browser.
Engine Camshaft Slip
- Thread starter timjimmy
- Start date
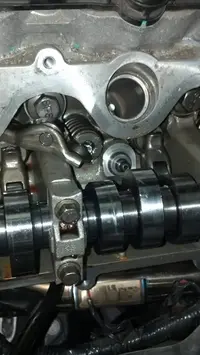
Update...started pulling my timing chain cover off, and when I pulled off the driver's side valve cover, I noticed this...a rocker from the exhaust valve and one intake on cylinder 7 had come unseated and were scattered inside the head. I'm still pulling the timing cover to inspect the cam timing and replace tensioner, guides, chains, etc., but could this have been triggered by the cam gear slipping on the chain, or could this have been my initial problem? It seems weird to me that the gear slipped and I only had interference on one cylinder. Side note, I correctly torqued the new phaser bolts and cam cap bolts and did not adjust rocker arm lash. They're Detroit Rocker supercharger cams that do not require new springs or phaser limiters.
Attachments
Ouch...I think that was your issue I've done lots of cams and have yet to see one slip.
Looks like it messed the valve tip up pretty good...time to pull the head and have that valve replaces. How's do the can lobes look
Sent from my XT907 using Tapatalk 2
Looks like it messed the valve tip up pretty good...time to pull the head and have that valve replaces. How's do the can lobes look
Sent from my XT907 using Tapatalk 2
Intake lobe has a light scratch and the exhaust lobe has a few nicks on the edge. After pulling the timing cover, I'm having a hard time telling if the cams are correctly timed. There aren't any marks on the chains that I've noticed to align the cam and crank gears. There are the marks that I applied when I installed the cams, but it looks like both cams have either slipped about 60 degress, or since the crank rotates twice for every revolution of the cams then the position of the cams in relation to the chain would vary. I haven't been able to figure that one out yet, so I'm sleeping on it. My new chains have two, single black links that are equal distances apart, so I'm assuming just find TDC and place the black links over the indicators for the crank and cam? Where's a good source for valves? I'm considering buying FRPP ported heads and intake, but I'm already about $1000 more into this whole project than I had wanted to spend.
http://iihs.net/fsm/?dir=167&viewfil...der Head.pdf
I've seen blue links or copper links on the chains... as far as valves go I'd go to your local machine shop they should check that guide out as well and can lap and install the new valve for you. If you decide to buy the heads let me know O can get you a good deal and save you some $$
Install the camshaft phaser sprockets and new camshaft phaser bolts finger tight.
Be careful not the damage the camshaft phaser sprocket assemblies. Use hand tools to remove the camshaft phaser sprocket assembly or damage may occur to the camshaft or camshaft phaser unit.
Using the camshaft sprocket holding tool, tighten the camshaft phaser sprocket bolts in 2 steps;
Step 1: Tighten to 30 ft-lb (40 Nm)
Step 2: Tighten an additional 90 degrees
Install the crankshaft sprocket, making sure the flange faces forward.
Rotate the crankshaft to position the crankshaft sprocket timing mark in the 6 o'clock position.
Inspect the timing chain tensioners. Install new tensioners as necessary.
Compress the tensioner plunger, using a vise.
Install a retaining clip on the tensioner to hold the plunger in during installation.
Remove the tensioner from the vise.
If the copper links are not visible, mark one link on one end and one link on the other end and use as timing marks.
Install the timing chain guides. Tighten the bolts to 89 in-lbs (10 Nm).
Install the lower end of the left (inner) timing chain on the crankshaft sprocket, aligning the timing mark on the crankshaft sprocket with the single copper (marked) link on the chain.
NOTE: Make sure the upper half of the timing chain is below the tensioner arm dowel.
Install the left timing chain on the camshaft sprocket. Make sure the timing mark on the sprocket is aligned with the marked chain link.
NOTE: The LH timing chain tensioner arm has a bump near the dowel hole for identification.
Install the left timing chain tensioner arm on the dowel pin and install the chain tensioner. Tighten the bolts to 18 ft-lb (25 Nm).
Remove the retaining clip from the left timing chain tensioner.
Install the right timing chain on the crankshaft and camshaft sprockets. Make sure the marks are aligned. The right camshaft sprocket will be stamped with one of the timing marks shown.
The right camshaft sprocket will be stamped with one of the marks shown
Install the right timing chain tensioner arm on the dowel pin and install the chain tensioner. Tighten the bolts to 18 ft-lb (25 Nm).
Remove the retaining clip from the right timing chain tensioner.
Verify correct alignment of all timing marks.
Install the crankshaft sensor ring on the crankshaft.
NOTE: It will be necessary to rotate the engine to position the camshaft lobes at base circle to install the roller followers.
Using the spring compressor, install all of the camshaft roller followers. Lubricate the roller followers with clean engine oil prior to installation.
Install the engine front cover.
ou are 100 percent right, the cam sprockets have BOTH L and R. And like you said, the L is used for the drivers side, and R is used for the passanger side.
I just did cam's, and for peace of mind I pulled my front cover to verify my timing too..
I have a few links Ill post at the end here to help you.
The way your supposed to do it, is to get the crank shaft at number one TDC, another words, get the "key slot" on the crank shaft pointing to the number one cyc. Number one is the first cyc on the passenger side. You have to watch out to make sure your not (180) off, just make sure that the cam shaft lobes for number one, aren't engaging any of the valves.. Once the crank is in the right spot, look at the bottom of your crankshaft sprocket, there should be a mark on it, groove or indent. This should be point down, 6 o'clock position.. Now look at your passenger side cam sprocket, note the position of the "R", you should have equal number of links on each side from those two marks. The book tells you to pull your chain off and pull it tight so you have two links farthest apart. Then mark those links, and then get those two links on each of the timing marks.
Note, you do the same to check the drivers side as well.. Only on that side, you use the "L"..
Sent from my XT907 using Tapatalk 2
Last edited:
Thanks, that's laid out much more simply than my repair manual. I'll get back to you once I get the heads pulled off.
Heads are off and disassembled. Everything checks out except the forward intake valve on cylinder seven. The lash adjuster is slightly chewed up and the valve stem is bent enough that it won't slide out of the guide. As for the guide itself, there is a little bit of play wiggling the valve back and forth by hand, but I'm not sure how much clearance there is supposed to be. I have yet to hear back from any of the local machine shops that I contacted. If I was to go the route of purchasing cylinder heads, what could you do for me?
They're clean and in great condition. I slapped them on with Ford's head changing kit and am waiting on new lash adjusters and followers, which arrive tomorrow. Should be back on the road tomorrow night.
SO, the latest and greatest. Last night, I finally got the car running (after a power steering fiasco that cost me a few more days) and it is having some runability issues. Below 2500-2700 RPM, it runs quite rough (and not rough like what the cams cause) like it has a intense misfire, regardless of throttle position. I ran it quite a bit and tested the powerband to get a feel for it. In 1st and 2nd, as soon as it hits 2500, at both light, half, and wide open throttle, the "misfire" immediately disappears. In 3rd, it disappears as soon as it hits 2700. Off the line, at WOT, I can't actually tell if it "misfires" below 2500 (since it kind of screams under load), but it pulls so hard that it chirps the tires shifting into 2nd and 3rd. I called the guys at Brenspeed, where I got my tune, cams, headers, etc, and they said that it was more than likely crossed O2 wires (nope), an intake that wasn't fully seated into the silicone couplings (nope), or cams that were out of time. I replaced the entire timing assembly and was very, VERY careful to ensure that the cams were properly timed. I have new spark plugs arriving in a couple hours, just to make sure my old, crappy Motorcraft plugs haven't taken a poop on me, and I have a new fuel filter to throw in for good measure. Also, I have no check engine light or codes, except the P1000 since I haven't taken it through the Ford Drive Cycle yet. I'm kinda thinking maybe they wrote the tune for a car that is using CMCV deletes, whereas I am still using the CMCVs. Know the specific RPM that the flaps open at and does that seems likely?
I feel like the only way the cams are out of time is if Comp sent me improperly manufactured cams. Any way to check cam timing using a tuner?
Just an update, I gapped the new plugs, threw them in and the car runs great now! Sounds amazing, pulls hard, and has a lot more top end power.
Steve491
Member
Great to hear it's running good now.
The moral of the story is: (and I hate to say it dude) It appears a follower wasn't in it's proper place.
I knew a guy that rebuilt a beautiful '67 Chevelle 396 and forgot to put in the oil pump drive. He didn't have a guage working when it was fired up.. Needless to say the engine was destroyed....
I'm pretty sure they were all properly seated after the swap. When I pulled the heads off, the exhaust valve lash adjuster had about 3/8" of play. My manual called for only 1/16". I think it failed to properly adjust valve lash, which didn't put enough pressure on the follower, and it fell out. That $3.95 piece cost me a pretty good chunk of money!
Similar threads
- Replies
- 45
- Views
- 2K
- Replies
- 11
- Views
- 1K
- Replies
- 6
- Views
- 2K