Codes 31 and 63

KingsKustoms

New Member
Nov 7, 2011
7
0
1
Hey all, new to the mustang scene. I just bought a 91 gt about 2 weeks ago. The check engine light comes on while driving. It will stay on for 4 seconds and then go out. Random. So I went to the parts store and got the codes. It threw out a 31 and 63. The EGR voltage too low. The TPS voltage too low as well. Now my question is, where do I start? Should I try adjusting them? Replace them? Any help is greatly appreciated.

Thanks,
Rocky
 
31 = EVP - EGR Valve Position
63 = TP (or TPS) - Throttle Position Sensor

Both are within a few inches of each other on the throttle body.
Remove the connectors & clean the contacts.

There are some electrical tests you can perform with a multimeter but your description sounds like bad electrical contact.
 
CODE: 31 (KOEO) - EVP circuit below minimum voltage. Vref (5 volt reference voltage supplied by the computer) missing or broken wire or bad connection in circuit. Use a DVM to check for 5 volts on the orange/white wire. If it is missing, look for +5 volts at the orange/white wire on the TPS or MAP sensor located on the firewall near the center of the car. Use the black/white wire for the ground for the DVM.
With the sensor removed from the EGR and still connected, press the plunger and watch the voltage change on the brown/lt green wire. Pull the passenger side kick panel and measure the voltage at the computer. You will need to remove the plastic cover over the wires and probe them from the backside. A safety pin may prove very useful for this task. Use pin 27, EVR input (brown/lt green wire) and pin 46, signal ground (black/white wire) to measure the voltage. The orange/white wire is Vref and should always be 5 volts -/+ .25 volt. Be sure to measure Vref at the EGR sensor to rule out any broken wires or bad connections.
Measuring the voltage at the computer helps you spot broken wiring and intermittent connections.


Code 63 - Throttle Position Sensor (TPS) signal too low TPS . TPS out of adjustment, or 5 V VREF missing, broken wiring or bad connections.

Wire colors & functions:
Orange/white = 5 volt VREF from the computer
Dark Green/lt green = TPS output to computer
Black/white = Signal ground from computer

Always use the Dark Green/lt green & Black/white wires to set the TPS base voltage.

Use the Orange/white & Black white wires to verify the TPS has the correct 5 volts source from the computer.

Setting the TPS: you'll need a good Digital Voltmeter (DVM) to do the job. Set the TPS voltage at .5- 1.1 range. Because of the variables involved with the tolerances of both computer and DVM, I would shoot for somewhere between .6 and 1.0 volts. Unless you have a Fluke or other high grade DVM, the second digit past the decimal point on cheap DVM’s is probably fantasy.

Since the computer zeros out the TPS voltage every time it powers up, playing with the settings isn't an effective aid to performance or drivability. The main purpose of checking the TPS is to make sure it isn't way out of range and causing problems.

The Orange/White wire is the VREF 5 volts from the computer. You use the Dark Green/Lt green wire (TPS signal) and the Black/White wire (TPS ground) to set the TPS. Use a pair of safety pins to probe the TPS connector from the rear of the connector. You may find it a little difficult to make a good connection, but keep trying. Put the safety pins in the Dark Green/Lt green wire and Black/White wire. Make sure the ignition switch is in the Run position but the engine isn't running.

Here’s a TPS tip I got from NoGo50

When you installed the sensor make sure you place it on the peg right and then tighten it down properly. Loosen the back screw a tiny bit so the sensor can pivot and loosen the front screw enough so you can move it just a little in very small increments. I wouldn’t try to adjust it using marks.

(copied from MustangMax, Glendale AZ)

A.) Always adjust the TPS and Idle with the engine at operating temp. Dive it around for a bit if you can and get it nice and warm.

B.) When you probe the leads of the TPS, do not use an engine ground, put the ground probe into the lead of the TPS. You should be connecting both meter probes to the TPS and not one to the TPS and the other to ground.

C.) Always reset the computer whenever you adjust the TPS or clean/change any sensors. I just pull the battery lead for 10 minutes.

D.) The key is to adjust the TPS voltage and reset the computer whenever the idle screw is changed.


The common fault here is the low or missing +5 volts to both sensors.

As suggested, check and clean the contacts in the connectors. Also check the ten pin connectors.


harness02.gif


attachment.php
 
Ok, first of all, thank you to everyone for the help! I cleaned both sensors. The white (salt) had a pin that had all sorts of white stuff on it. So I cleaned both thoroughly. Got it back to the parts store to run another test. Still have code 31 showing up on KOEO. Also did a KOER and got code 12, rpm out of range high? Then it said Cylinder 8? Im confused by this. Again, all help is greatly appreciated.

Rocky
 
Code 12 -Idle Air Bypass motor not controlling idle properly (generally idle too low) - IAB dirty or not working. Clean the electrical contacts with non flammable brake parts cleaner at the same time.

Recommended procedure for cleaning the IAC/IAB:
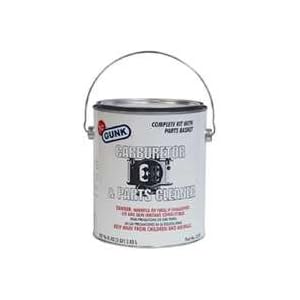
Conventional cleaning methods like throttle body cleaner aren’t very effective. The best method is a soak type cleaner used for carburetors. If you are into fixing motorcycles, jet skis, snowmobiles or anything else with a small carburetor, you probably have used the one gallon soak cleaners like Gunk or Berryman. One of the two should be available at your local auto parts store for $22-$29. Take the solenoid off the body and set it aside: the carb cleaner will damages some types of plastic parts. Soak the metal body in the carb cleaner overnight. There is a basket to set the parts in while they are soaking. When you finish soaking overnight, twist the stem of the IAB/IAC that sticks out while the blocker valve is seated. This removes any leftover deposits from the blocker valve seat. Rinse the part off with water and blow it dry with compressed air. The IAC/IAB should seal up nicely now. Once it has dried, try blowing through the bottom hole and it should block the air flow. Reassemble and reinstall to check it out.

Gunk Dip type carb & parts soaker:
21hb0QWbOeL._SL500_AA300_.jpg
 
I think it might have been recognizing that I am running 8 cylinders. The guy from the parts store just wrote it down on the paper and I didnt get a chance to read what was actually on the screen.

@jrichker-- The code said that it was idling too high, so should I still take it apart and soak it? I've been thinking about offering up some booze to anyone local that can come help me figure this out. All of these new terms and electrical testing is new to me. My other car is a 54 Ford Customline. Carbed cars are much easier to work on! Thank you for your help!

Rocky
 
You are there, I'm not there. You will have to make your own determination if the problem is worth attempting to fix it.

The idle speed specification is 650-725 RPM.

If you aren't having any other idle or stall problems, set the base idle speed. If you have a wandering idlle, surging or stalling problems, See the "Surging Idle Checklist for help with all your idle/stall problems. You can guess at the problem and throw parts at it, or you can use the checklist to help you find the problem quickly and inexpensively.

The quick and easy way to dump the codes is in there too, and all you need to do it is a paper clip! The first two posts contain all the fixes & updates. At last count there were 24 possible causes and fixes for surging idle/stall problems. I continue to update it as more people post fixes or ask questions.

See http://www.stangnet.com/mustang-forums/698148-help-me-create-surging-idle-checklist.html#post6855020 for the best way to set the mechanical base idle and cleaning procedure for the IAC/IAB.
 
I'll go thru the checklist and see what I can find. I am not really the kind of person to just throw parts at a problem. Money wasted when it doesn't need to be. I have a long holiday weekend and I will go thru the checklist. If I go slow and take my time, I should be able to figure it out. I really appreciate your help. I'll update again when I start on it.

Rocky
 
*UPDATE* Ok, So I cleaned the electrical connections for the EGR Valve and replaced the vacuum hose that went to it. Cleaned the IAB really well and even those electrical connections. Drove it around to heat it up a bit and went to pull my codes. At first, the KOEO pulled an 11 and a 64. Thought that was weird, so I did the KOER. With that one, I pulled an 11 and a 12 still. So I went back and did the KOEO again. This time it was all 11s. AWESOME! Now Im just curious if I should just go ahead and get a new IAB? The test stated out of range high still. Not sure where to go from here. As always, the help is appreciated!

Rocky
 
Nother update.... Messed around with the timing and reset it back to 10*. Thought that might help, but I still pulled a 12 code in KOER. Finally just got fed up with it and sold the car.... LOL KIDDING. I took it to emissions anyways. I knew it would fail cuz that light randomly comes on. Put the car on the dyno, did all the tests and the guy handed me a paper. PASSED EVERYTHING! I couldnt believe it! He never even looked down to see if the light came on or not. Lucky me! Big thank you to everyone for the help!