Confused about "Pre-load" when using a torque wrench!

mo_dingo

20+ Year Stangneter :roc</strong><span class=
Aug 26, 2003
3,031
2
58
Tucson, AZ
As the title says, I am a little confused about what they mean about pre-load. I am going to install gears in my car soon, and I want to be 100% clear about everything before I start the project.

I have the inch-pound torque wrench. It says to set the "pre-load" to 16-29 inch/pounds of torque for a new bearing. Exactly what does this mean?

I understand about turning the pinion nut until the crush collar starts to deform. So, after it starts to deform, do I set the torque wrench to 16 in/lbs and try to tighten the nut. If it doesn't click, do I then use a breaker bar, and tighten it 1/8 turn, then put the torque wrench on it again, and see if it clicks at 16 in/lbs? Just keep repeating the process until I read 16 in/lbs? Then change the setting to 20 in/lbs and repeat the process until it clicks. Then I am done?

Thanks in advance!
Scott
 
mo_dingo said:
As the title says, I am a little confused about what they mean about pre-load. I am going to install gears in my car soon, and I want to be 100% clear about everything before I start the project.

I have the inch-pound torque wrench. It says to set the "pre-load" to 16-29 inch/pounds of torque for a new bearing. Exactly what does this mean?

I understand about turning the pinion nut until the crush collar starts to deform. So, after it starts to deform, do I set the torque wrench to 16 in/lbs and try to tighten the nut. If it doesn't click, do I then use a breaker bar, and tighten it 1/8 turn, then put the torque wrench on it again, and see if it clicks at 16 in/lbs? Just keep repeating the process until I read 16 in/lbs? Then change the setting to 20 in/lbs and repeat the process until it clicks. Then I am done?

Thanks in advance!
Scott
Pre-load is referring to the spec that you are torquing the bolts to. Basically it means "torque the bolts to 16-29 in/lbs."

I hope you understand that pinion nuts need to be TIGHT. There is a minimum recommended torque of 150 ft/lbs and it should be closer to 180-190 ft/lbs. The crush collar is going to start to deform way before you reach the actual torque specs. You can't use a crush collar once it has been 'crushed,' so I think your process is a great way of going about it; nice and slow.

Good luck.

Joe
 
Here's my take....

You start cranking on the pinion nut....that mother will take 150-190 or more ft lbs to "start" crushing the collar...once you have started to crush it, you need to sneak up on it from there(with the big mother bar or ratchet)...take a tad, check for axial ( in/out) play on the pinion gear...still have axial play...creep up on it again, still using the big mother....
I do this til i have no axial play...then you should start to get a "drag" on the pinion as you creep up on it somemore...to me, this is where your "preload" is coming in...at this point..you should have no axial play and a light drag when turning the pinion by hand...if you put your "inch" TQ wrench on the pinion nut now, you should start to register "inch lbs" to turn the pinion....when you reach 16" lbs(on the small tq wrench) to have it rotate...you have obtained the proper preload....

you need to always crank on it with the big mother bar or ratchet...its only when you feel its there, that you "check the preload" with the inch TQ wrench..tighten with the big mother always..

Hope that clarifies things????
 
Yep, I understand. But here is where I am lost.

On the gear installation article, it says to tighten it to 16-29 inch-pounds. When you convert that to foot pounds, you get 1.666667 foot-pounds of torque. So how the hell do you tighten a nut to 1.66667 ft-lbs of torque when you are al ready at 150+ ft-lbs. I am extremely confused now.

BTW, here is the conversion site. http://www.onlineconversion.com/torque.htm Other websites have confirmed this also. Can anyone explain this please?
Scott
 
Well, I read through another article. Now, I am even more confused. It says that for the pinion nut, tighten to 140 ft-lbs. But for the pinion bearing pre load, tighten to 16-29 inch-lbs. When you tighten the pinion nut, you are tightening (sp?) the pinion bearing, right? I am so confused!!!! :sigh:
Scott
 
ok it's like all the post's above in one. Tighten the crush sleeve to the 140 or 150 lbs range. Personally I like the pinion solid sleeve, no worries about did I crush the sleeve or not and it's reusable. Then you need a dial inch pound torque wrench not a clicker type. Slowly and evenly rotate the pinion nut by the inch pound wrench and see what it reads. Should be about 15 for used bearings and 25 inch pounds of torque for new bearings to turn the pinion nut. I think you need to do this with the bearings dry the way they come out of the package. If you oil them first it will throw off your reading. Just tighten the pinion nut alittle at a time until you reach your setting. Hope this helps
 
mo_dingo said:
Well, I read through another article. Now, I am even more confused. It says that for the pinion nut, tighten to 140 ft-lbs. But for the pinion bearing pre load, tighten to 16-29 inch-lbs. When you tighten the pinion nut, you are tightening (sp?) the pinion bearing, right? I am so confused!!!! :sigh:
Scott
Pinion bearing pre-load? Hmm...thats a new one. I have a terribly bad memory, but if I remember correctly the pinion bearing is pressed on the pinion, not torqued on.

Dude, if you are unsure about what you are doing, it is best to be left to a professional. Yes, it is a lot of money, but it's better than screwing yourself. If you are worried about torque specs, wait until you have to set the backlash and gear pattern.

What you are doing is confusing yourself by other thinking things. Torque the pinion nut to 180 ft/lbs, do as RIO said and check for axial play, and adjust accordingly, but go very slow. Check the "final" torque specs, with the inch-pound wrench, but "tighten" the nut with a breaker bar and a piece of tubing. You are going to need a ton of leverage and a little bit of elbow grease to get that bitch tight.

Joe
 
Well, now I am enlightened. I was browsing through stangnet, and I found a link to this write-up on a full rebuild of a 8.8 rear end. Here is a link to the write up.

http://www.angelfire.com/theforce/5ohcpa/cpa5ohtech021.htm

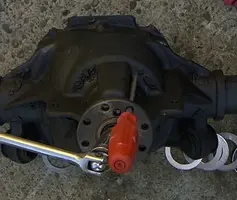
You brace the pinion gear with a screwdriver ran through the pinion yoke. Then turn the pinion nut until the play is removed from the pinion. The crush collar should begin to crush soon.
image125.webp


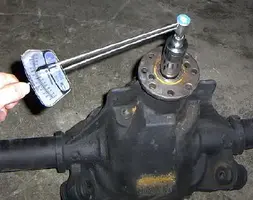
You then remove the screwdriver, and put the inch-pound torque wrench on the pinion nut, and turn the pinion nut to get a reading. The 15-29 inch-pound rating on the pinion nut is to see how much torque is needed to turn the entire pinion while able to freely spin. Here is the picture.
image126.webp


You then use the breaker bar, brace the pinion w/ the screwdriver, turn the nut 1/8 of a turn. Then, remove the screwdriver, put the tq wrench on the nut, and check the preload. Then keep repeating the process until you reach 16-29 inch-pounds of torque.

So simple! I was so confused. I just didn't know you weren't bracing the yoke when using the torque wrench. That is where I was confused.

Just thought I would share my revelation with everyone.
Scott
 

Attachments

  • image125.webp
    image125.webp
    23.8 KB · Views: 396
  • image126.webp
    image126.webp
    18.9 KB · Views: 2,612
Now you can have at it...I've done a couple gear swaps...It pretty cool once you do it...just crazy understanding the preload thing...bag and tag everything as you undo it...you'll be alright....i did my first one with an issue of 5.0 mag to guide me...
 
Another thing to remember, if you don't already know this, is to keep each side seperate. Some parts of the rear are "side specific," so just make sure that you make two separate piles; left and right. :D

Joe
 
Joes95GT said:
Another thing to remember, if you don't already know this, is to keep each side seperate. Some parts of the rear are "side specific," so just make sure that you make two separate piles; left and right. :D

Joe

And another...When you remove the big carrier shims (one on each side) watch which side the "chamfer" faces...when you reassy it you'll see that chamfer and say??? W.T.F.??? Was that chamfer in or out... :bang: