Drilling the cowl... so far

65nProgress

New Member
Jul 27, 2005
53
0
0
So far I have drilled 174 spot welds. Took about 5 hours. Now Im just going through with a chisel to break them and I will be ready to lift it off. The only really hard welds are the ones where two are welded with in a 1/4" of each other and make one complete weld. Everything else is just tedius. I found the best method was drilling a small pilot hole (but not all the way through) and then taking a normal 7/16" bit and enlarging the pilot hole to just bigger than 3/8". Then I took a 3/8" that I ground to nearly flat and used that to cut through the top metal. Overall I would say I made good progress this weekend.
 
Mine had 168 in it... I used a strange combination of bits, and ended up with the eastwood professional bits, worked like a charm.

When you install it, it basically sits down right where you cut them all off, clamp and get the welder out....

Good luck.
 
The problems I am running into right now are the two weld or brazed spots near the top sids of the cowl. The cutting wheel on my angle grinder is too large (only a 4" griding wheel) to get into the tight corners of where the welds are. I don't have a die grinder or a blow torch... Looks like it'll be this weekend before I finally pull the cover off. Gotta figure out a way. I'll post some pics as soon as I get the cover off.
 
RED5oh: Thanks for the idea. Im going to look into that tonight and see if I can get the darn thing off tonight. I see have about 10 or so spot welds to drill and about 30 to break loose. :bang:
 
Correction on my above post. After dealing with everything for about 2 hours, I got it 95% broken free. The thing should just pop off but it wont break free near the top. I am going to have to look for more spot welds. After working on it last night and finding more spots I needed to drill that I had missed... the new total for welds is 192. The damn thing looks like swiss cheese. Im probably going to weld new metal in places of the cowl cover where I had to drill. The corners are the worse.
 
It might take a while but look into getting a Dremel tool, they make very small cutoff wheels for them, under one inch that can get into tight spots. I wouldn't want to do a lot of cutting with such a small tool but for those tight spots it might be your answer.
 
Update...

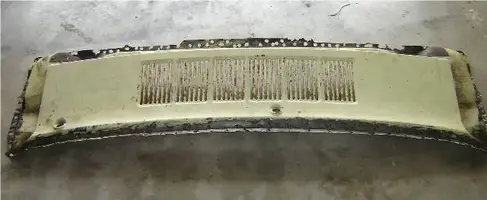
I finally got the cowl cover off last night (found more spot welds that I missed..bringing the total to almost 200). I will have pics this weekend. All in all, it was a PITA but not that hard. Just a lot of drilling, grinding, wire wheeling.

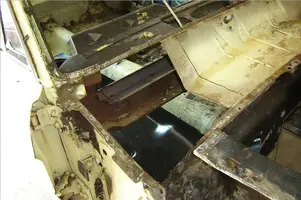
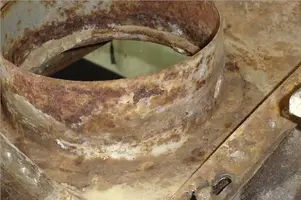
What I found: about 5lbs and 40 years worth of dirt, dust, and twigs totally incapsulaing each tophat. After shop vaccing them, they look remarkable well...till you look close. The passenger side is toasted with a lot of rusted pin holes. Now I think the rubber top hat kit would have fixed it, but Im not into doing a short term repair. I want to make sure my feet and my new interior (whenever that time comes) stays dry. And I also have to patch various pieces of the firewall directly below where the cowl cover attaches to. Even though Im not finished..barely began...I feel a huge sense of accomplishment just getting that cover off. You hear tons of horror stories about doing that and so far its gone pretty smoothly.

Advice I can give... Buy good spot weld bits. I finally got mine in the mail after drilling 150 or so welds. When the bit came in, it made quick and easy work of the rest.
 
are you going to delete them or repair?

It honestly sounds like one of those jobs that I would get half way through, then get distracted for six months and forget where I left off.
 
mustangdave said:
Can any idiot, (namely me :D ) drill these out? How do you know how deep to drill so you don't drill through bothe pieces?
If you buy the spotweld cutter drill you take it to the depth of the teeth and it works great. I did mine a couple of years ago with an Eastwood cutter, about 12 bucks I think at the local parts store.
 
If I can do it, anyone can. After drilling a few welds you start to realize how deep to go... I unfortunately went to far and have to weld up some holes. Live and learn. Im working on getting the firewall patched up. Its not turning out to be that hard... but like everything else, its taking a while to get everything perfect. I'll post pics tomorrow of my progess.
 
The work goes on. Although the pics don't look that bad, there are a lot of pin holes. The real rust was found under anywhere there was seam sealer and Im now having to replace the entire top two inches of the firewall. Its like swiss cheese the entire width of the car :(
 

Attachments

  • Cowlcover.webp
    Cowlcover.webp
    17.8 KB · Views: 148
  • Replacing1.webp
    Replacing1.webp
    40.8 KB · Views: 176
One suggestion I would like to make is when you do the drivers side if you havent cut it out already, I suggest you cut around the wiper mount and leave it intact. I didnt and it was a pain to measure and positiion everything not to mention brazing nuts back in place and such.
 
tos said:
One suggestion I would like to make is when you do the drivers side if you havent cut it out already, I suggest you cut around the wiper mount and leave it intact. I didnt and it was a pain to measure and positiion everything not to mention brazing nuts back in place and such.

I would agree with this statement... I left as much of the original metal in place to as to keep the spacing. That is why the strange cutout on the drivers side. See attached pictures.