Blandnuts said:
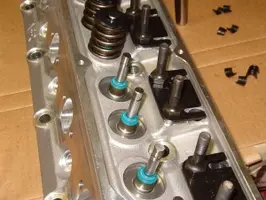
Do you have a picture of the viton seals? I have white plastic ones with a metal band going around them and they don't seem to stay in place(rides up and down the valve). These came with the comp cam "package." I also have some black rubber with a metal band and the umbrella ones mentioned that came with the summit rebuild kit. I'm not having luck with the plastic ones so I'm wondering if the ones I have are good enough or should I try these Viton seals?
Fred
i'm assuming these are going into a stock head. I would use the rubber ones instead, they should be pretty snug around the valve guide. i went ahead and used the rubber seals with the metal ring around the top and a metal band in the middle which is open to allow for expansion for the intake side and the regular umbrella like black seals for the exhaust, i wanted to use the intake ones on the exhaust side too since they were pretty snug ont he guide but some people mentioned i shouldnt use them in another board. before i bolt the heads up for good i'm going to ask a local engine builder see what he thinks/has done before about using the intake seals on the exhaust guides, i dont like the way the exhaust umbrella like seals ride up and down with the valve, it seems like they wouldnt protect as well as the intake ones.
on another side note as far as the shortblock goes its done, i need to save up a few more bucks for the arp head studs and cometic gaskets to get the long block compolete, once that happens i can bolt up the intake.
I wish i had a digital camera to take pictures as i go along and post them i'll just have to wait till i mostly finish the project or use up the roll of film to develop the pictures i currently have.
since my car has no heater/ac i went ahead and cut up the heater pipes that come up from the front of the lower intake from between the threaded part's hex head and the hexed piece that is connected to the tubes that swings around. i also cut off the round pice where the coolant temperature sensor goes and welded it to the other part i cut off the pices so as to get rid of the tubes and still have a place to get the temperature reading.
also i started on the headers, i'm using some equal lengths i had bought a while ago which never went into the car due to a bad motor mount i had and they would hit the k member mount plate/ steering shaft. i'm using a hacksaw... yes a hacksaw

i bought from harbor freight tools for 5 bucks to cut up the headers and see what i can piece togeather. reason why i didnt just flip them around and weld to the flange is because it would be nearly impossible to get to the plugs that way. so far it looks like i'll be able to rework the headers without having to get any other mandrel bent pipes, thriftyness at its best. i'm tack welding the pices togeather to get the overall design going, then once i have it how i want it i'm going to weld it all. i also dont want to make the mistake of welding onc piece all the say just to find out it would have been easier to weld the pice thats attatched to that first since some of the seams fall behind a tube. hope its not too confusing, but i'll have pictures once i get them developed. i'll hopefully get the driver's side done tomorrow for i have off and then i'll move on to the passenger's side. should be more or less the same thing.