
You are using an out of date browser. It may not display this or other websites correctly.
You should upgrade or use an alternative browser.
You should upgrade or use an alternative browser.
Exhaust exhaust manifold leak
- Thread starter Enzio
- Start date
1) Yes, it is possible to swap valve springs while the head is still on the engine. You will need adapters to connect compressed air to the spark plug hole of the cylinder you're working on. That allows the valve to stay in place when you remove/replace the spring.
I saw this done once with a piece of paracord fed into the spark plug hole and the engine turned by hand to hold valve with wad of rope.
It made me nervous but he pulled the tail he left hanging out after turning engine back a few degrees and all was good.

I've heard of using air like that. It makes since that if you have good seating surfaces and good air pressure it would just hold the valve up in place.
Enzio here.
Put up a new short video of the drive north to go fishing. I'm waiting for the valve springs and seals, and the valve spring micrometer and the valve keeper removal tool to show up.
Got the exhaust gaskets on. Wow what a job that was. I hope they work.
Found a broken piece of a rocker on the passenger side when I took the rocker cover off. I have a new one ordered so I'm waiting for that too. Pics and video link attached below.
Headed out hunting this weekend. Probably won't get the Cobra II back together until next week.
https://youtu.be/nnf99Ev87B8
Attachments


Found a broken piece of a rocker on the passenger side when I took the rocker cover off. I
WTF!?!
I'm pretty sure that most and if not caused by me, then all are the result of when my car was in possession of the ex and someone tried to start it. I have no proof but the battery was in the car and connected (dead when I finally got it back). Not something I did.
Ah well. It's definitely an adventure. And, it makes me smile when it does run good.
Ah well. It's definitely an adventure. And, it makes me smile when it does run good.
Here are answers to your questions:
1) Yes, it is possible to swap valve springs while the head is still on the engine. You will need adapters to connect compressed air to the spark plug hole of the cylinder you're working on. That allows the valve to stay in place when you remove/replace the spring.
2) Here is a good and fairly brief description concerning setting preload. All preload is is the spring installed height.
Valve Spring Installed Height: Why It's Important and How to Measure It
Valve springs are probably the most stressed components of an engine. Yet they are also one of the most oft-overlooked parts in the entire engine. The fact of the matter …www.onallcylinders.com
3) It is usually called out by the cam manufacturer. Assuming you're still running a stock cam, you should be able to just ask at your local parts store for valve springs for a 1969 Ford 302. If you have an aftermarket cam, you'll need to know the specifics for that cam - I.E. manufacturer, cam model, etc. Then you should be able to locate all of the information you'd need to purchase valve springs - open/closed pressures, installed height, etc.
4) You may need valve spring shims to adjust the installed height of the springs in order to meet manufacturer's specifications. Here is a link for Comp Cams shims, but there are probably as many manufacturers that supply shims as there are cam manufacturers - probably even more than that! Really all you need to search for is "valve spring shims" and a plethora of options come up on Summit's website.
I hope this all answers your questions!")
Hey Guys,
This spring issue is complicated. The only chart I could find online is the same chart that is in Tom Monroe's book; which I have. See Attached. (I think mine is the 302 68-69 1/2.
I bought a valve spring micrometer and borrowed a caliper to help with this job.
While waiting for the springs to show up. (This morning) Using the rope method (worked good) on #1 cylinder I removed the springs from both the intake and exhaust valves. Each of them had a shim which measures 0.0545". See attached. (All valves have shims. I have only removed #1 so far.)
I measured the installed height with the micrometer and came up with Ex - 1.66", In - 1.67". Almost perfect according to Tom's chart.
Question 1. Why use shims? Unless the springs didn't have the correct Lbs. rating without it?
So I measured the free length of the old springs and they were Ex - 1.949", In - 1.947". Just slightly more than Tom's chart. Again, not enough lbs.?
Both springs are not square and the exhaust is out slightly more than 1/16th inch.
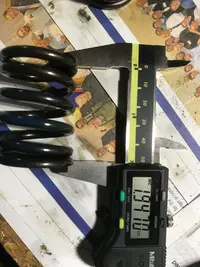
Went to pick up the new springs from Napa this morning. They all measure between 2.054" - 2.074" Free Length. They are Sealed Power brand #VS672.
Question 2. Are these replacement springs too long? If I add the old free length and the spacer I get Ex. - 2.0035, In - 2.0015 still short compared to the new.
Thank you,
Enzio
Attachments


I'll readily admit that I don't have all of the answers, but here's my take with what I think mixed with a little knowledge.
I'm pretty sure springs aren't made to an exact pressure, but a range of pressures that are acceptable. Let's say +/- 10%. In testing Windsor components and operation, engineers most likely discovered that in order for the valves not to float they had to use a specifically rated spring - not so strong that it wiped the cam lobes, but strong enough to close the valves under prescribed conditions. The length of that spring had to be strong enough to close the valve while having enough clearance between the coils to be able to fully open. So, in terms of keeping parts uniform, they come up with what they found to be an acceptable length of a specific spring and had to give manufacturing tolerances to ensure that when mass produced and factory installed, every spring met the requirements of every engine every time. So that comes down to where you are now, installing factory acceptable parts using factory prescribed methods and specifications. Chances are they would work fine without shims, but you would likely have valve float and possible valvetrain and or piston damage at higher RPM. And, as I'm sure you already know, spring pressures are variable depending on how much they are compressed. If a spring had little to no preload, the valve may or may not fully close either, which is no bueno!
Upon searching for more info to share I come across this article from Comp Cams. I hit the pressure tolerance on the head!
It also says that your installed lengths are good to go if they are all within +/-.020, so your springs are good as a set. The free length isn't as important as the installed length as long as there is no coil bind and the pressure isn't too great. I'd say that the lengths of your new springs are probably good. About the best way to check is to measure between the coils as best you can when the spring is installed and make sure that your overall cam lift is smaller than that number. So let's say your cam has .500 valve lift, you should have AT MINIMUM .500 or more between the coils when the spring is installed.
 www.compcams.com
I'm pretty sure springs aren't made to an exact pressure, but a range of pressures that are acceptable. Let's say +/- 10%. In testing Windsor components and operation, engineers most likely discovered that in order for the valves not to float they had to use a specifically rated spring - not so strong that it wiped the cam lobes, but strong enough to close the valves under prescribed conditions. The length of that spring had to be strong enough to close the valve while having enough clearance between the coils to be able to fully open. So, in terms of keeping parts uniform, they come up with what they found to be an acceptable length of a specific spring and had to give manufacturing tolerances to ensure that when mass produced and factory installed, every spring met the requirements of every engine every time. So that comes down to where you are now, installing factory acceptable parts using factory prescribed methods and specifications. Chances are they would work fine without shims, but you would likely have valve float and possible valvetrain and or piston damage at higher RPM. And, as I'm sure you already know, spring pressures are variable depending on how much they are compressed. If a spring had little to no preload, the valve may or may not fully close either, which is no bueno!
Upon searching for more info to share I come across this article from Comp Cams. I hit the pressure tolerance on the head!
It also says that your installed lengths are good to go if they are all within +/-.020, so your springs are good as a set. The free length isn't as important as the installed length as long as there is no coil bind and the pressure isn't too great. I'd say that the lengths of your new springs are probably good. About the best way to check is to measure between the coils as best you can when the spring is installed and make sure that your overall cam lift is smaller than that number. So let's say your cam has .500 valve lift, you should have AT MINIMUM .500 or more between the coils when the spring is installed.
COMP Cams Valve Springs 101 - COMP Cams®
Valve springs are one of the most critical and most overlooked components in your engine. Proper selection of the valve spring begins with identifying the application and selecting all of the valve train components to achieve the engine builders’ goals.
www.compcams.com
Great. Makes sense. Tom Monroe's book says that if you can see light through the coils at fully open then they are good. I can probably slip a feeler gauge in there also. You were talking about the .500 when fully open? And should I put the shim back in?
Edit: You had to be talking about .500 in the closed position. That makes sense.
From your response (thank you very much) you recommend replacing the shims. I'm going to mess around with #1 and see what we have. I'll get back probably tomorrow. Gotta go see about a girl.
Edit: You had to be talking about .500 in the closed position. That makes sense.
From your response (thank you very much) you recommend replacing the shims. I'm going to mess around with #1 and see what we have. I'll get back probably tomorrow. Gotta go see about a girl.
Last edited:
Yes, .500 when the valve is closed.
One thing that I'm curious about is your new springs. I looked them up a few minutes ago and Summit says that their free height is 1.97. You say they are all actually 2.05. I think that it would be critical to double check for coil bind when you install them. These might have been engineered to be installed without the shim? It's hard telling..... But from the info you've given vs what's advertised, your new springs may not be correct....
One thing that I'm curious about is your new springs. I looked them up a few minutes ago and Summit says that their free height is 1.97. You say they are all actually 2.05. I think that it would be critical to double check for coil bind when you install them. These might have been engineered to be installed without the shim? It's hard telling..... But from the info you've given vs what's advertised, your new springs may not be correct....
I bought them thinking they were 1.97. They were the closest to 1.93 I could find. Pics of old (smaller) and new (larger) attached.
Also a picture of the valve stems. One with the spacer and one with it removed. The distance between the top of the valve seal and the bottom of the keepers is ~0.528".
Also a picture of the valve stems. One with the spacer and one with it removed. The distance between the top of the valve seal and the bottom of the keepers is ~0.528".
Attachments


I took the springs back to Napa and reordered them from a different location. I'm pretty sure they were the Sealed Power VS703 not the VS672.
Almost the same spring but the coil bind would have trashed my motor. Waiting..........
Still don't know if the shims should be reinstalled or not?
Almost the same spring but the coil bind would have trashed my motor. Waiting..........
Still don't know if the shims should be reinstalled or not?
I've been trying to keep myself busy while waiting for the springs to arrive. Saturday I worked on the brakes. They were a little mushy for me so I pulled the MC and re-bled it and then made sure the rod was at the proper length and then after re-installation I re-bled the entire system. It feels a little better but without running the engine I'm not sure. Sunday I decided to get the Emergency Flasher working. I was sure I had everything right and the only thing I hadn't checked was the switch. So I pulled the steering wheel and cleaned everything up. Then I put new contact grease on all of the contacts I could get at. Put it back together and presto! They work.
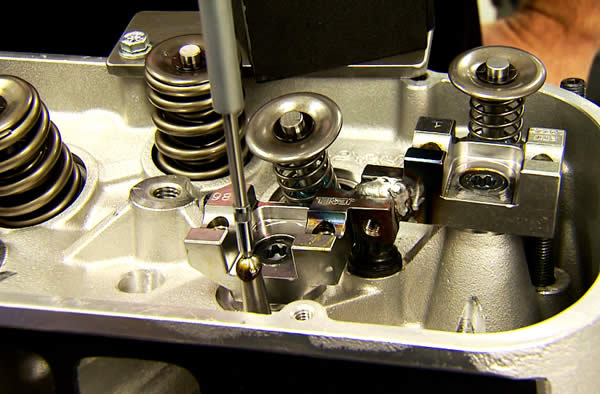
This afternoon the springs came in and I started to remove and re-install. Got #1 intake and exhaust done and moved to #5. This is what I found. (see pictures) It's #5 exhaust and it's just wobbling around it there.
I'm assuming the valve guides are done on #5 exhaust and at least #7 (which started this whole process). Before I go any farther-What are your thoughts?
Attachments


Similar threads
- Replies
- 2
- Views
- 59
- Replies
- 5
- Views
- 202
- Replies
- 1
- Views
- 181
- Replies
- 38
- Views
- 2K