To make sure that there isn't some other problem dump the codes BEFORE changing anything....
Dump the codes: Codes may be present even if the Check Engine Light (CEL) isn't on.
Dumping the computer diagnostic codes on 86-95 Mustangs
Revised 26-July-2011. Added need to make sure the clutch is pressed when dumping codes.
Codes may be present even if the check engine light hasn’t come on, so be sure to check for them.
Here's the way to dump the computer codes with only a jumper wire or paper clip and the check engine light, or test light or voltmeter. I’ve used it for years, and it works great. You watch the flashing test lamp or Check Engine Light and count the flashes.
Post the codes you get and I will post 86-93 model 5.0 Mustang specific code definitions and fixes. I do not have a complete listing for 94-95 model 5.0 Mustangs at this time.
Be sure to turn off the A/C, and put the transmission in neutral when dumping the codes. On a manual transmission car, be sure to press the clutch to the floor.
Fail to do this and you will generate a code 67 and not be able to dump the Engine Running codes.
If your car is an 86-88 stang, you'll have to use the test lamp or voltmeter method. There is no functional check engine light on the 86-88's except possibly the Cali Mass Air cars.
The STI has a gray connector shell and a white/red wire. It comes from the same bundle of wires as the self test connector.
89 through 95 cars have a working Check Engine light. Watch it instead of using a test lamp.
The STI has a gray connector shell and a white/red wire. It comes from the same bundle of wires as the self test connector.
WARNING!!! There is a single dark brown connector with a black/orange wire. It is the 12 volt power to the under the hood light. Do not jumper it to the computer test connector. If you do, you will damage the computer.
What to expect:
You should get a code 11 (two single flashes in succession). This says that the computer's internal workings are OK, and that the wiring to put the computer into diagnostic mode is good. No code 11 and you have some wiring problems.
This is crucial: the same wire that provides the ground to dump the codes provides signal ground for the TPS, EGR, ACT and Map/Baro sensors. If it fails, you will have poor performance, economy and driveablity problems
Some codes have different answers if the engine is running from the answers that it has when the engine isn't running. It helps a lot to know if you had the engine running when you ran the test.
Dumping the Engine Running codes: The procedure is the same, you start the engine with the test jumper in place. Be sure the A/C is off, and clutch (if present) is pressed to the floor, and the transmission is in neutral. You'll get an 11, then a 4 and the engine will speed up to do the EGR test. After the engine speed decreases back to idle, it will dump the engine running codes.
Trouble codes are either 2 digit or 3 digit, there are no cars that use both 2 digit codes and 3 digit codes.
Your 86-88 5.0 won't have a working Check Engine Light, so you'll need a test light.
See AutoZone Part Number: 25886 , $10
Alternate methods:
For those who are intimidated by all the wires & connections, see
Actron® for what a typical hand scanner looks like. Normal retail price is about $30 or so at AutoZone or Wal-Mart.
Or for a nicer scanner see
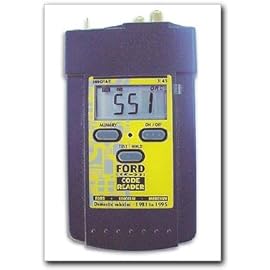
Equus Digital Ford Code Reader (3145) Equus - Digital Ford Code Reader 3145.
It has a 3 digit LCD display so that you don’t have to count flashes or beeps.. Cost is $22-$36.
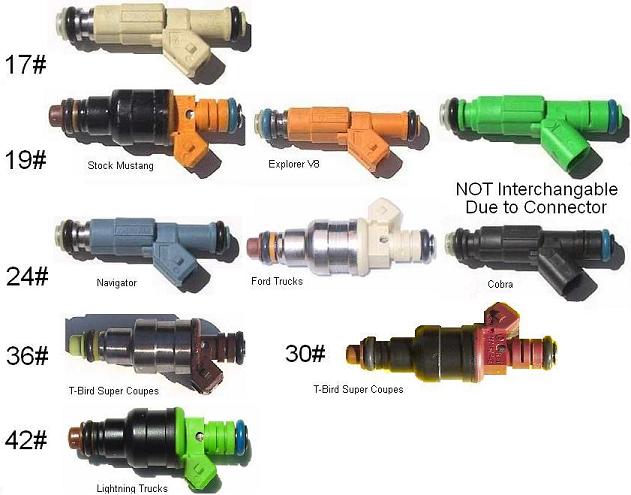
Once you have fixed any outstanding code problems, here's the injector size info you asked for...
Fuel injector sizing & injector photos
Revised 26-Dec-2014 to add statement about figures are for flywheel HP and not rear wheel HP
Injector HP ratings: this flywheel HP, not rear wheel HP.
Divide flow rating by.5 and multiply the result by the number of injectors. This uses a 100% duty cycle.
These ratings are for naturally aspirated engines at the flywheel.
Example:
19/.5 = 38, 38 x 8 = 304 HP
24/.5 = 48, 48 x 8 = 384 HP
30/.5 = 60, 60 x 8 = 480 HP
36/.5 = 72, 72 x 8 = 576 HP
42/.5 = 84, 84 x 8 = 672 HP
The preferred duty cycle is about 85% maximum, so for a safety factor multiply the final figure times .85.
19/.5 = 38, 38 x 8 = 304 HP x .85 = 258 HP
24/.5 = 48, 48 x 8 = 384 HP x .85 = 326 HP
30/.5 = 60, 60 x 8 = 480 HP x .85 = 408 HP
36/.5 = 72, 72 x 8 = 576 HP x .85 = 490 HP
42/.5 = 84, 84 x 8 = 672 HP x .85 = 571 HP
Remember that the above ratings are at 39 PSI. Increasing the pressure will effectively increase the flow rating. Example: a 19 lb injector will flow 24 lbs at 63 PSI, and a 24 lb injector will flow 30 lbs at 63 PSI.
See Stan Weiss' - Automotive Performance Software / Interactive JavaScript to Calculate Change in Fuel Injector Flow from change in Fuel Pressure to get the calculators used in these examples.
Here's the duty cycle explanation. Duty cycle is how much of the time the intake is open the injectors are turned on. The 85% figure means that for 85% of the time the intake valve is open, the injectors are spraying. The idea is that you want some percentage of the duty cycle left over so that you have some room to grow the process.
If you are at 100% and you need more fuel, all you can do is turn up the fuel pressure. That means the whole fuel curve from idle to WOT is affected. Maybe you are already too rich at idle, and turning up the fuel pressure makes it worse. If you had some injector duty cycle left to play with, a custom tune could use that where it is needed. That would not over richen the whole range from idle to WOT.
If you did turn up the fuel pressure, you might be able to change the injector duty cycle to get the air/fuel mixture ratio you want since the injectors will have extra fuel delivery capability.
With larger than stock injectors or higher that stock fuel pressure, you will need an aftermarket MAF that matches the injector size. The MAF “lies” to the computer to get a fuel delivery schedule that meets the engine’s needs and isn’t too rich or too lean. The best strategy is an aftermarket MAF and a custom tune to insure the best air/fuel ratio over all the RPM range.
Don't forget to increase the fuel pump size when you increase injector size or significantly increase the fuel pressure
Diagram courtesy of Tmoss & Stang&2birds
See the following website for some help from Tmoss (diagram designer) & Stang&2Birds (website host) for help on 88-95 wiring
Mustang FAQ - Wiring & Engine Info Everyone should bookmark this site.
Ignition switch wiring
http://www.veryuseful.com/mustang/tech/engine/images/IgnitionSwitchWiring.gif
Fuel, alternator, A/C and ignition wiring
http://www.veryuseful.com/mustang/tech/engine/images/fuel-alt-links-ign-ac.gif
Complete computer, actuator & sensor wiring diagram for 88-91 Mass Air Mustangs
http://www.veryuseful.com/mustang/tech/engine/images/88-91_5.0_EEC_Wiring_Diagram.gif
Vacuum diagram 89-93 Mustangs
http://www.veryuseful.com/mustang/tech/engine/images/mustangFoxFordVacuumDiagram.jpg
HVAC vacuum diagram
http://www.veryuseful.com/mustang/tech/engine/images/Mustang_AC_heat_vacuum_controls.gif
TFI module differences & pinout
http://www.veryuseful.com/mustang/tech/engine/images/TFI_5.0_comparison.gif
Fuse box layout
http://www.veryuseful.com/mustang/tech/engine/images/MustangFuseBox.gif


 Might need a little extra pressure and a pump is always a good idea. He should run codes and all the usual diagnostics before jumping into a MAF and injecters. Not to say he may need them lol.
