
I'm in the middle of taking my rack and pinoin out but i cant figure out how to get to the bolts that bolt to the steering shaft. how do i get to them? do i even have to take these bolts out?
You are using an out of date browser. It may not display this or other websites correctly.
You should upgrade or use an alternative browser.
You should upgrade or use an alternative browser.
How do i get to these bolts??
- Thread starter jmd2914
- Start date
bill302
Active Member
bill302
Active Member
i think your talking about the steering u joint you dont remove those bolts. you will remove steering section from the rack and pinion at the rag joint and theres a single bolt above the steering u joint that you will remove to allow shaft to slide inward to pull shaft loose at rag joint after loosening that bolt...click on link heres a picture of a rag joint
http://www.borgeson.com/Merchant2/m...ode=BUOS&Product_Code=990013&Category_Code=RJ
http://www.borgeson.com/Merchant2/m...ode=BUOS&Product_Code=990013&Category_Code=RJ
bill302
Active Member
heres a picture the circled areas is where the bolts need to be removed to remove steering shaft...and if you notice the top shaft will slide inward after bolt is removed to allow shaft to slide upward to release ragjoint from shaft on rack and pinion after that bolt is loosened or removed.......

Attachments

What Bill is saying sounds like the ticket. I recall a pinch bolt that was loosened and then the parts slid apart.
Before you separate the two parts, have the steering wheel and wheels pointed straight ahead.
Good luck.
Before you separate the two parts, have the steering wheel and wheels pointed straight ahead.
Good luck.
thanks, yeah the rag joint is what im talking about. there are two bolts one on each side of it though, i dont really see how i can get to the bolts though it looks pretty tight up in there. any ideas?
bill302
Active Member
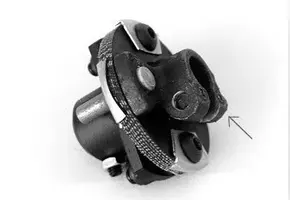
just loosen the pinch bolt at the rag joint should be 1 bolt when you remove the rack it should slide right out.or you can remove the whole shaft as stated above and as HISSIN50 says note position of wheels and steering wheel because you will want to reinstall with wheels and steering wheel in same position....notice the arrow in the picture below that is the pinch bolt that needs to be loosened...thats where the shaft from the rack and pinion is connected and held in by the pinch bolt...

Attachments
ok, im trying to understand this but im starting to become braindead ive been workin on this most of the day. so i see two joings, one is the rag joint and the other is between the rag joint and the firewall. which one do i unbolt to get the rack out?
It's been a long time; Bill, correct me if needed.
Look at the back of the rack where the shaft goes into the rack itself. Trace up the shaft from the rack and you will see or feel one bolt (it was like ~10 mm head IIRC - it's kinda small). This is the pinch bolt. Once that is loosened or removed, you can slide the rack apart from the steering linkage.
It very well might be pointing away from you so you are not seeing it. It will be pretty close to the rack itself.
Good luck.
bill302
Active Member

bill302
Active Member

Been there and done that - twice..
The simple way is to remove the two bolts that hold the rag joint together. A 3/8 drive ratchet & box end wrench (ring spanner if you are English or Canadian) is the ticket. You get to it from under the car.
Trying to open up the clamp on the rag joint that secures it to the shaft is difficult and is harder to put it back together. It can be hard to get lined up right while looking up at it with with dirt falling in your eyes.
Here’s more help if you haven’t already read it…
The two inner tie rod ends are usually what wears out, and at $45 each, it's better to get a replacement rack assembly since they are part of the package. The rack is about $100 + a $40 refundable core charge, which you get back when you return the old rack. Be sure to ask for the GT or high performance rack, it has fewer turns lock to lock than the standard rack.
The flex coupling for the steering shaft needs to be disconnected before you can get the rack out. You should disassemble the coupling by undoing the 2 bolts that hold it together. The lower part of the coupling will then come out with the rack, and can easily be removed.
The tie rod ends can be removed with a tool that looks like a giant "pickle fork", it's less than $8, or some stores will rent/loan one. Remove the cotter pin & nut on the tie end, stick the tool between the rod end and the arm it connects and hammer away. The bigger the hammer, the easier it comes apart.
Remove the two bolts that bolt the rack assembly to the frame and then pull the rack down. Get a catch pan to dump the fluid in when you disconnect the hydraulic lines. I replaced the rack mount bushings with some Energy Suspension urethane ones. When you re-install the rack assembly, put the rear bushings in the rack assembly and lift it into place. Then install the front bushings & washers and tighten down the nuts. Doing it this way makes room for the hydraulic lines without having them bind against the frame.
To change the tie rod ends, do them one at a time. Loosen the jam nut 1/4 turn, then unscrew the tie rod end from the rack. Turn the jam nut back 1/4 turn to return it to its original position. With the tie rod end removed, use a machinist square to measure the distance between the end of the threaded rod and the jam nut. Sit the bottom of the square against the end of the threaded rod, and the end of the blade of the square against the jam nut. Duplicate the measurement on the new rack and then install the tie rod end and tighten the jam nut. Then do the other side: the front end will need aligning, but the toe in will be close enough to the setting of the original rack to drive.
Buy several extra quarts of fluid to run through the system to flush it when you change the rack. The car needs to be up on jackstands for the next step. Fill the pump up, start the car, and turn the wheels lock to lock to bleed the air out. Then stop the engine, disconnect the low pressure hose (the one that is secured with a hose clamp) and drain the pump. Re-connect, refill and do it several more times or until the fluid looks clear and not burnt or black.
rd
Founding Member
A couple ways to remove the rack.
I usually try to remove the pinch bolt. With some experimenting, you can get it oriented so you can take it out. It has to come out, not just be loosened, as there is a groove on the rack shaft that it fits into to prevent accidentally being pulled out. Note how the stub shaft splines line up with the coupler on the lower rag joint piece, so you can line them up when you put it all back.
Next easiest way is to remove the large bolt that holds the intermediate shaft to the shaft from the steering column, up by the brake booster. Take this one out and the lower shaft can be pulled out with the rack. It may be hard to get the rag joint through under the motor mount, but I think it will work.
Sometimes the rag joints are riveted together and can't be unbolted, so you have to take it out and grind it apart
Similar threads
- Replies
- 25
- Views
- 903
- Replies
- 1
- Views
- 94
- Replies
- 3
- Views
- 229
- Replies
- 0
- Views
- 85
- Replies
- 2
- Views
- 57