How To Troubleshoot Power Mirror Switch

billison

I like tinted tail
15 Year Member
Feb 27, 2006
2,607
1,094
184
stl
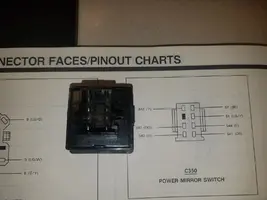
This is just a quick guide on how to test your power mirrors for function before you replace a switch.

The switch will have 7 wires going to it.
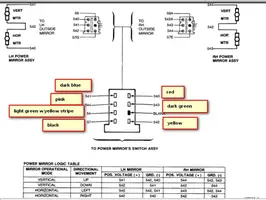
Green/yellow = HOT
2 Black = ground
2 yellow = polarity ( important)

Then 4 other wires, blue, dark green, purple , red. These are the up/down/left/right for the mirrors.

To test Up and Left place a jump wire from the ground to the 2 yellows. Then jump a wire from the green/yellow ( hot) to any of the directional wires. These will cause the mirrors to go up or left.

To make them go down/right you change the polarity. You jump the green/yellow ( hot) to the 2 yellows. Then jump the ground to any of the directional wires, this will get down and right.

If all of these work then they are Good and your problems are likely in the switch.

Knowing these work with a reversible polarity explains why so many fail by only going left and up.
 

Attachments

  • image.webp
    image.webp
    26.5 KB · Views: 3,174
I realize you wrote this quite a while ago, i'd just like to say thanks.
Thought I was going nuts and was considering pulling out the carpet to see if I damaged any wires when I switched to black.

Originally my power mirror would only go up and right.
Bought a NIB ford original, ebay, that one would only go up and left.
Purchased another used one on ebay, also would only go up and left.

Pins are all in solid.

I'd also like to add that on my 1990, the the green/yellow wire is light green.

To make matters more confusing, in the connector faces/pinout charts in the ford book, the blank pin hole is in the wrong spot.
While the pic may be of the connector, it doesn't really matter, no matter which direction you hold the connector or the switch, the dead hole is never in the correct place. Could I be going crazy? Hope not.

With all that said, if I followed the instructions you laid out, I do no have a damaged wiring problem, since it all works when jumped.

I'm going to get yet another switch. I prefer original electrical parts, but maybe this time I should get a new one at lmr.
 

Attachments

  • 20180627_091804.webp
    20180627_091804.webp
    85.6 KB · Views: 2,427
Glad this was able to help someone. I should add some pictures to help this along.

I had the same issue, was on my third switch before I figured it out.
 
Thanks,
I'm usually pretty good at reading diagrams, but between the center left/right switch and the reversed polarity it's confusing on which wires to jump out.
Ordered a new reproduction from blue oval industries (says it's made from ford tooling) $50 which is $10 less than lmr. I hope this ends it and I can finally complete bolting my interior down.
 
  • Like
Reactions: billison
I think I figured it out by removing one of the mirrors. I wanted to see why wire did what and that’s when I saw it only has 2-3 wires . But good luck, hope that sorts it.
 
Thanks blown, this was less about the actual mirrors and more about the wiring.

On another note, got the new switch from blue oval today.
It works, so I can stop obsessing over mirrors I never adjust, lol.
Bad original, bad ford nib, bad used one, good reproduction, go figure...

Couple notes, the arrows are clearly white on this one, the originals look like a goldish color. Maybe they were originally white?
It also was tight as hell fitting it back in the square hole, I though I was going to have to file it down, but it went it.

Thanks again for the test method.
Joe
 
Just wanted to thank you for this thread.
I tried cleaning my switch with Deoxit (you should have seen all the nasty gunk that came out of it!). Tested it and the mirrors moved, but wouldn't stop moving in the down position! I panicked when I heard the motor clicking on the passenger side. I quickly turned off the key and removed the switch.
Using your diagram and instructions, I confirmed that the wiring is good, and so are the mirrors. I was able to move them back to a position where they weren't "maxed out" while I wait on a new switch.

It was nice to confirm everything else worked before spending $55 on a new switch!