instructions or checklist for full window install

Edbert

Founding Member
Jul 13, 2002
3,548
32
109
Austin TX
I've found a few videos on youtube, but nothing really good, either they are sitting around telling jokes or the video quality is too low or they just skip over things or leave out details etc.

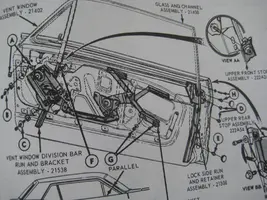
I was hoping someone here has a checklist or to-do article for installing everything inside of an empty door shell. I think I have a good grasp of how it all works, but I think it does matter to some extent or another to install the miscellaneous components in a certain order. Plus I bet there are some known difficult areas that can be avoided (or made easier) by planning ahead

As things stand right now I have everything that comes apart is apart. The glass is out of the rails, no weatherstripping anywhere, and I intend to install my own vent and quarter glass into the frames.

Here's what I have laid out in my garage right now...
IMG_20180320_180114.jpg
 
  • Sponsors (?)


Glad to see this thread, and I know what you're saying about the youtube vids. I don't have a checklist, but here's what I plan to do.

I've two doors to assemble on a 66 coupe. I do have a complete door to use as an example, so I'm thinking that I'll take the assembled one apart and put the disassembled one together by the reverse process at the same time. If I don't do that I'd probably forget, so I'll be trying to take pics of the work during the disassembly as well, never know, I may wind up doing something else for a couple days, tends to happen more then I'd like.
The second door should be fairly easy once I've done one, at least I hope so.
 
My original doors are long gone, and I have a good grasp of what all the parts are and what they do, But I'm convinced there's a better way to assemble than just start everywhere and put stuff in until you are done.

Spent some time yesterday using degreaser (couldn't do much with 52 years of grease) and finished a 6HP gas powerwasher that did better. Today I'll get after them with a toothbrush, then treat the blemishes and neutralize the surface rust. I've got a lot of work to do (hours of time nothing difficult) in polishing the stainless trim before getting the actual glass going in. That (the glass) I've already polished, saved a lot of money by keeping the OEM, even has the green tint and carlite logos, but a lot more work to do getting that all put into frames too.

I'll update the blog, and I'll aslo try to put together a set of bullet items as instructions. Main concern is what order to put which component to avoid having to remove one to get the other into position.
 
In my searching I've still not found the order in which to install the smaller bits and components. But I was told by two other sources to install vent window 1st, then the side, and the quarter last. At least that answers my question of which goes in first, the rear-run or the division bar :-D
 
Update and question(s)...

I got this thin rubbery liner for the spots where the stainless trim attaches itself to the glass like the vent window and the top/rear of the side glass. It is very thin and frankly a little too much so. It is my understanding that the side glass adheres to the channel assembly with a special epoxy. But the channel (see here http://www.dynacorn.com/ShowItem.aspx?item=3614EK ) is WAY too wide for the glass, I'd have to double or triple apply that thin rubbery gasket-like weatherstrip to this to make it tight.

How does the side glass or main window connect to the part I linked above?
 
Check out West Coast Classic Cougar website they did a great video on rebuild and glass installation. I had problems with measurements gluing the glass into the channels and correct adhesive. I called their shop and was actually was able to speak with the guy who made the video. Great people !!! Extremely knowledgeable,helpful and patient
 
I've been updating the blog as I work slowly through the windows. Got the two front vent windows in this weekend, that takes care of the front-runs, also got the rear runs installed so I just need regulators and glass.

One of my big hurdles was finding a strong way to attach the verticle stainless trim of the vents to the assembly. Originals were riveted, but I've heard/read that using a pop-rivet will fail. I ended up using a combination of screws and epoxy bond. I think it worked VERY well but only time will tell if it hods

I reached a stopping point when I could not figure out how I am supposed to get the rollers (rear run) lined up while the vent window is in, same goes for the rear run...cannot see how I can line up the front section with it in place.

I'll check out the Cougar video, maybe it shows that, if not ...has anyone done this and can tell me the trick?
 
Last edited:
I found their videos on Youtube.

View: https://www.youtube.com/watch?v=J9uBLsG8p00


My problem is, it addresses installing the regulator, not the glass. In that video the glass remained inside the door and on both the front and rear runs. I'm stuck trying to figure out how to get the glass in there to begin with, I think putting the regulator on is easy once the glass in there.

I found this video from NPD

View: https://www.youtube.com/watch?v=79-cXNnQaAo


it deals with a 65/66 which are not that much different but in the section around 11 minutes into the video he's trying to get the glass off the rear rail (where the rollers ride in the C-channel), which is pretty much my problem. He's able to wiggle it out by loosening the rear run. On my '67 the C-channel goes almost all the way up top where the belt-line weather stripping would be, no amount of loosening is going to allow those rollers to pop out from the top of the channel like that.
 
Last edited: