Engine Piston Ring Gap Issue

Boricua86

Active Member
Jul 17, 2016
86
42
38
Milford, Michigan
I have a set of hastings piston rings for my 87 block with stock pistons and stock bore. As I measure the gaps I'm getting .020 to .022 and higher... as high as
.026.... Haynes and Chiltons both say .010 to .020 for ring gaps.... this is the second set I have purchased chasing the below. 020 gap.... advice/opinion?
 
  • Sponsors (?)


Hi, These are File-fit Rings- correct? It sounds as if you have one of 5 issues, most likely listed first.
1) You’ve encountered 2 pairs of Rings that are BOTH are designed for a 0.020-0.030 overbore, not a Stock 4” Bore..
2) The Block has been previously Bored out, and you have Stock 4” Rings...
3) Are you using a Piston to Push the Rings into the Cylinder, ensuring they are sitting in square..?
4) Your Bore is larger than 4” from excessive wear and is “Bellmouthed”...
5) There is a Machining error in a batch from the Manufacturer..
6) Your Measuring Tool is somehow in error.
7) The Bores were excessively Honed by someone, did you lay an old Ring over a new Ring to compare?

Remedy, Calibrate your measurement Tools. Measure your actual Bore with a Bore Dial Indicator, or use a Telescoping Tool, measure that Tool’s with a 3-4”, if needed, move to a 4-5” Micrometer. Make a measurement 1” down from TDC, and 1” down, incrementally to the bottom of the Bore(s). Rotate the Tool 90 Deg. to verify Concentricity. Use only Micrometers that can read into the 10th’s (Lines atop the Micrometer’s barrel, top of Tool). Measure the Piston OD.
Document everything, I’d think you will find your issue once you follow the above.


Oversized Rings & Pistons are available in .020 , .030 , .040 and .060. Older 302’s offered 0.010’s, in the 70’s when Racing restrictions regarding C.I. were really tight. Never seen anything less than 0.020 oversized, and it’s difficult to achieve Cyl. “Clean up” with that, 0.010- Moreso.
I Gap the compression rings at 0.016-0.018 for a Stock 4.00 bore, 0.018-0.020 for a 4.030 bore. Add 0.002-0.004 when boost or nitrous is within the Master plan.

The rings you get should come with directions on how to gap. Does it give information about correct numbers of what you should have, there?
Contrary to typical mindset, a larger second Ring’s gap lessens pressure build up between the two, making it less likely to lift the first ring off the Cylinder Wall. I would still gap the Rings the same, nonetheless..
Good luck!
Cheers!!
 
Hey thanks for the reply,

1) You’ve encountered 2 pairs of Rings that are BOTH are designed for a 0.020-0.030 overbore, not a Stock 4” Bore..
--- I thought that too, maybe mislabeled.

2) The Block has been previously Bored out, and you have Stock 4” Rings...
--- the machine shop assured me that the block was still 4" stock bore.

3) Are you using a Piston to Push the Rings into the Cylinder, ensuring they are sitting in square..?
--- yes I am.

4) Your Bore is larger than 4” from excessive wear and is “Bellmouthed”...
--- I'll have to check this one, but I'm sure the machinist said all the measurements check out.

5) There is a Machining error in a batch from the Manufacturer..
--- the thought crossed my mind but they were different production dates.

6) Your Measuring Tool is somehow in error.
--- will check on this one also.

7) The Bores were excessively Honed by someone, did you lay an old Ring over a new Ring to compare?
--- well doggone it I didnt, i do have one old one on the table.

Thanks again I'll check on this.
 
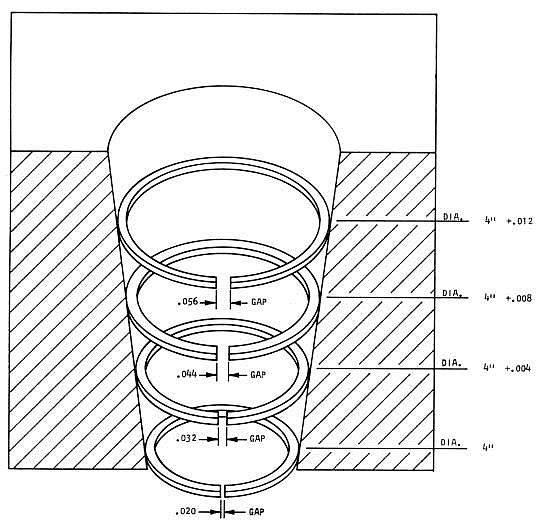
Hi, you’re Welcome! The answer should be one of those. Below is a helpful 3D rendition (not to Scale- for illustration). However, the numbers ARE correct.This normal type of wear coined as “Bellmouthing” within a 4”’ Cylinder Bore with an overall Cylinder taper of a seemingly benign total of 0.012, the Diagram shows the resultant +0.036 Ring gap VARIABLE between the Top and Bottom Ring(s) in an obvious format:
1538156757943.jpeg


Staying within the low side of the range of 0.003 to 0.010 in.(Maximum) per inch of Ring gap tolerance is recommended, for successful Re-Ringing. Beyond that, the Block should be Bored and Honed with Deck Plates Bolted to simulate Bore distortion caused by the Heads, to the smallest, yet effective oversize required.
Feel free to post any other questions/info.
Cheers! John
 

Attachments

  • 1538147220079.jpeg
    1538147220079.jpeg
    40.8 KB · Views: 1,588
So if I get .022 to .026 dead center on the cylinder I should be good?
If you’re End gap is .010-.020 you’re within, if you’re much beyond that, you have something off. Opened up that much may cause ‘BlowBy’. You should be .015-.020. The numbers you have make it sound like what I’d said, previously. Do you have the Motor at Home on a stand?
 
The Ring needs to be checked in different heights on the Cylinder. If you’re getting different numbers, even a little off in the Bore Sizes, you really need to consider getting it Bored & Honed, they’ll fit the Pistons & Rings to the Block- ensuring it’s correct.
If you like the Car, and want it to be strong, it’s important to Build it from a Solid Foundation, Correct in vital areas...
Are you assembling to Sell it, or want it for yourself? John
 
What reading do you get with the OEM Piston Ring in the same area? Insert one, then the other, and see what differences you get with them side by side with a feeler Gauge. Then, move them both to the very bottom of the Cylinder, what #’s do you get there? Same with 1 inch in the Bore- make sure you use a Piston to keep them inserted/positioned flat. Careful with the Connecting Rod bumping the Piston Skirt- you can bend the Skirts real easy and Trash your Pistons.
If you’re on, let me know, I’ll look for a response in 5 Minutes, it’s 3:15, I’ll check back at 3:20. John
 
Yes I have it on the stand. I measured on the center of the cylinder and an inch from the top, used the piston to square the ring. I'm building it to keep it. As for the end gap, the manual says .010 to .020, I called Hastings and they told me the set of rings I have are to be between .012 to .022....
 
I’d sent you a PM. I’d looked at Hastings, the Site said 0.018–0.020. I’d keep the tolerances as low as possible, within .002 is not...bad- but not ideal. You still get other measurements in different areas of the Bore- correct? The BIG issue is keeping the Piston to wall clearance right, or you’ll get Piston slap, accelerated wear, and the top Ring, especially will get Carbon on it from the Combustion process. Typically (memorize this) you want 0.004 Multiplied by Cubic Inches for the Top Comp Ring, 0.005 Multiplied “ “ “ for the Bottom Compression Ring. So- .016 & .020.
 
I’d sent you a PM. I’d looked at Hastings, the Site said 0.018–0.020. I’d keep the tolerances as low as possible, within .002 is not...bad- but not ideal. You still get other measurements in different areas of the Bore- correct? The BIG issue is keeping the Piston to wall clearance right, or you’ll get Piston slap, accelerated wear, and the top Ring, especially will get Carbon on it from the Combustion process. Typically (memorize this) you want 0.004 Multiplied by Cubic Inches for the Top Comp Ring, 0.005 Multiplied “ “ “ for the Bottom Compression Ring. So- .016 & .020.
Scratch the “Cubic Inches”, use the Bore Diameter- which is 4”.My bad.
 
  • Like
Reactions: 1 user