
You are using an out of date browser. It may not display this or other websites correctly.
You should upgrade or use an alternative browser.
You should upgrade or use an alternative browser.
Progress Thread Project Fury 2
- Thread starter Fredmatic
- Start date
gearheadboy
15 Year Member
Let me start off by saying the first few pictures actually made me sick to my stomach. A loss like that is really sad. I'd murder the guys that did that if I ever found them. I'm glad you held on to it until you could do it over. Now when I was a kid there was a show called the 6 million dollar man... BETTER, STRONGER, FASTER! Great job.

Let me start off by saying the first few pictures actually made me sick to my stomach. A loss like that is really sad. I'd murder the guys that did that if I ever found them. I'm glad you held on to it until you could do it over. Now when I was a kid there was a show called the 6 million dollar man... BETTER, STRONGER, FASTER! Great job.
Oscar Goldman will approve of this project build
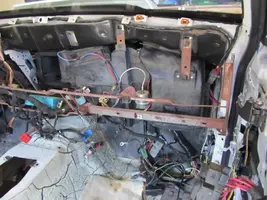
Lots of progress since coming back from paint. The painstaking process of re-wiring and modifiying the entire cars electronic wiring is nearly complete.
A new windshield was in order, so we took care of that.

SCRATCH THE PAINT AND I WILL KILL YOU!!


Remote shut off


Sneak peek of under fender wiring


Lights


Behind front bumper

Battery Box

Molding prep & finish work


A new windshield was in order, so we took care of that.
SCRATCH THE PAINT AND I WILL KILL YOU!!
Remote shut off
Sneak peek of under fender wiring
Lights
Behind front bumper
Battery Box
Molding prep & finish work
Old, dingy, and faded.

Prepped and squirted

Although the quarter windows were redone, we wanted all trim to match perfectly


Special glue flown in from the LaBrea tar pits

Coming together!


Prepped and squirted
Although the quarter windows were redone, we wanted all trim to match perfectly
Special glue flown in from the LaBrea tar pits
Coming together!
gearheadboy
15 Year Member
nickstone302
Member
All the hard work seems to be paying off looks to be quite the build. Can't wait to see it complete.
Sent from my Desire HD using Tapatalk 2
Sent from my Desire HD using Tapatalk 2
ERM636
Founding Member
Looking great Fred, coming along very nicely, sure your keeping George busy. The guys at Century did a great job on the paint.
David Pepiton
Active Member
wow loving the resto. one thing though why did you keep the stock k member? you seem to be worried about weight. just curious.
More work on restoring the window moldings and trim pieces.
Tore off the old back window tint, and removed the old glue ( about as much fun as a trip to the dentist!) Also clay bar treated the inside and out, which removed years of hard water spots and debris.

Passenger side process was the same as previous, however we decided the inner portion of the B pillar needed some TLC in black.


Done. Drivers side got the same treatment shortly after


Quarter window


Some salvage yard serching rewarded us with door hrnesses, a complete steering column, and a couple of other goodies. Spare steeering wheel is being sent out for restoration & wrap.


The next point goes for ANYONE who has ever rewired a car, this is like Frankenstein coming to life.
WE HAVE POWER!!!!


Tore off the old back window tint, and removed the old glue ( about as much fun as a trip to the dentist!) Also clay bar treated the inside and out, which removed years of hard water spots and debris.
Passenger side process was the same as previous, however we decided the inner portion of the B pillar needed some TLC in black.
Done. Drivers side got the same treatment shortly after
Quarter window
Some salvage yard serching rewarded us with door hrnesses, a complete steering column, and a couple of other goodies. Spare steeering wheel is being sent out for restoration & wrap.
The next point goes for ANYONE who has ever rewired a car, this is like Frankenstein coming to life.
WE HAVE POWER!!!!
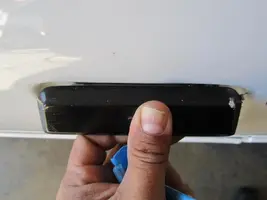
The trim work is about 90% complete. We may replace the door belt moldings, or try a different base coat/top coat method, as the originals were in pretty rough shape.
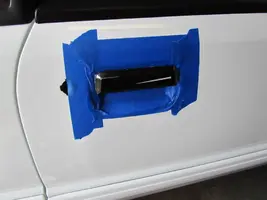
New door lock actuators, lock cylinders, and door handles installed. The factory pop rivets them in, but this method can lead to the handle contacting the door skin. We bolted them in instead. Straight and clean.


Finished. Also LRS hooked us up with all new door seals, run channels, and weatherstripping. Doors work better than NEW!

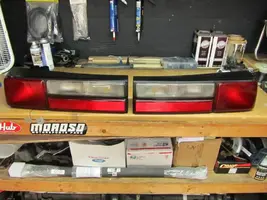
Tailight assemblies got buffed and polished
BEFORE

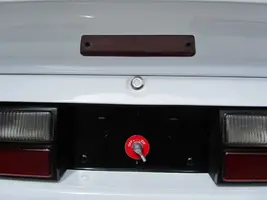
AFTER

After some thought, we dcided to shoot the license plate and tailight panel in black.


Quick hand drawn vanity plate! THE FURY II

Now to the Headlights. Long story short, the hardware assemblies needed some modifications and drilling, but GEO got everything in, weather sealed, and better than new.


Had to drill for proper depth and diameter


Still some aligning to do, but after the headlight bulbs come in.

New door lock actuators, lock cylinders, and door handles installed. The factory pop rivets them in, but this method can lead to the handle contacting the door skin. We bolted them in instead. Straight and clean.
Finished. Also LRS hooked us up with all new door seals, run channels, and weatherstripping. Doors work better than NEW!
Tailight assemblies got buffed and polished
BEFORE
AFTER
After some thought, we dcided to shoot the license plate and tailight panel in black.
Quick hand drawn vanity plate! THE FURY II
Now to the Headlights. Long story short, the hardware assemblies needed some modifications and drilling, but GEO got everything in, weather sealed, and better than new.
Had to drill for proper depth and diameter
Still some aligning to do, but after the headlight bulbs come in.
Attachments
-
 IMG_2276.webp26.7 KB · Views: 211
 -
 IMG_2275.webp23.7 KB · Views: 178
 -
 IMG_2283.webp23.2 KB · Views: 204
 -
 IMG_2262.webp43.5 KB · Views: 180
 -
 IMG_2264.webp57.9 KB · Views: 191
 -
 IMG_2270.webp30.3 KB · Views: 188
 -
 IMG_2274.webp35.6 KB · Views: 214
 -
 IMG_2269.webp29.7 KB · Views: 187
 -
 IMG_2240.webp45.2 KB · Views: 202
 -
 IMG_2245.webp43.2 KB · Views: 173
 -
 IMG_2253.webp19.1 KB · Views: 183
 -
 IMG_2255.webp23.4 KB · Views: 182
 -
 IMG_2256.webp23.6 KB · Views: 182
 -
 IMG_2258.webp27.7 KB · Views: 180
 -
 IMG_2248.webp38.5 KB · Views: 198
 -
 IMG_2261.webp31.9 KB · Views: 178
 -
 IMG_2273.webp33.5 KB · Views: 181
David Pepiton
Active Member
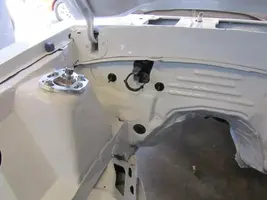
Great job so far. Did you put anything under those fender panels under the hood? I would have at least sprayed and sealed the rust spots or something before putting those in. The idea of moisture getting under those and rotting out gives me a sick feeling.
Great job so far. Did you put anything under those fender panels under the hood? I would have at least sprayed and sealed the rust spots or something before putting those in. The idea of moisture getting under those and rotting out gives me a sick feeling.
Any rust or corrosion was treated before the panels were final fitted and installed.

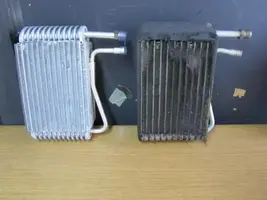
Time to overhaul the HVAC system. Out comes the heater box/blower motor assembly
Out of the dash

The behemoth


New vs Old


Installed

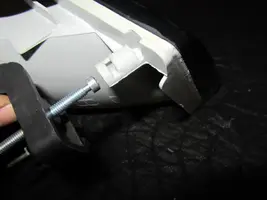
We were talking door handles. OE are riveted on, and you can see here how this method puts the handle too close to the door skin, leading to contact. GEO installed the new set with bolts.


Coming off

The right way

Drivers door finished

Out of the dash
The behemoth
New vs Old
Installed
We were talking door handles. OE are riveted on, and you can see here how this method puts the handle too close to the door skin, leading to contact. GEO installed the new set with bolts.
Coming off
The right way
Drivers door finished
Attachments
-
 IMG_2295.webp64.4 KB · Views: 211
 -
 IMG_2285.webp32.9 KB · Views: 214
 -
 IMG_2286.webp36.7 KB · Views: 191
 -
 IMG_2287.webp48.4 KB · Views: 185
 -
 IMG_2288.webp44.5 KB · Views: 181
 -
 IMG_2291.webp35 KB · Views: 200
 -
 IMG_2292.webp25.4 KB · Views: 185
 -
 IMG_2298.webp17 KB · Views: 191
 -
 IMG_2301.webp13.1 KB · Views: 190
 -
 IMG_2302.webp20.7 KB · Views: 184
 -
 IMG_2303.webp13.3 KB · Views: 177
 -
 IMG_2307.webp9.8 KB · Views: 177
David Pepiton
Active Member
I've found installing the handles with bolt over rivets is the way to go drilling out rivets sucks but bolt take no time at all
Hmm,.. Very nice project. I'd guess that this is Georges' build and you're paying him to do it for you then?
Similar threads
- Replies
- 28
- Views
- 6K
- Replies
- 1
- Views
- 1K